Sony STR-DG2100 Operating Instructions
Sony STR-DG2100 - Multi Channel A/v Receiver Manual
 |
View all Sony STR-DG2100 manuals
Add to My Manuals
Save this manual to your list of manuals |
Sony STR-DG2100 manual content summary:
- Sony STR-DG2100 | Operating Instructions - Page 1
AV Receiver Operating Instructions Owner's Record The model and serial numbers are located on the rear of the unit. Record the serial number in the space provided below. Refer to them whenever you call upon your Sony dealer regarding this product. Model No. Serial No. STR-DG2100 ©2007 Sony - Sony STR-DG2100 | Operating Instructions - Page 2
power cord can be unplugged from the wall socket immediately in the event of trouble (servicing) instructions in receiver is connected. - Consult the dealer or an experienced radio/TV technician for help. CAUTION You are cautioned that any changes or modification not expressly approved in this manual - Sony STR-DG2100 | Operating Instructions - Page 3
LTD. iPod is a trademark of Apple Inc., registered in the U.S. and other countries. All other trademarks and registered trademarks are of their respective holders. In this manual, ™ and ® marks are not specified. Hereby, Sony Corporation declares that this STR-DG2100 Multi Channel AV Receiver is in - Sony STR-DG2100 | Operating Instructions - Page 4
menu 58 Enjoying Surround Sound Enjoying a pre-programmed sound field ....59 Adjusting the sound effect 66 Using the surround back decoding mode ...68 Enjoying the surround effect at low volume levels (NIGHT MODE 70 4GB Advanced Speakers Setting Up Adjusting the speaker settings manually .... 71 - Sony STR-DG2100 | Operating Instructions - Page 5
Additional Information Glossary 120 Precautions 123 Troubleshooting 124 Specifications 128 Index 131 5GB - Sony STR-DG2100 | Operating Instructions - Page 6
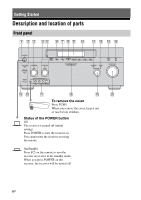
it out of reach from children. Status of the POWER button Off The receiver is turned off (initial setting). Press POWER to turn the receiver on. You cannot turn the receiver on using the remote. On/Standby Press ?/1 on the remote to turn the receiver on or set it to the standby mode. When you press - Sony STR-DG2100 | Operating Instructions - Page 7
MODE radio (XM/SIRIUS) (page 111-113). TUNING E Remote sensor Receives signals from remote commander. F DIMMER Press repeatedly to adjust brightness of the display. G DISPLAY Press repeatedly to select information displayed on the display. H SUR BACK DECODING Press to activate SB DECODING - Sony STR-DG2100 | Operating Instructions - Page 8
Name S INPUT SELECTOR T MASTER VOLUME Function Turn to select the input source to play back. Turn to adjust the volume level of all speakers at the same time. 8GB - Sony STR-DG2100 | Operating Instructions - Page 9
provides a better quality sound (page 18, 20, 21, 29, 30). HDMI IN/ OUT* jacks Connect receiver (page 35). XM jack Connects to the XM Mini Tuner and Home Dock (not supplied) (page 83). SIRIUS jack Connects to a SiriusConnect Home Tuner (not supplied) (page 83). C DMPORT Connects to a Sony - Sony STR-DG2100 | Operating Instructions - Page 10
INPUT/OUTPUT section AUDIO IN/ OUT jacks Connect to a VCR or a DVD player etc. (page 18, 29, 30, 31). VIDEO IN/ OUT* jacks G SPEAKERS section Connects to speakers (page 16). * You can watch the selected input image when you connect the MONITOR VIDEO OUT jack to a TV (page 18). You can operate - Sony STR-DG2100 | Operating Instructions - Page 11
50). You can program the remote to control non-Sony components following the steps in "Programming the remote" (page 116). D TEST TONE Press to output the test tone from each speaker. E AMP Press to enable the receiver operation (page 38). F MUSIC Press to select sound field (page 64). G MOVIE - Sony STR-DG2100 | Operating Instructions - Page 12
press to enter the selection. Press to display and select items from option menus for receiver and DVD player, Blu-ray Disc Player. TOOLS Press to display and select items from the option menus the resolution of signals output from the HDMI OUT or COMPONENT VIDEO MONITOR OUT jack (page 91). 12GB - Sony STR-DG2100 | Operating Instructions - Page 13
on-screen guide of the VCR, DVD player, or satellite tuner is displayed on the TV screen. W DISPLAY Press to select information displayed in the display window, the receiver turns off automatically (page 103). wl TV Press to enable the TV operation. e; RM SET UP Press to set up the remote. a) - Sony STR-DG2100 | Operating Instructions - Page 14
1: Installing speakers This receiver allows you to use a 7.1 channel system (7 speakers and one sub woofer). Enjoying a 5.1/7.1 channel system To fully enjoy theater-like multi-channel surround sound requires five speakers (two front speakers, a center speaker, and two surround speakers) and a sub - Sony STR-DG2100 | Operating Instructions - Page 15
Getting Started Tips • The angle A should be the same. • When you connect a 6.1 channel speaker system, place the surround back speaker behind the seating position. • Since the sub woofer does not emit highly directional signals, you can place it wherever you want. 15GB - Sony STR-DG2100 | Operating Instructions - Page 16
AC power cord (mains lead). H A G F FRONT SPEAKERS B B terminals a) E D C B A A Monaural audio cord (not supplied) B Speaker cords (not supplied) ACenter speaker BFront speaker A (L) CFront speaker A (R) DSurround speaker (L) ESurround speaker (R) FSurround back speaker (L)b) GSurround - Sony STR-DG2100 | Operating Instructions - Page 17
sound may not be output. Notes • When you connect all the speakers with a nominal impedance of 8 ohms or higher, set "Impedance" in the Speaker settings menu to "8 Ω." In other connections, set it to "4 Ω." For details, see "8: Setting the speakers" (page 41). • Before connecting the AC power cord - Sony STR-DG2100 | Operating Instructions - Page 18
when you connect the MONITOR VIDEO OUT jack to a TV. You can operate this receiver using a GUI (Graphical User Interface). It is not necessary to connect all the supplied) B Audio cord (not supplied) C Video cord (not supplied) D HDMI cable (not supplied) E Component video cord (not supplied) 18GB - Sony STR-DG2100 | Operating Instructions - Page 19
, see "Notes on converting video signals" (page 33). • The sound of the TV is output from the speakers connected to the receiver if you connect the audio output jack of the TV and the TV IN jacks of the receiver. In this configuration, set the sound output jack of the TV to "Fixed" if it can - Sony STR-DG2100 | Operating Instructions - Page 20
up your components This section describes how to hook up your components to this receiver. Before you begin, refer to "Component to be connected" below for 23 24 21 24 24 Audio input/output jacks to be connected The sound quality depends on the jack used. Refer to the illustration that follows. - Sony STR-DG2100 | Operating Instructions - Page 21
) B Coaxial digital cord (not supplied) C Optical digital cord (not supplied) Notes • Before connecting cords, make sure to disconnect the AC power cord (mains lead). • To disconnect the DIGITAL MEDIA PORT adapter, observe the following precautions. - Remove the DIGITAL MEDIA PORT adapter after - Sony STR-DG2100 | Operating Instructions - Page 22
• No sound is output when playing a Super Audio CD on a Super Audio CD player connected to only the COAXIAL SA-CD/ CD IN jack on this receiver. When you play a Super Audio CD, connect the player to the MULTI CHANNEL INPUT or SA-CD/CD IN jacks. Refer to the operating instructions supplied - Sony STR-DG2100 | Operating Instructions - Page 23
to the MULTI CHANNEL INPUT jacks of this receiver to enjoy multichannel sound. Alternatively, the multichannel input jacks can be used power cord (mains lead). • DVD and Super Audio CD players do not have the SURROUND BACK jacks. • When "Sur Back Assign" is set to "BI-AMP" in the Speaker settings - Sony STR-DG2100 | Operating Instructions - Page 24
) Notes • If your turntable has a ground (earth) wire, connect it to the (U) SIGNAL GND terminal. 24GB • Before connecting cords, make sure to disconnect the AC power cord (mains lead). - Sony STR-DG2100 | Operating Instructions - Page 25
components This section describes how to hook up your components to this receiver. Before you begin, refer to "Component to be connected" below the antennas (aerials)" (page 35). Component to be connected TV monitor With HDMI jack DVD player, Blu-ray Disc Player Satellite tuner, CATV system DVD - Sony STR-DG2100 | Operating Instructions - Page 26
. It is an interface which transmits video and audio signals in digital format. HDMI features • A digital audio signals transmitted by HDMI can be output from the speakers connected to this receiver. This signal supports Dolby Digital, DTS, and linear PCM. • Linear PCM (sampling frequency less than - Sony STR-DG2100 | Operating Instructions - Page 27
Getting Started DVD player Audio/video signals Satellite tuner Audio/video signals Blu-ray Disc Player, PS3™, hard disk recorder Audio/video signals A A A A Audio/video signals TV monitor, projector, etc. A HDMI cable (not supplied) continued 27GB - Sony STR-DG2100 | Operating Instructions - Page 28
OUT jacks. • The audio and video signals of HDMI input are not output from the HDMI OUT jack while the receiver menu is displayed. • When you want to listen to the sound from the TV speaker, set "HDMI Audio" to "TV+AMP" in the HDMI settings menu. If set to "AMP," the sound is not output from the TV - Sony STR-DG2100 | Operating Instructions - Page 29
digital audio output setting on the DVD player, Blu-ray Disc Player. Refer to the operating instructions supplied with the DVD player, Blu-ray Disc Player. • Before connecting cords, make sure to disconnect the AC power cord (mains lead). Audio signals DVD player, Blu-ray Disc Player Video signals - Sony STR-DG2100 | Operating Instructions - Page 30
(not supplied) B Audio cord (not supplied) C Video cord (not supplied) D Component video cord (not supplied) Note Before connecting cords, make sure to disconnect the AC power cord (mains lead). 30GB - Sony STR-DG2100 | Operating Instructions - Page 31
which has analog jacks such as a DVD recorder or VCR, etc. Audio signals DVD recorder, VCR Video signals A B To the VIDEO 3 IN/PORTABLE AV IN jacks (Front panel) Camcorder, video game A Audio cord (not supplied) B Video cord (not supplied) C Audio/video cord (not supplied) C Note Before - Sony STR-DG2100 | Operating Instructions - Page 32
input/output conversion table classified by the menu settings" (page 34). In the video input/output conversion table of the receiver Input Signals A B C Output Signals BC ABC BC OUTPUT jack INPUT jack HDMI IN 1/2/3 A VIDEO IN B COMPONENT VIDEO IN C HDMI OUT f a a COMPONENT VIDEO MONITOR OUT - Sony STR-DG2100 | Operating Instructions - Page 33
converted up to 1080i. The resolution of the signals output to the HDMI OUT jack is converted up to 1080p. • COMPONENT VIDEO MONITOR OUT both are connected. To display Closed Caption Set "Resolution" to "DIRECT" in the Video settings menu when receiving a signal that supports Closed Captions. Use - Sony STR-DG2100 | Operating Instructions - Page 34
"Resolution" menu setting Output from Input signals DIRECT Component video Video AUTO (initial Component video setting) Video 480i/ the monitor, etc., is connected to the HDMI OUT jack. • If you select a resolution that the connected TV does not support in the "Resolution" menu, the images - Sony STR-DG2100 | Operating Instructions - Page 35
) * The shape of the connector varies depending on the area. Notes • To prevent noise pickup, keep the AM loop antenna (aerial) away from the receiver and other components. • Be sure to fully extend the FM wire antenna (aerial). • After connecting the FM wire antenna (aerial), keep it as horizontal - Sony STR-DG2100 | Operating Instructions - Page 36
is turned on. • Make sure that the total power consumption of the component(s) connected to the receiver's AC OUTLET(s) does not exceed the wattage stated on the rear panel. Do not connect high-wattage electrical home appliances such as electric irons, fans, or TVs to this outlet. This may cause - Sony STR-DG2100 | Operating Instructions - Page 37
use the same command mode. If the command modes of the receiver and the remote are different, you cannot use the remote to operate the receiver. If the command modes of both the receiver and the remote are those of the initial setting (AV SYSTEM 2), it is not necessary to reset them. You can switch - Sony STR-DG2100 | Operating Instructions - Page 38
twice, then the command mode setting process is completed. Tip When you press RM SET UP, use a thin wire, such as a paper clip. 7: Operating the receiver using the GUI (Graphical User Interface) By using the GUI menu, you can make various settings and adjustments. Displaying the GUI menu on the TV - Sony STR-DG2100 | Operating Instructions - Page 39
Speaker settings menu to adjust the speakers manually for the current position, and to set the speaker impedance. For details, see "Setting the speaker impedances" (page 41) and "Adjusting the speaker settings manually" (page 71). Surround You can use the Surround settings menu to select the sound - Sony STR-DG2100 | Operating Instructions - Page 40
adjusting the system using the System settings menu, see "Settings for the system (System settings menu)" (page 58). Navigating through displayed in the display window of the receiver, follow the steps given in "Displaying the GUI menu on the TV screen" (page 38). 2 Press MENU repeatedly to display - Sony STR-DG2100 | Operating Instructions - Page 41
display window of the receiver, follow the steps given in "7: Operating the receiver using the GUI (Graphical User Interface)" (page 38). 2 Press V/v repeatedly to select "Settings," then press or b. The Settings menu list appears on the TV screen. 3 Press V/v repeatedly to select "Speaker," then - Sony STR-DG2100 | Operating Instructions - Page 42
"Impedance" to "8 Ω" in the Speaker settings menu. - For other types of speakers in other configurations: Set "Impedance" to "4 Ω" in the Speaker settings menu. Selecting the front speakers You can select the front speakers you want to drive. SPEAKERS switch Set the SPEAKERS switch to select the - Sony STR-DG2100 | Operating Instructions - Page 43
, and measuring the distance of each speaker from your seating position automatically. Refer also to "Quick Setup Guide" supplied with the receiver. Notes • The auto calibration function does not work if headphones are connected. • Cancel MUTING if it is set to on. Optimizer microphone Before you - Sony STR-DG2100 | Operating Instructions - Page 44
the display may differ from the actual distance value. However, there will be no problems even if you continue to use the receiver with that value. Performing auto calibration The auto calibration function allows you to measure the following: • Speaker connectionsa) • Polarity of speakers • Speaker - Sony STR-DG2100 | Operating Instructions - Page 45
starts in five seconds. Note You cannot measure the speaker height of the surround speakers and the surround back speakers. Set the position of the surround speakers from "Position" in the Speaker settings menu. Tips • Operations other than turning the receiver on or off are deactivated during the - Sony STR-DG2100 | Operating Instructions - Page 46
continue to use the receiver. Tip The displayed unit of distance for models for US and Canada is feet. The unit of distance for models for countries/areas other than US and Canada is meters. You can change the unit of distance use in "Distance Unit" in the Speaker settings menu. 2 Press to select - Sony STR-DG2100 | Operating Instructions - Page 47
a sampling frequency of more than 96 kHz are being received. Tip The size of a speaker (LARGE/SMALL) is determined by the low characteristics. speakers, and the shape of the room. It is recommended that you follow the measurement results. However, you can change those settings in the Speaker settings - Sony STR-DG2100 | Operating Instructions - Page 48
auto calibration measurement Display Explanation Code 30 Headphones are connected. Remove the headphones and perform the auto calibration again. Code 31 SPEAKERS (OFF/A/B/A+B) is set to OFF. Set it to others and re-perform the measurement. Code 32 None of the speakers were detected. Make - Sony STR-DG2100 | Operating Instructions - Page 49
listening environment, and measurement conditions. • Calibration Type For details, see the table on page 46. Optional menu parameters for Enhanced Setup settings • EQ Curve Activates/deactivates the EQ curve measurement. • Name Input You can rename the position number; for details, refer to "Naming - Sony STR-DG2100 | Operating Instructions - Page 50
Built-in radio tuner. DMPORT Portable audio, etc., connected to the DIGITAL MEDIA PORT adapter connected to the receiver. HDMI 1, 2, 3 HDMI components connected to the HDMI 1, HDMI 2 or HDMI 3 jack. PHONO Turntable, etc., connected to the PHONO jack. MULTI IN Component connected to the MULTI - Sony STR-DG2100 | Operating Instructions - Page 51
. To cancel, press MUTING on the remote again or turn MASTER VOLUME clockwise to raise the volume. Even if you turn off the receiver, the muting function works when you turn the receiver on again. To avoid damaging your speakers Before you turn off the receiver, be sure to turn down the volume level - Sony STR-DG2100 | Operating Instructions - Page 52
Sony Super Audio CD player. • Refer to the operating instructions supplied with the Super Audio CD player or CD player. z You can select the sound field to suit the music. Refer to page 64 for details. Recommended sound on the receiver to select "SA-CD/CD." An example of the display 4 Play back - Sony STR-DG2100 | Operating Instructions - Page 53
, Blu-ray Disc Player is set up properly. 1 Turn on the TV and DVD player or Blu-ray Disc Player. 2 Turn on the receiver. 3 Press INPUT SELECTOR to select "DVD/BD." You can also use INPUT SELECTOR on this receiver to select "DVD/BD." An example of the display 4 Switch the input of the - Sony STR-DG2100 | Operating Instructions - Page 54
INPUT SELECTOR to select "VIDEO 3*." You can also use INPUT SELECTOR on this receiver to select "VIDEO 3*." * When you connect a TV game to the VIDEO 3 IN/PORTABLE AV IN jack on the front panel. An example of the display 4 Switch the input of the TV so that an image of the video game - Sony STR-DG2100 | Operating Instructions - Page 55
the operating instructions supplied with the TV and VCR. 6 3 1 Turn on the VCR. 2 Turn on the receiver. 3 Press INPUT SELECTOR to select "VIDEO 1*." You can also use INPUT SELECTOR on this receiver to select "VIDEO 1*." * When you connect VCR to the VIDEO 1 jack. An example of the display 4 Switch - Sony STR-DG2100 | Operating Instructions - Page 56
are input, there may be no sound, depending on the format. In this case, set this item to "AUTO." When signals from the HDMI IN jack are selected, only PCM signals are output from the connected player. When signals in any other format are received, set this item to "AUTO." • AUTO Automatically - Sony STR-DG2100 | Operating Instructions - Page 57
Note When you set "HDMI Control" to "ON," "HDMI Audio" may be changed automatically. x HDMI Audio (Setting HDMI audio input) Lets you set the HDMI audio signals output from the playback component connected to the receiver via an HDMI connection. • TV+AMP The sound is output from TV's speaker and the - Sony STR-DG2100 | Operating Instructions - Page 58
connected to the receiver. The multi-channel sound can be played back as it is. Note Audio signals are not output from the TV's speakers when HDMI Audio is set to "AMP." x HDMI SW Level Lets you set the level of the sub woofer to 0 dB or +10 dB when PCM signals are input via an HDMI connection. You - Sony STR-DG2100 | Operating Instructions - Page 59
repeatedly to select the surround sound you want. Enjoying Surround Sound 2 3-6 1 Start playing a sound source you want to listen to (CD, DVD, etc.). 2 Make sure that the AMP button is lit. If it is not lit, or "GUI MODE" is not displayed in the display window of the receiver, follow the steps - Sony STR-DG2100 | Operating Instructions - Page 60
speaker balance can be adjusted. When connecting Blu-ray Disc Players and other next generation HD players This receiver supports the following audio formats. Audio format Connection of the playback component and Maximum number the receiver of channels COAXIAL/OPTICAL HDMI - Sony STR-DG2100 | Operating Instructions - Page 61
signals are output in another format if the playback component does not correspond to the format. For details, refer to the operating instructions of the playback component. b)Signals with a sampling frequency of more than 96 kHz are played back at 96 kHz or 88.2 kHz. Enjoying Surround Sound 61GB - Sony STR-DG2100 | Operating Instructions - Page 62
-THX® Surround. In addition to stereo enhancement processing and pure discrete 5.1 surround sound, now capable of full 360° 7.1 surround sound playback from Neural-THX® surround encoded content. * You cannot select this decoding mode if there are no surround back speakers connected to the receiver - Sony STR-DG2100 | Operating Instructions - Page 63
Surround Sound Notes • This function does not work in the following cases. - The multi-channel input is selected. - DTS-HD signals with a sampling frequency of more than 48 kHz are being received. - Dolby TrueHD signals with a sampling frequency of more than 96 kHz are being received. • If you set - Sony STR-DG2100 | Operating Instructions - Page 64
music/movie mode You can take advantage of surround sound simply by selecting one of the receiver's preprogrammed sound fields. They bring the exciting and powerful sound of movie theaters and concert halls into your home. Sound field for Movie Sound field Cinema Studio EX A DCS Cinema Studio EX - Sony STR-DG2100 | Operating Instructions - Page 65
or surround speakers are set to "SMALL," the sound field for movie is selected, or "Portable Audio" is selected. Tips • Sound fields with DCSmarks use DCS technology. See "Glossary" (page 120). • When the sound field's DCSmark is selected, the Digital Cinema Sound lamp lights up on the display. To - Sony STR-DG2100 | Operating Instructions - Page 66
settings apply more surround effect. You can adjust the level from 20% to 120% in 5% steps. 1 Choose the sound field (page 59). 2 Press b to select "Custom Settings," then press . Custom Settings IIx Music mode decoding. You can set this parameter only when A.F.D. mode is set to "PLII Music" or " - Sony STR-DG2100 | Operating Instructions - Page 67
for Dolby Pro Logic II and IIx Music mode decoding. You can set this parameter only when A.F.D. mode is set to "PLII Music" or "PLIIx Music." • ON Lets you enjoy surround sound by spreading the sound field of the front speakers to the left and right of the seating position. • OFF This function - Sony STR-DG2100 | Operating Instructions - Page 68
back decoding mode using "SB Decoding" on the Surround settings menu. 1 Make sure that the AMP button is lit. If it is not lit, or "GUI MODE" is not displayed in the display window of the receiver, follow the steps in "7: Operating the receiver using the GUI (Graphical User Interface)" (page 38 - Sony STR-DG2100 | Operating Instructions - Page 69
signals to 6.1 discrete channels. Discrete 6.1 channel signals are DVD specific signals not used in movie theaters. e)When two surround back speakers are connected, the output channel will be 7.1 channel signals. • ON The SB Dec Mode setting is applied to 5.1 channel and 6.1 channel decoding in the - Sony STR-DG2100 | Operating Instructions - Page 70
Enjoying the surround effect at low volume levels (NIGHT MODE) This function allows you to retain a theater like environment at low volume levels. This function can be used with other sound fields. When watching a movie late at night, you will be able to hear the dialog clearly even at a low volume - Sony STR-DG2100 | Operating Instructions - Page 71
" is not displayed in the display window of the receiver, follow the steps given in "7: Operating the receiver using the GUI (Graphical User Interface)" (page 38). Note When one of the sound fields for music is selected, no sound is output from the sub woofer if all the speakers are set to "LARGE - Sony STR-DG2100 | Operating Instructions - Page 72
that speaker, set it to "SMALL." If the overall sound level is lower than you prefer, set all speakers to "LARGE." If there is not enough bass, you can use the equalizer to boost the bass levels. • The surround back speakers will be set to the same setting as that of the surround speakers. • When - Sony STR-DG2100 | Operating Instructions - Page 73
space between the surround sound from the surround speakers and the sound of the front speakers. If you are not sure which sounds best, select "BEHD" and then use the speaker distance parameter and speaker level adjustments to obtain proper balance. Making settings with the Speaker Pattern menu - Sony STR-DG2100 | Operating Instructions - Page 74
auto calibration. 5 Press V/v repeatedly to select the speaker pattern you want. Making settings with the Test Tone menu 1 2-6 1 Make sure that the AMP button is lit. If it is not lit, or "GUI MODE" is not displayed in the display window of the receiver, follow the steps given in "7: Operating the - Sony STR-DG2100 | Operating Instructions - Page 75
cords may have the short-circuit problem. When a test tone is output from a different speaker than the speaker displayed on the screen The speaker pattern to the connected speaker is not set up correctly. Make sure the speaker connection and the speaker pattern match. Test Tone menu parameters - Sony STR-DG2100 | Operating Instructions - Page 76
then connect the surround back speakers to this receiver when you want to change the connection from a bi-amplifier connection to a surround back speakers connection. Re-set up the speakers after you connect the surround back speakers. Refer to "Auto Calibration" (page 43) or "Manual Setup" (page 71 - Sony STR-DG2100 | Operating Instructions - Page 77
. These settings are applied to all sound fields and for each speaker. Bass Treble Level (dB) Frequency (Hz) Notes • This function does not work in the following cases. - The multi-channel input is selected. - Dolby TrueHD signals with a sampling frequency of more than 96 kHz are being received - Sony STR-DG2100 | Operating Instructions - Page 78
The equalizer adjustment screen appears on the TV screen. 5 Choose the speaker you want to adjust using B/b, then press . 6 Press B/b repeatedly the front speaker bass and treble level with TONE MODE and TONE on the receiver. 7 Press to enter the parameter. Clearing stored equalizer settings 1 Press - Sony STR-DG2100 | Operating Instructions - Page 79
1 Make sure that the AMP button is lit. If it is not lit, or "GUI MODE" is not displayed in the display window of the receiver, follow the steps given in "7: Operating the receiver using the GUI (Graphical User Interface)" (page 38). 2 Press V/v repeatedly to select "FM" or "AM," then press or - Sony STR-DG2100 | Operating Instructions - Page 80
4 2-4 1 Make sure that the AMP button is lit. If it is not lit, or "GUI MODE" is not displayed in the display window of the receiver, follow the steps given in "7: Operating the receiver using the GUI (Graphical User Interface)" (page 38). 2 Press V/v repeatedly to select "FM" or "AM," then press or - Sony STR-DG2100 | Operating Instructions - Page 81
5-7 4 1 Make sure that the AMP button is lit. If it is not lit, or "GUI MODE" is not displayed in the display window of the receiver, follow the steps given in "7: Operating the receiver using the GUI (Graphical User Interface)" (page 38). 2 Press V/v repeatedly to select "FM" or "AM," then press or - Sony STR-DG2100 | Operating Instructions - Page 82
Conditions XM monthly service subscription sold separately. XM Mini Tuner and Home Dock required (each sold separately) to receive XM service. Installation costs full channel lineup on your XM Ready home audio system you are done. SIRIUS Satellite Radio: The Best Radio On Radio SIRIUS brings all your - Sony STR-DG2100 | Operating Instructions - Page 83
outlet. Keep the SiriusConnect Home Tuner, antenna, and AC power adaptor away from the speaker cords and the power cord to avoid picking up noise. 2-3 3 1 Make sure that the AMP button is lit. If it is not lit, or "GUI MODE" is not displayed in the display window of the receiver, follow the steps - Sony STR-DG2100 | Operating Instructions - Page 84
it in the space provided here. XM Radio ID Sirius ID You can also check the XM Radio ID and Sirius ID using the display on the receiver. Selecting a channel by Category Mode You can select a channel from one category or all the categories. 3 Press OPTIONS, then press V/v repeatedly to select - Sony STR-DG2100 | Operating Instructions - Page 85
1 Make sure that the AMP button is lit. If it is not lit, or "GUI MODE" is not displayed in the display window of the receiver, follow the steps given in "7: Operating the receiver using the GUI (Graphical User Interface)" (page 38). 2 Press V/v repeatedly to select "XM" or "SIRIUS," then press or - Sony STR-DG2100 | Operating Instructions - Page 86
1 Make sure that the AMP button is lit. If it is not lit, or "GUI MODE" is not displayed in the display window of the receiver, follow the steps given in "7: Operating the receiver using the GUI (Graphical User Interface)" (page 38). 2 Press V/v repeatedly to select "XM" or "SIRIUS," then press or - Sony STR-DG2100 | Operating Instructions - Page 87
specific channels (Parental Lock) (SIRIUS only) You can restrict access to certain channels using your own lock code. The lock code is set or "GUI MODE" is not displayed in the display window of the receiver, follow the steps given in "7: Operating the receiver using the GUI (Graphical User Interface - Sony STR-DG2100 | Operating Instructions - Page 88
using Category Tuning, locked channels are skipped. • When the receiver is reset to the factory settings, the lock code returns to the default (0000), but the Parental Lock settings are not removed. • You cannot preset locked channels. If you set the Parental Lock for a preset channel, the preset - Sony STR-DG2100 | Operating Instructions - Page 89
. Check the connection between the SiriusConnect Home Tuner and the antenna. Acquiring Signal The receiving condition is not good. Try moving the antenna to another location. For details about the antenna location, see the instructions supplied with the SiriusConnect Home Tuner. Call 888-539- You - Sony STR-DG2100 | Operating Instructions - Page 90
Firmware Updating ----- Explanation The SiriusConnect HomeTuner firmware is being updated. There is no text information in the channel. Remedies - This is not an error. The text information may not be displayed depending on the system condition, for example, right after the system has received - Sony STR-DG2100 | Operating Instructions - Page 91
a DIGITAL MEDIA PORT adapter, you can enjoy sound from the connected component on the receiver. Available DIGITAL MEDIA PORT adapters vary in each sure to turn the receiver off using the remote. • Do not connect or disconnect the DIGITAL MEDIA PORT adapter to/from the receiver while the system is - Sony STR-DG2100 | Operating Instructions - Page 92
-iP1 and TDM-NC1. The list of tracks will be displayed on the GUI screen of the receiver. You can select a track you want and play back displayed on the TV screen. • iPod This mode can be selected only when the TDM-iP1 is connected. If "DMPORT Control" is not displayed, see the operating instructions - Sony STR-DG2100 | Operating Instructions - Page 93
For details on operating the iPod, refer to the operating instruction supplied with the iPod. Playing back the track selected During playback of the track selected, the displayed screen changes depending on MEDIA PORT adapter using the play mode buttons on the remote of the receiver. continued 93GB - Sony STR-DG2100 | Operating Instructions - Page 94
backward/forward Press m/M.** * When a TDM-iP1 is connected, the receiver enters pause mode when x is pressed. ** Fast-backward/forward while Connecting to the server. Configuring* The network is setting up. Warning* Check the display of the DIGITAL MEDIA PORT adapter. Party Mode* The - Sony STR-DG2100 | Operating Instructions - Page 95
Naming inputs You can enter a name of up to 8 characters for inputs and display it. This is convenient for labeling the jacks with the names of the connected components. 4 Press V/v/B/b to select a character, then press . 5 Press [Finish] to enter - Sony STR-DG2100 | Operating Instructions - Page 96
2 1 Press the input button. You can also use INPUT SELECTOR on the receiver. 2 Press AMP. 3 Press INPUT MODE repeatedly to select the audio input be set up depending on the input. • When either HDMI input, satellite tuner or DIGITAL MEDIA PORT adapter is selected, "------" appears on the display, - Sony STR-DG2100 | Operating Instructions - Page 97
sound/ images from other inputs You can reassign video and/or audio signals to another input. Example) Connect the OPTICAL OUT jack of the DVD player to the OPTICAL VIDEO 1 IN jack of this receiver , or "GUI MODE" is not displayed in the display window of the receiver, follow the steps given in "7: - Sony STR-DG2100 | Operating Instructions - Page 98
assign coaxial signals from the input source to the coaxial input jacks on the receiver. • When you assign the digital audio input, the INPUT MODE setting may change automatically. • You cannot reassign more than one HDMI input to the same input. • You cannot reassign more than one digital audio - Sony STR-DG2100 | Operating Instructions - Page 99
etc., by changing the information on the display. SHIFT DISPLAY MENU Press DISPLAY repeatedly. Each time you press DISPLAY, the display will change as follows. Input name you selected t Original input name t Sound field type t Volume... Tip You cannot switch the display while "GUI MODE" is shown on - Sony STR-DG2100 | Operating Instructions - Page 100
how the receiver downmixes the source sound (based on the speaker settings). Front Left Front Right Center (monaural) Surround Left Surround Right Surround (monaural or the surround components obtained by Pro Logic processing) Surround Back Left Surround Back Right Surround Back (the surround back - Sony STR-DG2100 | Operating Instructions - Page 101
is set to "Auto." Lights up when the receiver recognizes a component connected via an HDMI IN R SIRIUS Lights up when the SiriusConnect Home Tuner is connected and "SIRIUS" is receiver (EX) is decoding Dolby Digital Surround signals. When the receiver is decoding Dolby Digital Surround - Sony STR-DG2100 | Operating Instructions - Page 102
satellite radio operation. ef neural THX Lights up when the receiver applies Neural-THX processing to input signals. eg BI-AMP Lights up when surround back speakers selection is set to "BI-AMP." eh SP.A/SP.B Lights up according to the speaker system used. "SP.A" and "SP.B" turn off, when the - Sony STR-DG2100 | Operating Instructions - Page 103
set the receiver to turn off automatically at a specified time. Recording using the receiver You can record from a video/audio component using the receiver. Refer to the operating instructions time before the receiver turns off, press SLEEP. The remaining time appears on the display. If you press - Sony STR-DG2100 | Operating Instructions - Page 104
. Not doing so may cause a malfunction of the receiver. To set up speakers Set "Sur Back Assign" to "BI-AMP" in the Speaker settings menu. The same signals output from the FRONT SPEAKERS A jacks can be output from the SURROUND BACK SPEAKERS terminals by setting "Sur Back Assign" to "BI-AMP." 104GB - Sony STR-DG2100 | Operating Instructions - Page 105
. • If you make the bi-amplifier settings, the speaker level, balance, and equalizer settings of the surround back speakers become invalid, and those of the front speakers are used. Operating without connecting to the TV You can operate this receiver using the display even if you do not use a GUI - Sony STR-DG2100 | Operating Instructions - Page 106
page 40. Menu Item Parameter Initial setting Auto Calibration AUTO CAL START? Level Settings COMPLETE [xxxxxxxxxx] RETRY, SAVE EXIT, xxx.x dB] -20.0dB to +10.0dB (0.5dB step) 0dB SURROUND L [xxx.x dB] -20.0dB to +10.0dB (0.5dB step) 0dB SURROUND R [xxx.x dB] -20.0dB to +10.0dB (0.5dB - Sony STR-DG2100 | Operating Instructions - Page 107
Menu Item Parameter Initial setting Speaker Settings SP PATTERN [xxxxx] 2/0 to 3/4.1 3/4.1 SUB WOOFER [xxx] NO, YES YES FRONT SP [xxxxx] SMALL, LARGE LARGE CENTER SP [xxxxx] NO, SMALL, LARGE LARGE SURROUND SP [xxxxx] NO, SMALL, LARGE LARGE SUR BACK SP [xxxxxx] NO, SINGLE, DUAL - Sony STR-DG2100 | Operating Instructions - Page 108
Settings EQ Settings Tuner Settings SOUND step) PANORAMA MODE [xxx] OFF, ON SCREEN DEPTH [xxx] OFF, ON VIR. SPEAKERS [xxx] OFF, ON FRONT REVERB [xxx] WET, STD EQ PRESET [xxx] OFF, LOCK CODE EDIT ? XM ID DISPLAY SIRIUS ID DISPLAY Initial setting AUTO PLIIx MV 100% 3 0 OFF ON ON - Sony STR-DG2100 | Operating Instructions - Page 109
IN SAT/CATV c [xxxxxxxx] VIDEO1 DVD/BD SAT/CATV HDMI Settings HDMI CONTROL [xxx] OFF, ON OFF HDMI AUDIO [xxxxxx] AMP, TV+AMP AMP HDMI SW [xxx dB] 0dB, +10.0dB, AUTO AUTO HDMI VIDEO ASSIGN ? HDMI 1 c [xxxxxxxx] HDMI 2 c [xxxxxxxx] HDMI 3 c [xxxxxxxx] HDMI1 to 3, VIDEO1 to 3, DVD/BD, SAT - Sony STR-DG2100 | Operating Instructions - Page 110
, switch functions, change the setting of the SPEAKERS switch of the receiver, or connect headphones. Note You cannot measure the speaker height of the surround speakers and the surround back speakers. Set this value from "SP POSI." settings in the Speaker settings menu. Tips • Operations other - Sony STR-DG2100 | Operating Instructions - Page 111
other way around. However, depending on the speakers, "OUT" appears on the display even though the speakers are connected properly. This is because of the speakers' specifications. In this case, you can continue to use the receiver. - - - No speakers are connected. Tip Depending on the position - Sony STR-DG2100 | Operating Instructions - Page 112
MEMORY" appears on the display for a few seconds. Perform steps 3 and 4 before the display changes. 3 Press PRESET can also press TUNING MODE on the receiver repeatedly to select "PRESET," then use TUNING satellite tuner For details on XM/SIRIUS Radio service, refer to "Listening to satellite radio" ( - Sony STR-DG2100 | Operating Instructions - Page 113
on the receiver. 2 Press CATEGORY MODE repeatedly to select "ONE CATEGORY." • All Categories: You can select a channel from all the categories. The initial setting is "All Categories." • One Category: You can select a channel from one category. "CAT" is displayed on the display when you set to "ONE - Sony STR-DG2100 | Operating Instructions - Page 114
Operating each component using the remote When you program the remote to control the following Sony or non-Sony components, you can use the buttons on the remote that are marked with circles. Note, however, that some buttons may not operate your component. If you want to change the contents of - Sony STR-DG2100 | Operating Instructions - Page 115
PORT VHS LD (UC) receiver deck device Button combo player (EURO) AV ?/1, zz z z z z z ?/1 (after pressing TV) zz zz Numeric buttons zz z z zz z z z z zz z z MEMORY/ENTER z z z z z z* z z z zz z z CLEAR/D.TUNING/ z z z z zz z >10/-/-- DISPLAY Remote 115GB - Sony STR-DG2100 | Operating Instructions - Page 116
uses as an example a case in which a VCR made by a company other than Sony is connected to the VIDEO 2 IN jacks on the receiver. Before you begin, note that: - You cannot change the settings of PHONO. - The remote can control only components that accept infrared wireless control signals. Be sure to - Sony STR-DG2100 | Operating Instructions - Page 117
will not respond to some or all of the codes. • All of the input buttons on this remote may not be available when used with your particular component. To control a CD player Maker SONY DENON JVC KENWOOD MAGNAVOX MARANTZ ONKYO PANASONIC PHILIPS PIONEER TECHNICS YAMAHA Code(s) 101, 102, 103 104 - Sony STR-DG2100 | Operating Instructions - Page 118
, 547, 549, 558 517, 518, 567 503, 517, 566 566 542, 543, 567 503, 509, 510, 544 515, 534, 556 To control a satellite tuner Maker SONY AMSTRAD BskyB GENERAL ELECTRIC(GE) GRUNDING HUMAX THOMSON PACE PANASONIC PHILIPS Code(s) 801, 802, 803, 804, 824, 825, 865 845, 846 862 866 859, 860 - Sony STR-DG2100 | Operating Instructions - Page 119
a Blu-ray Disc Player Maker SONY Code(s) 310, 311, 312 To control a PSX Maker SONY Code(s) 313, 314, 315 Clearing all the contents of the remote's memory AV ?/1 ?/1 MASTER VOL - 1 Press and hold MASTER VOL - first, then press ?/1, then press AV ?/1. The RM SET UP button flashes three times - Sony STR-DG2100 | Operating Instructions - Page 120
environment with actual speakers up to 7.1 channels, and brings the surround sound experience of a theater with the latest facilities into your home. "Screen Depth Matching" reproduces treble attenuation, fullness, and depth of sound usually created in a theater using sound emission from behind - Sony STR-DG2100 | Operating Instructions - Page 121
at 96 kHz/24 bit and up to 6ch at 192 kHz/24 bit. Together with high-definition video, it offers an unprecedented home theater experience. x DTS 96/24 A high sound quality digital signal format. It records audio at a sampling frequency and bit rate of 96 kHz/24 bit which is the highest - Sony STR-DG2100 | Operating Instructions - Page 122
sound. The HDMI specification supports A scanning method which completes a picture by displaying half of the lines on a tube surface more powerful. x Neural THX Neural-THX® Surround is taking surround sound to xvYCC standard proposed by Sony, and is a trademark of Sony. xvYCC is an international - Sony STR-DG2100 | Operating Instructions - Page 123
, contact your dealer. • AC power cord (mains lead) must be changed only at a qualified service shop. On heat buildup Although the receiver heats up during operation, this is any questions or problems concerning your receiver, please consult your nearest Sony dealer. Additional Information 123GB - Sony STR-DG2100 | Operating Instructions - Page 124
while using the receiver, use this troubleshooting guide to help you remedy the problem. Should any problem persist, consult your nearest Sony dealer. Audio There is no sound, no matter which component is selected, or only a very low-level sound is heard. • Check that the speakers and components are - Sony STR-DG2100 | Operating Instructions - Page 125
when you display the receiver's menu on the TV monitor. Press AMP MENU to turn off the display. • You can listen to the Super Audio CD on HDMI only by linear PCM signal transmission. • Depending on the playback component, component may need to be set up. Refer to the operating instructions supplied - Sony STR-DG2100 | Operating Instructions - Page 126
may need to be set up. Refer to the operating instructions supplied with the each component. • Be sure to use a connecting cable for the HDMI jack corresponding to high speed (an HDMI version1.3a, category 2 cable) when you view images or listen to sound during a DeepColor transmission. Recording - Sony STR-DG2100 | Operating Instructions - Page 127
. If any problem persists, consult your nearest Sony dealer. PROTECTOR Irregular current is output to the speakers, or the upper panel of the receiver is covered with something. The receiver will automatically turn off after a few seconds. Check the connection of speakers and turn on the power again - Sony STR-DG2100 | Operating Instructions - Page 128
Output (4 ohms 1 kHz, THD 0.7%) FRONT2): 100 W + 100 W CENTER2): 100 W SURROUND2): 100 W + 100 W SURROUND BACK2): 100 W + 100 W 1)Depending on the sound field settings and the source, there may be no sound output. 2)Measured under the following conditions: Power requirements: 120 V AC, 60 Hz 128GB - Sony STR-DG2100 | Operating Instructions - Page 129
CENTER, Voltage: 2 V SURROUND L/R, Impedance: 1 kohm SURROUND BACK L/R, SUB WOOFER EQUALIZER off the receiver. While holding down TUNING MODE, press POWER on the receiver. All preset 0.7 Vp-p, 75 ohms 80 MHz HD Pass Through HDMI Video Input/Output (HDMI Repeater block) 640 × 480p@60 Hz 720 × - Sony STR-DG2100 | Operating Instructions - Page 130
Setup Guide (1) HDMI CONTROL Guide (1) GUI Menu List (1) Optimizer microphone ECM-AC2 (1) FM wire antenna (aerial) (1) AM loop antenna (aerial) (1) Remote commander RM-AAP018 (1) R6 (size-AA) batteries (2) Design and specifications are subject to change without notice. • Standby power consumption - Sony STR-DG2100 | Operating Instructions - Page 131
Sync 56, 109 AC power cord 36 AM 79, 99, 111 Audio (Settings) 56, 109 Auto display 99 Cinema Studio EX (mode) 64 Clear EQ 78, 108 memory 36 remote 119 Command mode 37 Connections antennas 35 audio components 20 monitor 18 speakers 16 video components 25 Crossover Freq 76, 107 Custom Settings - Sony STR-DG2100 | Operating Instructions - Page 132
82 Size 72 Sleep timer 103 SMALL 72 Sound Field Select 59, 111 Sound Field Setup 59 Speaker (Settings) 41, 76, 107 Speaker Impedance 41, 107 Speaker Pattern 73, 107 SPEAKERS (OFF/A/B/A+B) 7, 42 Super Audio CD player 21, 24, 52 Sur Back Assign 76 Sur Settings 108 Surround 59 System (Settings) 58, 109 - Sony STR-DG2100 | Operating Instructions - Page 133
T Test Tone 74, 75, 106 TONE 7 TONE MODE 7, 36 Treble 7, 77, 108 Tuner 79 Tuner (Settings) 108 Tuning 79, 80, 81 U Up converting 32 V VCR 55 Video (Settings) 57, 109 VIDEO 3 IN/PORTABLE AV IN jacks 31, 54 Video game 54 Virtual Speakers 67, 108 X XM Radio 82 133GB Additional Information - Sony STR-DG2100 | Operating Instructions - Page 134
134GB
-
 1
1 -
 2
2 -
 3
3 -
 4
4 -
 5
5 -
 6
6 -
 7
7 -
8
-
9
-
10
-
11
-
12
-
13
-
14
-
15
-
16
-
17
-
18
-
19
-
20
-
21
-
22
-
23
-
24
-
25
-
26
-
27
-
28
-
29
-
30
-
31
-
32
-
33
-
34
-
35
-
36
-
37
-
38
-
39
-
40
-
41
-
42
-
43
-
44
-
45
-
46
-
47
-
48
-
49
-
50
-
51
-
52
-
53
-
54
-
55
-
56
-
57
-
58
-
59
-
60
-
61
-
62
-
63
-
64
-
65
-
66
-
67
-
68
-
69
-
70
-
71
-
72
-
73
-
74
-
75
-
76
-
77
-
78
-
79
-
80
-
81
-
82
-
83
-
84
-
85
-
86
-
87
-
88
-
89
-
90
-
91
-
92
-
93
-
94
-
95
-
96
-
97
-
98
-
99
-
100
-
101
-
102
-
103
-
104
-
105
-
106
-
107
-
108
-
109
-
110
-
111
-
112
-
113
-
114
-
115
-
116
-
117
-
118
-
119
-
120
-
121
-
122
-
123
-
124
-
125
-
126
-
127
-
128
-
129
-
130
-
131
-
132
-
133
-
134
 |
 |

Sony Corporation
Printed in Malaysia
©2007 Sony Corporation
3-274-907-
12
(1)
Multi Channel
AV Receiver
Operating Instructions
Owner’s Record
The model and serial numbers are located on the rear of the unit. Record the serial
number in the space provided below. Refer to them whenever you call upon your Sony
dealer regarding this product.
Model No.
Serial No.
STR-DG2100