Sony STR-K995 Quick Setup Guide - Page 1
Sony STR-K995 - Lifier Component Of Ht-ddw995 Manual
 |
View all Sony STR-K995 manuals
Add to My Manuals
Save this manual to your list of manuals |
Page 1 highlights
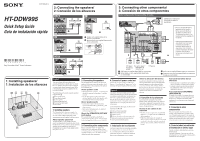
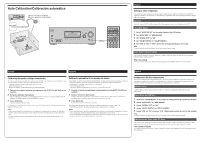
3-097-355-01(1) HT-DDW995 Quick Setup Guide Guía de instalación rápida Sony Corporation © 2007 Printed in Malaysia 1: Installing speakers/ 1: Instalación de los altavoces 2: Connecting the speakers/ 2: Conexión de los altavoces 3: Connecting other components/ 3: Conexión de otros componentes Video components/ Componentes de vídeo DIGITAL (ASSIGNABLE) OPTICAL SAT IN ANTENNA VIDEO 2/ AM BD IN COAXIAL DVD IN DMPORT DVD IN VIDEO 2/BD IN OUT HDMI Y PB/CB PR/CR VIDEO IN VIDEO IN VIDEO OUT VIDEO IN VIDEO OUT SAT IN DVD IN VIDEO 1 IN MONITOR OUT L MONITOR COMPONENT VIDEO RL L L L L AUDIO OUT R R OUT IN IN SA-CD/CD/CD-R TV R R AUDIO IN AUDIO IN AUDIO OUT AUDIO IN SUB SAT DVD VIDEO 1 WOOFER FRONT B R FRONT A SPEAKERS L R SURROUND CENTER L L SS-MSP900 L SS-MSP900 R DIGITAL (ASSIGNABLE) OPTICAL SAT IN ANTENNA VIDEO 2/ AM BD IN COAXIAL DVD IN DMPORT DVD IN VIDEO 2/BD IN OUT HDMI Y PB/CB PR/CR VIDEO IN VIDEO IN VIDEO OUT VIDEO IN VIDEO OUT SAT IN DVD IN VIDEO 1 IN MONITOR OUT L MONITOR COMPONENT VIDEO RL L L L L AUDIO OUT R R OUT IN IN SA-CD/CD/CD-R TV R R AUDIO IN AUDIO IN AUDIO OUT AUDIO IN SUB SAT DVD VIDEO 1 WOOFER FRONT B R FRONT A SPEAKERS L R SURROUND CENTER AUDIO OUT SA-WP780 R FRONT A SPEAKERS R SURROUND A DIGITAL (ASSIGNABLE) OPTICAL SAT IN ANTENNA VIDEO 2/ AM BD IN COAXIAL DVD IN DMPORT DVD IN VIDEO 2/BD IN OUT HDMI Y PB/CB PR/CR VIDEO IN VIDEO IN VIDEO OUT VIDEO IN VIDEO OUT SAT IN DVD IN VIDEO 1 IN MONITOR OUT L MONITOR COMPONENT VIDEO RL L L L L AUDIO OUT R R OUT IN IN SA-CD/CD/CD-R TV R R AUDIO IN AUDIO IN AUDIO OUT AUDIO IN SUB SAT DVD VIDEO 1 WOOFER FRONT B R FRONT A SPEAKERS L R SURROUND CENTER CENTER A SUB WOOFER B SS-CNP680 A Speaker cord (supplied)/Cables de los altavoces (suministrada) B Monaural audio cord (supplied)/Cable de audio mono (suministrada) 10 mm DIGITAL (ASSIGNABLE) OPTICAL SAT IN ANTENNA VIDEO 2/ AM BD IN COAXIAL DVD IN DMPORT DVD IN VIDEO 2/BD IN OUT HDMI Y PB/CB PR/CR VIDEO IN VIDEO IN VIDEO OUT VIDEO IN VIDEO OUT SAT IN DVD IN VIDEO 1 IN MONITOR OUT L MONITOR COMPONENT VIDEO RL L L L L AUDIO OUT R R OUT IN IN SA-CD/CD/CD-R TV R R AUDIO IN AUDIO IN AUDIO OUT AUDIO IN SUB SAT DVD VIDEO 1 WOOFER FRONT B R FRONT A SPEAKERS L R SURROUND CENTER L L SS-SRP900 SS-SRP900 R FRONT A SPEAKERS R SURROUND A DIGITAL (ASSIGNABLE) OPTICAL SAT IN ANTENNA VIDEO 2/ AM BD IN COAXIAL DVD IN DMPORT DVD IN VIDEO 2/BD IN OUT HDMI Y PB/CB PR/CR VIDEO IN VIDEO IN VIDEO OUT VIDEO IN VIDEO OUT SAT IN DVD IN VIDEO 1 IN MONITOR OUT L MONITOR COMPONENT VIDEO RL L L L L AUDIO OUT R R OUT IN IN SA-CD/CD/CD-R TV R R AUDIO IN AUDIO IN AUDIO OUT AUDIO IN SUB SAT DVD VIDEO 1 WOOFER FRONT B R FRONT A SPEAKERS L R SURROUND CENTER D OUTPUT OPTICAL F COMPONENT VIDEO OUTPUT Y PB/CB PR/CR DIGITAL (ASSIGNABLE) OPTICAL SAT IN ANTENNA VIDEO 2/ AM BD IN COAXIAL DVD IN DMPORT L L DVD IN VIDEO 2/BD IN OUT HDMI Y PB/CB PR/CR VIDEO IN VIDEO IN VIDEO OUT VIDEO IN VIDEO OUT MONITOR SAT IN DVD IN VIDEO 1 IN MONITOR OUT COMPONENT VIDEO RL L L AUDIO OUT R R OUT IN IN SA-CD/CD/CD-R TV R R AUDIO IN AUDIO IN AUDIO OUT AUDIO IN SUB SAT DVD VIDEO 1 WOOFER FRONT B C C OUTPUT OUTPUT E C L R AUDIO INPUT COMPONENT VIDEO INPUT Y PB/CB PR/CR Satellite tuner or Set-top box/ Sintonizador vía satélite o decodificador * Be sure to program the VIDEO 2 input button on the remote so that you can control the Blu-ray disc player. For details, refer to "Programming the remote" in the operating instructions supplied with the receiver. * Asegúrese de programar el botón de la entrada VIDEO 2 del mando a distancia para controlar el reproductor de Blu-ray Disc. Si desea obtener más información, consulte "Programación del mando a distancia" en el manual de instrucciones suministrado con el F receptor. DVD player/ Blu-ray disc player*/ Reproductor Reproductor de de DVD discos Blu-ray* TV/Televisor C HDMI cable (not supplied)/Cable HDMI (no suministrado) D Optical digital cord (not supplied)/Cable digital óptico (no suministrado) E Audio cord (not supplied)/Cable de audio (no suministrado) F Component video cord (not supplied)/Cable de componente de vídeo (no suministrado) English This Quick Setup Guide describes how to connect a DVD player, satellite tuner or set-top box, TV, speakers and a sub woofer so that you can enjoy multi channel surround sound. Refer to the operating instructions supplied with the receiver for details. The illustrations in the guide designate speakers as through . Front speaker (left) Front speaker (right) Center speaker Surround speaker (left) Surround speaker (right) Sub woofer 1: Installing speakers The illustration above show an example of a 5.1 channel speaker system (five speakers and one sub woofer) configuration. Refer to the operating instructions supplied with the receiver. About speaker placement The front speakers, center speaker and sub woofer are magnetically shielded to allow it to be installed near a TV set. However, as the surround speakers are not magnetically shielded, we recommend that you place them slightly further away from a TV set. 2: Connecting the speakers The illustrations above show how to connect the speakers. Before you connect the speakers, check the speaker label on the rear panel of the speakers for the speaker type. About speaker cords • Black striped wire is minus (-) in polarity and should be connected to the minus (-) speaker terminal. • Use the long speaker cords to connect the surround speakers and the short speaker cords to connect the front and center speakers. About speaker jacks • Connect the jack to the jack of the receiver and connect the jack to the jack of the receiver. • Refer to the illustration above for details of connecting speaker cords. About the SPEAKERS (OFF/A/B/ A+B) button You can select the speaker system. Refer to "6: Selecting the speaker system" in the operating instructions supplied with the receiver for details. 3: Connecting other components This is an example of how to connect this receiver and your components. Refer to step 3 of "Getting started" of the operating instructions supplied with this receiver for details on other connections and other components. 4: Connect all power cords last Connect the AC power cord to a wall outlet. Refer to "Connecting the AC power cord" in the operating instructions supplied with the receiver. Español Esta guía de instalación rápida describe cómo conectar un reproductor de DVD, un sintonizador vía satélite o un decodificador, un televisor, los altavoces y un altavoz potenciador de graves para que pueda disfrutar del sonido envolvente multicanal. Consulte el manual de instrucciones suministrado con el receptor para obtener más información. En las ilustraciones de la guía, los altavoces se identifican de a . Altavoz frontal (izquierdo) Altavoz frontal (derecho) Altavoz central Altavoz de sonido envolvente (izquierdo) Altavoz de sonido envolvente (derecho) Altavoz potenciador de graves 1: Instalación de los altavoces Las ilustraciones anteriores muestran un ejemplo de configuración de un sistema de altavoces de 5.1 canales (cinco altavoces y un altavoz potenciador de graves). Consulte el manual de instrucciones suministrado con el receptor. Sobre la ubicación del altavoz Los altavoces frontales, el altavoz central y el altavoz potenciador de graves están protegidos magnéticamente para que puedan instalarse cerca de un televisor. Sin embargo, debido a que los altavoces de sonido envolvente no están protegidos magnéticamente, se recomienda situarlos a una distancia considerable del televisor. 2: Conexión de los altavoces Las ilustraciones que aparece más arriba muestra cómo conectar los altavoces. Antes de conectarlos, compruebe la etiqueta del altavoz situada en el panel posterior de los mismos para conocer el tipo de altavoz. Acerca de los cables de los altavoces • El cable con rayas negras tiene una polaridad negativa (-) y se debe conectar al terminal de altavoz negativo (-). • Utilice los cables largos de conexión de altavoces para conectar los altavoces de sonido envolvente y los cables cortos de conexión de altavoces para conectar el altavoz frontal y el central. Acerca de las tomas de los altavoces • Conecte la toma a la toma del receptor, y conecte la toma a la toma del receptor. • Consulte la ilustración anterior para obtener más información sobre cómo conectar los cables de los altavoces. Acerca del botón SPEAKERS (OFF/A/B/A+B) Es posible seleccionar el sistema de altavoces. Consulte el apartado "6: Selección del sistema de altavoces" del manual de instrucciones suministrado con el receptor para obtener más información. 3: Conexión de otros componentes Este es un ejemplo de cómo conectar este receptor a los componentes. Consulte el paso 3 de "Procedimientos iniciales" del manual de instrucciones suministrado con el receptor para obtener más información sobre cómo realizar otras conexiones y sobre otros componentes. 4: Conecte todos los cables de alimentación en último lugar Conecte el cable de alimentación de ca a una toma de pared. Consulte el apartado "Conexión del cable de alimentación de ca" del manual de instrucciones suministrado con el receptor.
-
 1
1 -
 2
2
 |
 |