Sony TAM-100 Quick Start Guide
Sony TAM-100 Manual
 |
UPC - 027242552357
View all Sony TAM-100 manuals
Add to My Manuals
Save this manual to your list of manuals |
Sony TAM-100 manual content summary:
- Sony TAM-100 | Quick Start Guide - Page 1
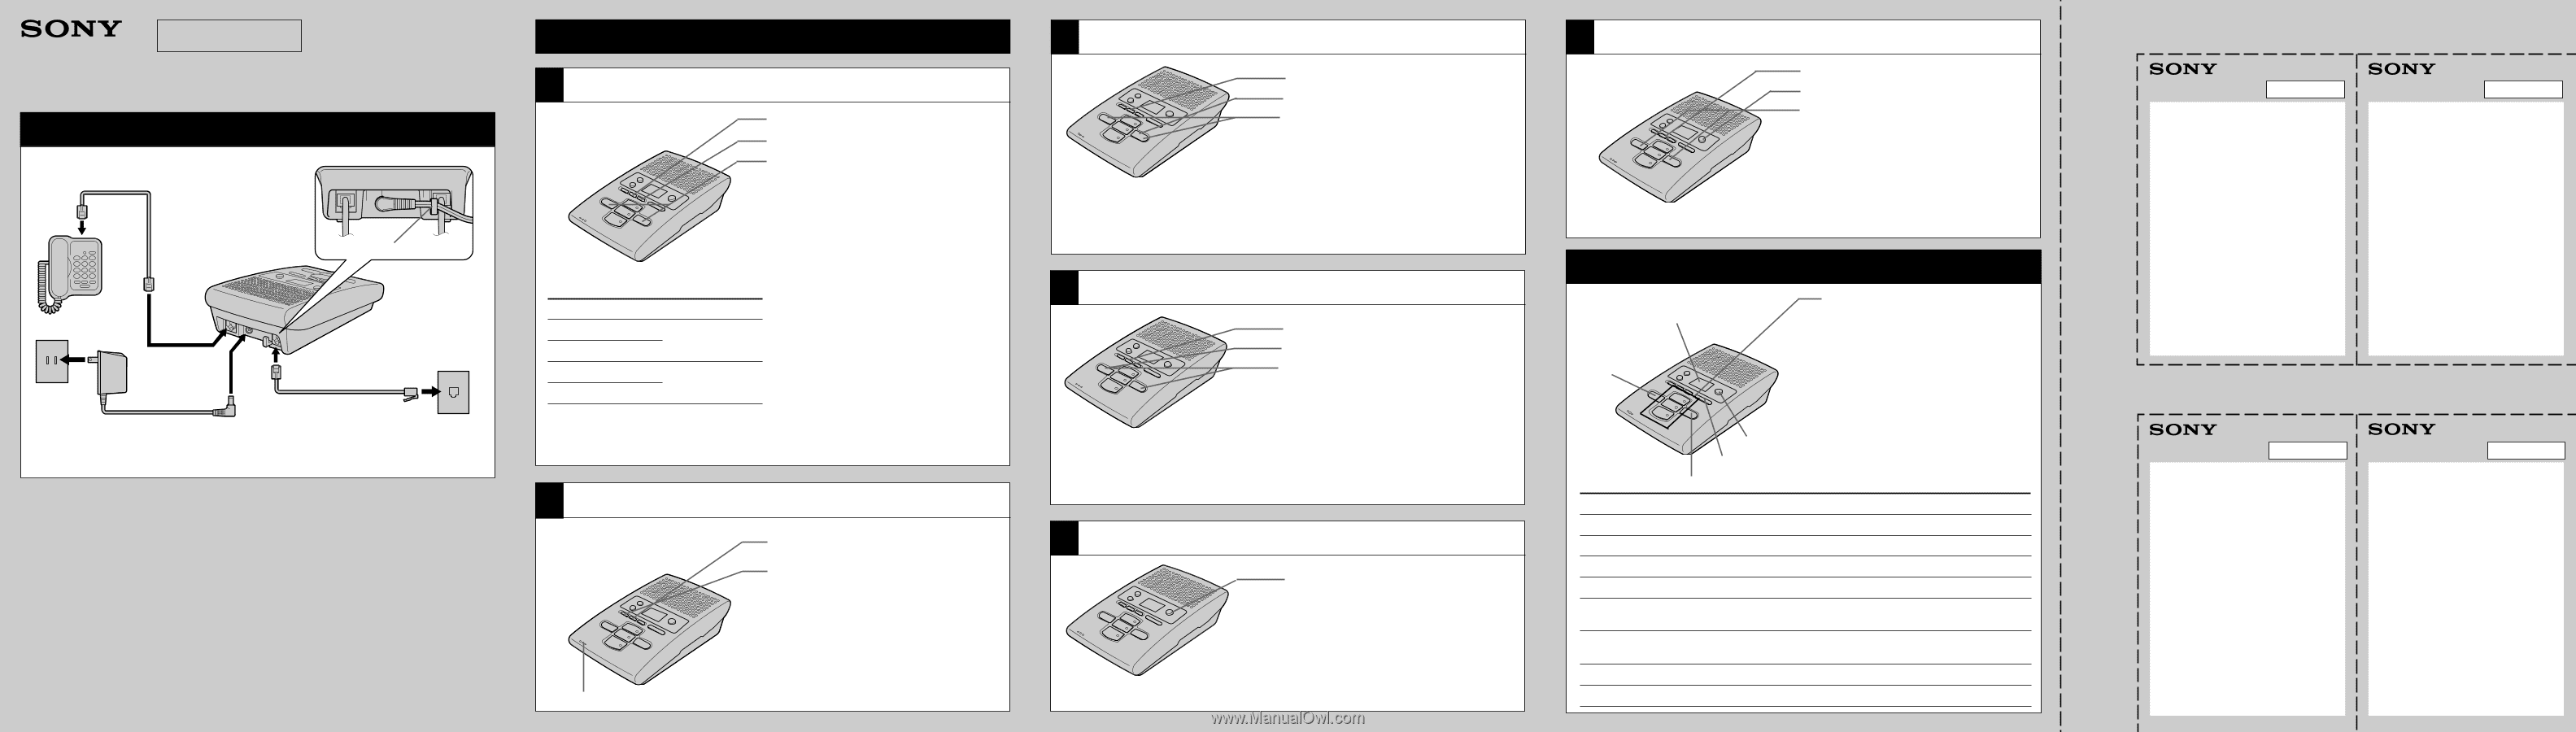
çaise se trouve au verso. Quick Start Guide 3-866-418-61(1) Telephone Answering Machine TAM-100 Setting up the answering machine 1 Connect the telephone line cord (supplied). Hook the cord. To AC outlet To TEL To DC IN 12V To LINE To telephone outlet 3 Connect the AC power adaptor (supplied - Sony TAM-100 | Quick Start Guide - Page 2
Arrêter l'opération en cours (*)(*) See reverse for English version. Répondeur Guide rapide d'utilisation automatique TAM-100 Installation du répondeur 1 Raccordez le cordon de ligne téléphonique (fourni). Accrochez le cordon. Vers une prise murale Vers TEL Vers DC IN 12V Vers LINE
-
 1
1 -
 2
2
 |
 |
3-866-418-
61
(1)
Telephone Answering
Machine
TAM-100
Quick Start Guide
La version française se
trouve au verso.
Setting up the answering machine
Sony Corporation
2001
Printed in China
1
Press
(SET/REC)
.
2
Press
(GREETING)
.
3
Start recording.
Speak about 12 inches (30 cm)
away from the microphone.
4
Press
(SET/REC)
to stop
recording.
2
Recording the greeting
To
Press
Advance the day
Increase hour/minute
Go back the day
Decrease hour/minute
1
Press
(SET/REC)
.
2
Press
(TIME)
.
3
Press
(SKIP/QUICK)
or
(REPEAT/SLOW)
repeatedly until
the correct day of the week is
announced.
See the table on the left for use of
(SKIP/QUICK)
and
(REPEAT/SLOW)
.
4
Press
(SET/REC)
.
5
Press
(SKIP/QUICK)
or
(REPEAT/SLOW)
repeatedly until
the correct hour is announced.
6
Press
(SET/REC)
.
7
Press
(SKIP/QUICK)
or
(REPEAT/SLOW)
repeatedly until
the correct minute is
announced.
8
Press
(SET/REC)
.
Preparing the answering machine
1
Setting the day and time
(REPEAT/SLOW)
(SKIP/QUICK)
Remote Control Card
Cut along the dotted line.
We have given you one spare.
TAM-100
Remote ID code
N
1
Call your phone from a touch-
tone phone.
2
While you hear the greeting play,
press
(#)
, and your remote ID
code (security code).
You hear a long confirmation
beep and the greeting stops.
Following the voice guide
informing you of the number of
messages recorded, the
answering machine stands by for
you to enter a control code.
3
To quit, hang up the phone.
If you forgot to turn the
answering function on
Call your phone and let it ring 10
times until it answers. Then the
answering function automatically
turns on.
Carte de commande à distance
Coupez la carte en suivant les pointillés. Vous disposez d’une carte de rechange.
TAM-100
Code d’identification
N
à distance
1
Composez votre numéro depuis
un téléphone à touches.
2
Lorsque vous entendez le
message de salutation, appuyez
sur
(#)
et indiquez votre code
d’identification à distance (code
de sécurité).
Vous devez entendre un long bip
de confirmation et le message de
salutation s’arrête.
Après le guide vocal qui vous
indique le nombre de messages
enregistrés, la machine attend que
vous tapiez un code de
commande.
3
Raccrochez lorsque vous avez fini.
Si vous avez oublié de mettre
le répondeur en marche
Composez votre numéro et laissez-le
sonner 10 fois jusqu’à ce qu’il
réponde. Le répondeur se met alors
en marche.
To telephone outlet
3
Connect the AC power
adaptor (supplied AC-T70).
To AC outlet
1
Connect the telephone
line cord (supplied).
2
Connect the telephone
line cord.
To TEL
To LINE
To DC IN 12V
Hook the cord.
MIC (Microphone)
Press
(ANSWER°ON/OFF)
so that
it lights up in red.
5
Turning on the answering function
1
Press
(SET/REC)
.
2
Press
(REPEAT/SLOW)
.
3
Press
(SKIP/QUICK)
or
(REPEAT/SLOW)
.
The current setting is around.
4
Press
(SKIP/QUICK)
or
(REPEAT/SLOW)
repeatedly to
select a ring duration.
5
Press
(SET/REC)
.
4
Selecting the answering mode
When there are newly recorded
messages,
(ANSWER°ON/OFF)
flashes in
red, or the display window
shows the total number of new
messages and the MAIL BOX
indicator flashes, press the
mailbox button
(
(MAIL°BOX°1)
,
(MAIL°BOX°2)
or
(MAIL°BOX°3)
).
Use the following buttons to play
back messages in various ways.
To
Do this
Adjust the speaker volume
Press
(VOLUME)
(+)
or
(--)
.
Stop playback
Press the mailbox button again.
Replay the messages
Press the mailbox button again.
Skip to the next message
Press
(SKIP/QUICK)
while the current message is playing.
Repeat the current message
Press
(REPEAT/SLOW)
while the current message is
playing.
Go back to previous messages
Press
(REPEAT/SLOW)
within the first three seconds
of the current message.
Play back slowly
Keep
(REPEAT/SLOW)
pressed during playback.
Play back quickly
Keep
(SKIP/QUICK)
pressed during playback.
Playing back messages
Display window
(VOLUME)
(SKIP/QUICK)
(REPEAT/SLOW)
(ANSWER°ON/OFF)
1
Press
(SET/REC)
.
2
Press
(ANSWER°ON/OFF)
.
3
Set a two-digit number
between 00 and 99 by pressing
(SKIP/QUICK)
or
(REPEAT/SLOW)
.
Press
(SKIP/QUICK)
to increase a
number, or
(REPEAT/SLOW)
to
decrease.
4
Press
(SET/REC)
.
6
Setting the remote ID code (security code)
1
Press
(SET/REC)
.
2
Press
(SKIP/QUICK)
.
3
Press
(SKIP/QUICK)
or
(REPEAT/SLOW)
.
The current setting is around.
4
Press
(SKIP/QUICK)
or
(REPEAT/SLOW)
repeatedly to
select a ring duration.
5
Press
(SET/REC)
.
3
Selecting the ring time