Sony UP-D895 User Instructions
Sony UP-D895 Manual
 |
View all Sony UP-D895 manuals
Add to My Manuals
Save this manual to your list of manuals |
Sony UP-D895 manual content summary:
- Sony UP-D895 | User Instructions - Page 1
2-345-260-11 (4) Digital Graphic Printer Instructions for Use UP-D897 © 2005 Sony Corporation - Sony UP-D895 | User Instructions - Page 2
upon your Sony dealer regarding Refer servicing to digital device pursuant to Subpart B of Part 15 of FCC Rules. For the customers in Canada This unit has been certified according to Standard CSA C22.2 No.601.1. For the customers in the U.S.A. and Canada Model UP-D897 the instruction manual, - Sony UP-D895 | User Instructions - Page 3
proper ratings (Voltage, Ampere). If you have questions on the use of the above Power Cord/Appliance Connector/Plug, please consult a qualified service personnel. Warning on power connection for medical use Please use the following power supply cord. With connectors (plug or female) and cord types - Sony UP-D895 | User Instructions - Page 4
14 Feeding Paper 14 Adjusting the Contrast and Brightness 15 Others Precautions 16 On Safety 16 On the Printer Carriage 16 On Installation 16 Maintenance 17 Cleaning the Cabinet 17 Cleaning the Thermal Head 17 Cleaning the Platen Roller 17 Specifications 18 Troubleshooting 19 Error - Sony UP-D895 | User Instructions - Page 5
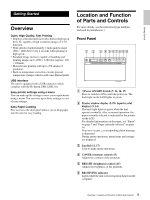
Fast Printing • Employs a thin thermal head with a built-in high a set of user settings. Easy Paper Loading Free access to the door panel allows you to drop paper into the unit light on the LCD lights in green. B Printer window display (LCD: liquid crystal display) (9, 14) The back light lights in - Sony UP-D895 | User Instructions - Page 6
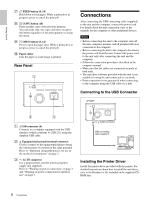
use" on page 3. to (USB) connector USB connecting cable (supplied) Installing the Printer Driver Install the printer driver provided with the printer. For detailed instructions about how to install the unit driver, refer to the Readme.txt file included on the supplied CDROM disc. 6 Connections - Sony UP-D895 | User Instructions - Page 7
Started Paper Use only Sony UPP-110S/110HD/110HG paper designed for use with this unit. High print quality cannot be guaranteed if any other paper is used with this unit, and such paper could damage the unit. You cannot use the UPP-110HA as specified for the UP-D890/890 series printer. Paper You - Sony UP-D895 | User Instructions - Page 8
is set straight. 3 Remove the label from the leading edge of the paper, pull out about 15~20 cm (about 6~8 in.) of the paper, and then set the paper roll in the paper tray. Note To avoid exposing the paper to dust, dirt, etc. always handle it carefully when removing from its package and loading - Sony UP-D895 | User Instructions - Page 9
set up the unit according to its intended purpose, connected equipments or your individual preferences. You can store up to three settings as a set of user settings. flow chart, and you can make the settings for each menu item. Operation 9 Adjustments and Settings Using the Menu - Sony UP-D895 | User Instructions - Page 10
printer driver to be used CO:895: UP-D895 driver conversion mode. Uses the printer driver for the UPD895. [CO:897]: Uses the printer driver for the UP-D897 setting change and returns to the item selection column. To select the type of paper ME:S: Uses the UPP-110S. ME:HD: Uses the UPP110HD. [ME: - Sony UP-D895 | User Instructions - Page 11
is enlarged [RS:OFF]: Prints the image at the original size. RS:ON: Prints the image at a larger size, according to the paper size set by the printer driver. BACK: Cancels the setting change and returns to the item selection column. SAVE SHARP b) SIDE c) To register up to three kinds of settings - Sony UP-D895 | User Instructions - Page 12
Operation The back light on the LCD lights in green. LCD 4 Press the jog dial. 2 Confirm that "READY" is displayed on the LCD, and press the jog dial. The unit enters the mode in which you can select the printing direction. "DI:NOR," which is the factory setting, is displayed on the LCD. "DI:NOR - Sony UP-D895 | User Instructions - Page 13
Operation To cancel the setting 1 Display "BACK" by turning the jog dial in step 5. 2 Press the jog dial. The display on the LCD returns to "DIR." To continue menu operations Make settings by repeating steps 3 to 5. To end the menu operation 1 Display "BACK" by turning the jog dial after performing - Sony UP-D895 | User Instructions - Page 14
points: • unit connected correctly? (page 6) • Printer driver installed? (page 6) • Paper loaded correctly? (page 7) • Menu settings and menu the error message stating the problem is displayed on the LCD. Message EMPTY DOOR Cause and remedy Paper is not loaded. Load paper. The door is open - Sony UP-D895 | User Instructions - Page 15
weaker: Turn the CONTR control counterclockwise. Note The contrast adjusting function is equivalent to "Light" of the density control provided with the printer driver. The value adjusted by using this CONTR control is added to the value already set as "Light." To adjust the brightness You can - Sony UP-D895 | User Instructions - Page 16
. • Do not disassemble the cabinet. Refer servicing to qualified personnel only. • Connect the power paper cutter A paper cutter is mounted with the unit. When loading a paper or cleaning the unit, be careful not to touch the paper cutter. Touching the paper cutter may cause injury. On the Printer - Sony UP-D895 | User Instructions - Page 17
the cleaning sheet supplied. Carry out the head cleaning operation using the menu. Note A paper cutter is mounted with the unit. When cleaning the thermal head, be careful not to touch the paper cutter. Touching the paper cutter may cause injury. 1 Press the power ON/OFF switch to ON to turn the - Sony UP-D895 | User Instructions - Page 18
-Speed USB (USB 2.0) Accessories provided Thermal head cleaning sheet (1) CD-ROM (including multi-lingual operating instructions, Readme and printer driver) (1) Media label (1) USB cable 1-824-211-41 (SONY) (1) Before Using this Printer (1) Service Contact List (1) Software License (1) 18 - Sony UP-D895 | User Instructions - Page 19
The design and these specifications are subject to change without prior notification. Troubleshooting Before you call for service, please check the problems and solutions described below. If you cannot solve the problem, contact the nearest authorized dealer. Symptom Causes/remedies First few - Sony UP-D895 | User Instructions - Page 20
to correct the problem. Messages DOOR EMPTY COOL LOCK WAIT Description and remedy The paper door is open. tClose the paper door until it is locked securely. • There is no paper loaded. • Paper has been used up. tLoad some paper. (page 7) The protection circuit that prevents the thermal head from - Sony UP-D895 | User Instructions - Page 21
17 cleaning the thermal head 17 Menu basic paper you can use 7 Precautions on installation 16 paper cutter 16 printer carriage 16 safety 16 Printer driver 6 Printing adjusting the brightness 15 adjusting the contrast 15 cancelling 14 staring a print job 14 S Specifications 18 T Troubleshooting - Sony UP-D895 | User Instructions - Page 22
Sony Corporation
-
 1
1 -
 2
2 -
 3
3 -
 4
4 -
 5
5 -
 6
6 -
 7
7 -
8
-
9
-
10
-
11
-
12
-
13
-
14
-
15
-
16
-
17
-
18
-
19
-
20
-
21
-
22
 |
 |

2-345-260-
11
(4)
Digital Graphic
Printer
© 2005 Sony Corporation
UP-D897
Instructions for Use