Sony UP-D895 User Instructions - Page 6
Connections - manual
 |
View all Sony UP-D895 manuals
Add to My Manuals
Save this manual to your list of manuals |
Page 6 highlights
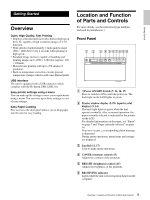
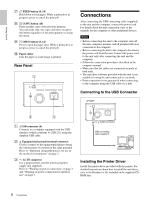
Getting Started G FEED button (8, 14) Hold down to feed paper. While a print job is in progress, press to cancel the print job. H COPY button (14) Prints another copy of the previous printout. You can make only one copy each time you press this button regardless of the print quantity set using the menu. I OPEN button (8, 14) Press to open the paper door. While a print job is in progress, press to cancel the print job. J Paper cutter Cuts the paper as each image is printed. Rear Panel Connections After connecting the USB connecting cable (supplied) to the unit and the computer, connect the power cord. For details about the unit connection, refer to the manuals for the computer or other peripheral devices. Notes • Before connecting the unit to the computer, turn off the unit, computer, monitor, and all peripheral devices connected to the computer. • Before connecting the unit to the computer, disconnect the power cord from the unit. Connect the power cord to the unit only after connecting the unit and the computer. • Follow the connection procedures described in the computer manual. • Make sure that the cables are connected securely at both ends. • The unit drive software provided with the unit is not suitable for using the unit connected to a network. • Printer operation is not guaranteed when connecting to the computer using the USB cable via a hub. Connecting to the USB Connector UP-D897 A USB connector (6) Connects to a computer equipped with the USB interface (which conforms to USB 2.0), using the supplied USB cable. B Equipotential ground terminal connector Used to connect to the equipotential plug to bring the various parts of a system to the same potential. Refer to "Important safeguards/notices for use in the medical environments" on page 2. C - AC IN connector Use a proper power cord for your local power supply (not supplied). Refer to "Warning on power connection" on page 3 and "Warning on power connection for medical use" on page 3. to (USB) connector USB connecting cable (supplied) Installing the Printer Driver Install the printer driver provided with the printer. For detailed instructions about how to install the unit driver, refer to the Readme.txt file included on the supplied CDROM disc. 6 Connections
-
 1
1 -
 2
2 -
 3
3 -
 4
4 -
 5
5 -
 6
6 -
 7
7 -
 8
8 -
 9
9 -
 10
10 -
 11
11 -
 12
12 -
13
-
14
-
15
-
16
-
17
-
18
-
19
-
20
-
21
-
22
 |
 |