Sony UP-DP10 Operating Instructions / Mode d’emploi
Sony UP-DP10 Manual
 |
View all Sony UP-DP10 manuals
Add to My Manuals
Save this manual to your list of manuals |
Sony UP-DP10 manual content summary:
- Sony UP-DP10 | Operating Instructions / Mode d’emploi - Page 1
3-203-973-11(1) Digital Photo Printer Operating Instructions Page 2 GB Mode d'emploi Page 37 FR UP-DP10 © 2000 Sony Corporation - Sony UP-DP10 | Operating Instructions / Mode d’emploi - Page 2
of Conformity Trade Name: SONY Model No: UP-DP10 Responsible Party: Sony Electronics Inc. Address: 1 Sony Drive, Park Ridge, to comply with the limits for a Class B digital device, pursuant to Part 15 of the FCC and used in accordance with the instructions, may cause harmful interference to - Sony UP-DP10 | Operating Instructions / Mode d’emploi - Page 3
16 Removing the Ink Ribbon Cartridge and the Printing Paper 19 Making Printer Setting from your Computer 20 With Windows 20 With the Macintosh 25 Miscellaneous 31 Maintaining the Performance of the Printer 31 Troubleshooting 31 If the Paper Jams 33 Main Specifications 35 3 Table of - Sony UP-DP10 | Operating Instructions / Mode d’emploi - Page 4
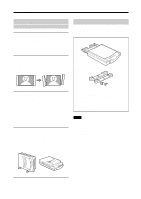
(driver, application) (1) Operating Manual (this manual) (1) Software license agreement (1) Warranty (1) Notes • We recommend saving the box and the packing materials in case it is necessary to transport or ship the printer. • When shipping the printer, remove the ink cartridge and the paper supply - Sony UP-DP10 | Operating Instructions / Mode d’emploi - Page 5
of RAM • At least 30MB of hard disk space • A printer port* *Please see the user's manual provided with your computer for the appropriate type of printer cable. Note When using device driver (Windows\system\lpt.vxd) version 4.00.953 in Windows 95, normal printing might be impossible. In this event - Sony UP-DP10 | Operating Instructions / Mode d’emploi - Page 6
View> 5 6789 1 Operation switch 5 Bottom cover 2 Ribbon cartridge cover 6 USB port 3 Lamps 7 Parallel port POWER lamp PRINT lamp 8 AC power inlet PAPER lamp RIBBON lamp 9 Ventilation holes ALARM lamp The lamps indicate the printer status by lighting or flashing. For details, refer to - Sony UP-DP10 | Operating Instructions / Mode d’emploi - Page 7
printer, the computer, the monitor, etc. • Read the operating manual for the personal computer carefully. • When connecting to a printer port, we recommend using a shielded printer when making the connections. • The driver provided with this printer does not support usage through a network. • Proper - Sony UP-DP10 | Operating Instructions / Mode d’emploi - Page 8
36-pin connector) Windows 95/98 computer Note When using the printer in fast transfer mode (ECP mode), use an IEEE1284-compliant cable. Note that in order to use fast transfer mode, the parallel port must be set up on the personal computer side. For details, refer to the operating manual for the - Sony UP-DP10 | Operating Instructions / Mode d’emploi - Page 9
Printer Driver With Windows 98 Install the printer driver that is contained in the CD-ROM that is provided with the printer. The "printer driver" is the software that allows you to print on the UP-DP10, using the Print function of typical application software. Before installing the printer driver - Sony UP-DP10 | Operating Instructions / Mode d’emploi - Page 10
as shown below. 9 Select [Search for the best driver for your device], and then click [Next]. The window changes as shown below. 12 If necessary, you can type a name for the printer in the [Printer name] field. Then, click [Finish]. The window changes as shown below. 13Click [Finish]. The wizard - Sony UP-DP10 | Operating Instructions / Mode d’emploi - Page 11
the "Add New Hardware Wizard" dialog box does not appear when Windows 98 starts up, install the printer by selecting [Start] t [Settings] t[Printers] t[Add Printer]. 2 Click [Next]. The window changes as shown below. 4 Place the "Printer Software UP-DP10" CD- ROM in the CD-ROM drive. 5 Select the - Sony UP-DP10 | Operating Instructions / Mode d’emploi - Page 12
the procedure described here, depending on the Windows 95 version that you are using. If that is the case, refer to your Windows 95 operating manual for instructions. 3 Select [Other Locations]. The window changes as shown below. 4 Place the "Printer Software UP-DP10" CD- ROM in the CD-ROM drive - Sony UP-DP10 | Operating Instructions / Mode d’emploi - Page 13
below. 6 Click [Finish]. The window changes as shown below. With the Macintosh OS Install the printer driver that is contained in the CD-ROM that is provided with the printer. 1 Place the "PRINTER SOFTWARE UP- DP10" CD-ROM in the Macintosh's CDROM drive. The "PRINTER SOFTWARE" icon appears on the - Sony UP-DP10 | Operating Instructions / Mode d’emploi - Page 14
"Border" is selected in the printer driver, each of the print sizes will be reduced somewhat. Notes on Using Print Packs • The ink ribbon cartridge is designed to allow you to print an image on each of the sheets in the Print Pack. • If photos taken with a digital camera that has a 3:4 aspect ratio - Sony UP-DP10 | Operating Instructions / Mode d’emploi - Page 15
• If photos taken with a digital camera that has a 2:3 aspect ratio (V:H) are printed on the paper in a UPC-10P34 Print Pack, the printed image may extend beyond the left and right perforations, or white border may appear at the top and bottom of the paper. • Use the ink ribbon cartridge and paper - Sony UP-DP10 | Operating Instructions / Mode d’emploi - Page 16
Print Loading the Ink Ribbon Cartridge and Printing Paper Loading the Ink Ribbon Cartridge Note Do not touch ink ribbon cartridge, and make sure that the ink ribbon cartridge is facing the right way. Align the protuberances on the cartridge with the grooves in the printer and slide the cartridge in - Sony UP-DP10 | Operating Instructions / Mode d’emploi - Page 17
the ribbon cartridge cover, and then make sure that the RIBBON lamp has turned off. Loading the Printing Paper Note Never touch the printing side (the blank, glossy side) of the paper. Doing so could leave fingerprints, which will harm image quality. 1 Fan the paper thoroughly. If the paper is - Sony UP-DP10 | Operating Instructions / Mode d’emploi - Page 18
, attach the provided tray cover to the paper supply/eject tray when you take the tray out of the printer. The printer is now ready to print. To print, first read "Preparing to Print" (page 14). Once printer setup is complete, use the Print function in any typical application software to print. 18 - Sony UP-DP10 | Operating Instructions / Mode d’emploi - Page 19
Removing the Ink Ribbon Cartridge and the Printing Paper Removing the ink ribbon cartridge 1 Open the ribbon cartridge cover. 2 Grasp the handle and pull the cartridge out. Removing the printing paper 1 Pull the paper supply/eject tray out of the printer. 2 Lift the metal plate at the bottom of the - Sony UP-DP10 | Operating Instructions / Mode d’emploi - Page 20
. The "SONY UP-DP10: Properties" dialog box has tabs that are standard for the OS, and tabs that are specific to the UP-DP10. The following section explains the tabs that are specific to the UP-DP10: [Paper] and [Graphics]. Note also that although the sample screens are taken from Windows 98, the - Sony UP-DP10 | Operating Instructions / Mode d’emploi - Page 21
a textured finish. • If [Matte] is selected, prints are produced with a matte finish. < [About...] Clicking this button displays the version information for the printer driver. < [Restore Defaults] Clicking this button restores all of the settings under the [Paper] tab to their initial values. 21 - Sony UP-DP10 | Operating Instructions / Mode d’emploi - Page 22
Making Printer Setting from your Computer [Graphics] tab settings This tab is used processing that is suited for digital camera images is performed on the image. • Optimal processing can be performed by selecting [Auto]. • Selecting [Custom] allows you to manually set [Intensity] and [Saturation - Sony UP-DP10 | Operating Instructions / Mode d’emploi - Page 23
Use this screen to adjust the color balance of the printer, either by dragging the sliders left or right, clicking on [ v ] or [ V], or by inputting a value directly through the keyboard. < [Tone Curve] You can adjust values output by the printer with respect to values input by choosing a tone curve - Sony UP-DP10 | Operating Instructions / Mode d’emploi - Page 24
Making Printer Setting from your Computer < [Sharpness] Use this screen to adjust the contour emphasis of the image, either by dragging the sliders left or right, clicking - Sony UP-DP10 | Operating Instructions / Mode d’emploi - Page 25
Chooser must be performed the first time that you use the UP-DP10,, and whenever you have been using another printer and now want to use the UP-DP10. 1 Select the Chooser from the Apple menu. The Chooser window opens. 2 Select the UP-DP10 icon from among the icons displayed on the left side of - Sony UP-DP10 | Operating Instructions / Mode d’emploi - Page 26
Setup" from the "File" menu. All of the items in the "Page Setup" dialog box are described below. < "Paper Type" Select the type of Print Pack that has been loaded in the printer from among "UPC-10P23," "UPC-10P34," and "UPC-10S01." < "Scale" Specify the enlargement/reduction ratio. Any integer - Sony UP-DP10 | Operating Instructions / Mode d’emploi - Page 27
Printing Settings The "Print" dialog box appears if "Print" is selected from the "File" menu. Select either "General" or "Color Correction" from the pop-up menu near the top of the dialog box to set various items. "General" settings < "Copies" Set a value from 1 to 25. < "Pages" Specify the range - Sony UP-DP10 | Operating Instructions / Mode d’emploi - Page 28
suited for digital camera images is performed on the image. • Optimal processing can be performed by selecting "Auto." • Selecting "Custom" allows you to manually set to adjust the color balance of the printer. • Click "Restore Defaults" to return all of the settings on this screen to their initial - Sony UP-DP10 | Operating Instructions / Mode d’emploi - Page 29
< "Tone Curve" You can adjust values output by the printer with respect to values input by choosing a tone curve setting of "Hard" or "Soft". < "Sharpness" Use the scroll bar on this screen to adjust the - Sony UP-DP10 | Operating Instructions / Mode d’emploi - Page 30
Making Printer Setting from your Computer < "ColorSync" The following items can be set if the "Use ColorSync" option is on: • In the "Profile" pop-up menu, specify the UP-DP10 profile. • In the "Intent" pop-up menu, select one of the following for color reproduction mapping: Perceptual (Images) - Sony UP-DP10 | Operating Instructions / Mode d’emploi - Page 31
Sony service center. Symptom Cause/Remedy Power does not go on. • Check that the printer's power cord is plugged in properly. t Properly connect the power cord as explained in "Connecting the Power Supply" (page 8). Printer does not print • Check that the ink ribbon cartridge and printing paper - Sony UP-DP10 | Operating Instructions / Mode d’emploi - Page 32
as explained in "Loading the Printing Paper" (page 17) • Check whether the ink ribbon cartridge or printing paper are dirty. t Load a new ink ribbon cartridge or clean printing paper. Status Indications The printer status is indicated by the POWER, PRINT, PAPER, RIBBON, and ALARM lamps lighting or - Sony UP-DP10 | Operating Instructions / Mode d’emploi - Page 33
ribbon cartridge cover is open. t Close the cover. • The bottom cover is open. t Close the cover. All a lamps • A problem has occurred that requires repair by service personnel. t Contact your dealer or the nearest Sony Service Center. If the Paper Jams If the paper jams while the printer - Sony UP-DP10 | Operating Instructions / Mode d’emploi - Page 34
2 Turn the ink ribbon cartridge over, turn the gear in the direction indicated by the arrow, and advance the ribbon until the cellophane tape is no longer visible. Cellophane tape Notes • If you cannot remove the jammed paper, contact your dealer or the nearest Sony Service Center. • Do not attempt - Sony UP-DP10 | Operating Instructions / Mode d’emploi - Page 35
Main Specifications Power supply 100 to 120 VAC (50 Hz/60 Hz) Current consumption 1.0 Amax. Tray case (1) Ink ribbon cartridge (sufficient for printing 10 sheets) (1) Print paper (5 sheets each of UPC- 10P23 and UPC-10P34) (1) CD-ROM (1) Operating Manual (1) Software license agreement (1) Warranty - Sony UP-DP10 | Operating Instructions / Mode d’emploi - Page 36
Data, pull up to +3.3V by a 1.5 Ω resistor Cable ground The specifications and appearance of this printer are subject to change without notice. Within the bi-directional parallel interface (IEEE STD 1284-1994) standard, the UP-DP10 supports Compatible mode, Reverse Nibble mode, and ECP mode. 36 - Sony UP-DP10 | Operating Instructions / Mode d’emploi - Page 37
AVERTISSEMENT CET APPAREIL DOIT ÈTRE RELIÉ À LA TERRE. AVERTISSEMENT Afin d'éviter tout risque d'incendie ou d'électrocution, ne pas exposer cet appareil à la pluie ou à l'humidité. Afin d'écarter tout risque d'électrocution, garder le coffret fermé. Ne confier l'entretien de l'appareil qu'à - Sony UP-DP10 | Operating Instructions / Mode d’emploi - Page 38
photo numérique 39 Vérification du contenu de l'emballage 39 Conditions requises 40 Nomenclature 41 Installation et connexion 42 Fixation des supports de l'ordinateur 55 Avec Windows 55 Avec Macintosh 60 Divers 66 Maintien des performances de l'imprimante 66 Guide de dépannage 66 En cas - Sony UP-DP10 | Operating Instructions / Mode d’emploi - Page 39
laminés Le processus de lamination s'effectue en même temps que l'impression des photos, ces dernières ne se décolorent pas avec le temps. Vous pouvez sé que 2,7 kg et est de ce fait légère et facile à manipuler. Supports (2) Cordon d'alimentation (1) Boîtier de plateau (1) Cartouche ruban d'encre ( - Sony UP-DP10 | Operating Instructions / Mode d’emploi - Page 40
nécessaires pour pouvoir utiliser le UP-DP10. Lors de l'utilisation d'un ordinateur avec Windows < Conditions requises pour la connexion plus récente du pilote chez le distributeur Windows 95. Lors de l'utilisation D'un Macintosh • Un ordinateur Power Macintosh avec Mac OS 8.6 ou ultérieur, équipé - Sony UP-DP10 | Operating Instructions / Mode d’emploi - Page 41
du socle 2 Couvercle de la cartouche ruban 6 Port USB 3 Témoins 7 Port parallèle Témoin POWER Témoin PRINT 8 Prise d'alimentation CA Témoin PAPER Témoin RIBBON 9 Fentes de ventilation Témoin ALARM Les témoins indiquent l'état de l'imprimante en s'allumant ou en clignotant. Pour les - Sony UP-DP10 | Operating Instructions / Mode d’emploi - Page 42
peuvent être fixés par des vis. Le montage des supports dépend de la position d'utilisation de l'imprimante verticale ou ) - Sony UP-DP10 | Operating Instructions / Mode d’emploi - Page 43
Mise sous/hors tension Appuyer sur l'interrupteur d'alimentation pour allumer le témoin POWER. Pour éteindre, appuyer de nouveau sur l'interrupteur. Ordinateur avec Windows 95/98 Au port parallèle (connecteur Amphénol à 36 broches) Remarque Lors de l'utilisation de l'imprimante en mode de transfert - Sony UP-DP10 | Operating Instructions / Mode d’emploi - Page 44
un câble USB 1 Mettre tout d'abord l'imprimante sous tension, puis l'ordinateur. Une fois Windows 98 lancé, la fenêtre "Assistant Ajout de nouveau matériel" apparaît. 4 Placer le CD-ROM "Printer Software UP- DP10" dans le lecteur CD-ROM. 5 Sélectionner l'option [Définir un emplacement], cliquer sur - Sony UP-DP10 | Operating Instructions / Mode d’emploi - Page 45
7 Cliquer sur [Terminer]. La fenêtre change comme ci-dessous. 10 Sélectionner l'option [Définir un emplacement], cliquer sur [Parcourir], spécifier le dossier [Win98\French] dans le CD-ROM, puis cliquer sur [Suivant]. La fenêtre change comme ci-dessous. 8 Cliquer sur [Suivant]. La fenêtre change - Sony UP-DP10 | Operating Instructions / Mode d’emploi - Page 46
matériel" n'apparaît pas lorsque Windows 98 est lancé, il faut installer l'imprimante en sélectionnant [Démarrer] t [Paramètres] t[Inmprimantes] t[Ajout d'imprimante]. 2 Cliquer sur [Suivant]. La fenêtre change comme ci-dessous. 4 Placer le CD-ROM "Printer Software UP- DP10" dans le lecteur CD-ROM - Sony UP-DP10 | Operating Instructions / Mode d’emploi - Page 47
édure décrite ici en fonction de la version Windows 95 utilisée. Si cela est le cas, se reporter au mode d'emploi Windows 95 pour les instructions. 3 Sélectionner [Autres emplacements]. La fenêtre change comme ci-dessous. 4 Placer le CD-ROM "Printer Software UP- DP10" dans le lecteur CD-ROM. 47 - Sony UP-DP10 | Operating Instructions / Mode d’emploi - Page 48
ône "PRINTER SOFTWARE" apparaît dans le bureau. 2 Faire un double clic sur l'icône "Driver" pour ouvrir le dossier. 3 Faire un double clic sur l'icône "Chooser" pour ouvrir le dossier. 4 Cliquer deux fois sur l'icône "UP-DP10 Install-F" pour lancer l'installation. 5 Suivre les instructions affichées - Sony UP-DP10 | Operating Instructions / Mode d’emploi - Page 49
doit être acheté séparément. Le tableau suivant liste les types de packs d'impression Sony disponibles. Produit No. Type UPC- Cartes 10P23 photo UPC- Cartes 10P34 photo UPC10S01 Stickers photo brillants Taille/nombre de feuilles Caractéristiques 100 × 180 mm (100 × 152 mm après avoir coupé) 25 - Sony UP-DP10 | Operating Instructions / Mode d’emploi - Page 50
Préparation à l'impression • Si des photos prises avec un appareil photo numérique d'un ratio d'aspect de 2:3 (V:H) de bourrage de papier, ne pas tirer seulement le papier coincé. Retirer le papier en suivant les instructions de la procédure "En cas de bourrage de papier" (page 68). • Si le ruban - Sony UP-DP10 | Operating Instructions / Mode d’emploi - Page 51
Chargement de la cartouche ruban d'encre et du papier d'impression Chargement de la cartouche ruban d'encre Remarque Ne pas toucher le ruban d'encre. Les traces de doigts sur le ruban d'encre risquent de détériorer la qualité de l'image. 1 Retendre le mou dans le ruban d'encre en tournant dans la - Sony UP-DP10 | Operating Instructions / Mode d’emploi - Page 52
Préparation à l'impression 4 Fermer le couvercle de la cartouche ruban et s'assurer que le témoin RIBBON est éteint. Chargement du papier d'impression Remarque Ne pas toucher le ruban d'encre. Les traces de doigts sur le ruban d'encre risquent de détériorer la qualité de l'image. 1 Ventiler la rame - Sony UP-DP10 | Operating Instructions / Mode d’emploi - Page 53
Aligner les protubérances sur le plateau avec les rainures sur l'imprimante, glisser le plateau le plus loin possible et vérifier que le témoin PAPER est éteint. Arrêtoir Remarques • Ne pas laisser plus de 10 feuilles s'accumuler sur le plateau d'alimentation/éjection du papier. • Pour éviter toute - Sony UP-DP10 | Operating Instructions / Mode d’emploi - Page 54
Préparation à l'impression Retrait de la cartouche ruban d'encre et du papier d'impression Retrait de la cartouche ruban d'encre 1 Ouvrir le couvercle de la cartouche ruban d'encre. 2 Tenir la languette et tirer la cartouche vers l'extérieur. Retrait du papier d'impression 1 Tirer le plateau d' - Sony UP-DP10 | Operating Instructions / Mode d’emploi - Page 55
jusqu'à ce qu'on quitte l'application. La boîte de dialogue "SONY UP-DP10 : Propriétés" possède des onglets standard pour OS et d'autres spé les onglets spécifiques à la UP-DP10 : [Paper] et [Graphics]. Noter que les écrans échantillons sont pris dans Windows 98 mais les articles de réglages, - Sony UP-DP10 | Operating Instructions / Mode d’emploi - Page 56
ce bouton pour afficher les informations sur la version du pilote d'imprimante. < [Restore Defaults] Cliquer sur ce bouton pour remettre tous les réglages de l'onglet [Paper] à leurs valeurs par défaut. 56 - Sony UP-DP10 | Operating Instructions / Mode d’emploi - Page 57
numérique pour corriger l'intensité et la saturation. • Si la case [Use Digital Camera Correction] est cochée, le traitement de correction d'image approprié à l'appareil photo numérique est appliqué à l'image. • Le traitement optimal est effectué lorsque [Auto] est sélectionné. • La sélection de - Sony UP-DP10 | Operating Instructions / Mode d’emploi - Page 58
Réglages d'imprimante à partir de l'ordinateur < [Color Balance] Utiliser cet écran pour régler l'équilibrage des couleurs de l'imprimante, soit en glissant les réglettes à gauche et à droite, soit en cliquant sur [ v ] ou [ V] ou en entrant directement une valeur par le clavier. < [Tone Curve] Il - Sony UP-DP10 | Operating Instructions / Mode d’emploi - Page 59
< [Sharpness] Utiliser cet écran pour régler l'accentuation du contour de l'image, soit en glissant les réglettes à gauche et à droite, soit en cliquant sur [ v ] ou [ V] ou en entrant directement une valeur par le clavier. Plus la valeur du réglage augmente, plus le contour de l'image est accentué. - Sony UP-DP10 | Operating Instructions / Mode d’emploi - Page 60
le Sélecteur doit être effectuée à la première utilisation de la UP-DP10 et chaque fois qu'une autre imprimante a été utilisée avant la UP-DP10. 1 Sélectionner Sélecteur dans le menu Apple. La fenêtre Sélecteur'ouvre. 2 Sélectionner l'icône UP-DP10 parmi les icônes affichées à gauche de la fenêtre - Sony UP-DP10 | Operating Instructions / Mode d’emploi - Page 61
Setup", sélectionner "Format d'impression" dans le menu "Fichier". Tous les articles de la boîte de dialogue "Page Setup" sont décrits ci-dessous. < "Paper Type" Sélectionner le type de pack d'impression chargé dans l'imprimante parmi "UPC-1023", "UPC-10P34" et "UPC-10S01". < "Scale" Spécifier le - Sony UP-DP10 | Operating Instructions / Mode d’emploi - Page 62
Réglages d'imprimante à partir de l'ordinateur Réglages d'impression La boîte de dialogue "Print" apparaît si "Imprimer" est sélectionné dans le menu "Fichier". Sélectionner "General" ou "Color Correction" dans le menu déroulant à côté du haut de la boîte de dialogue pour régler divers articles. Ré - Sony UP-DP10 | Operating Instructions / Mode d’emploi - Page 63
numérique pour corriger l'intensité et la saturation. • Si la case "Use Digital Camera Correction" est cochée, le traitement de correction d'image approprié à l'appareil photo numérique est appliqué à l'image. • Le traitement optimal est effectué lorsque "Auto" est sélectionné. • La sélection de - Sony UP-DP10 | Operating Instructions / Mode d’emploi - Page 64
Réglages d'imprimante à partir de l'ordinateur < "Tone Curve" Il est possible de régler les valeurs de sortie par l'imprimante en fonction des valeurs d'entrée en choisissant un réglage de courbe de tonalité entre "Hard" et "Soft". < "Sharpness" Utiliser la barre de défilement pour régler l' - Sony UP-DP10 | Operating Instructions / Mode d’emploi - Page 65
suivants peuvent être réglés si l'option "ColorSync" est activée : • Dans le menu déroulant "Profile", spécifier le profil de UP-DP10. • Dans le menu déroulant "Intent", sélectionner l'un des articles suivants pour le mappage de la reproduction couleur : Perceptual (Images) Saturation (Graphics - Sony UP-DP10 | Operating Instructions / Mode d’emploi - Page 66
ou tout autre matériau qui risquent d'endommager la finition du boîtier. Guide de dépannage Que faire ? Avant d'envoyer l'imprimante en réparation, refaire correctement, s'adresser au magasin d'achat de l'imprimante ou au service aprèsvente Sony. Symptôme Cause/Remède Impossible • Vérifier si le - Sony UP-DP10 | Operating Instructions / Mode d’emploi - Page 67
une nouvelle cartouche ruban d'encre ou du papier d'impression propre. Indications d'état L'état de l'imprimante est indiqué par les témoins POWER, PRINT, PAPER, RIBBON et ALARM qui s'allument ou qui clignotent. S'il y a un problème dans l'imprimante, agir en fonction de l'état indiqué par les - Sony UP-DP10 | Operating Instructions / Mode d’emploi - Page 68
cartouche ruban et retirer cette dernière. Remarque S'il n'est pas possible de retirer la cartouche ruban d'encre, contacter le revendeur ou le service après-vente Sony le plus proche. 4 Retirer le papier coincé. En cas de bourrage de papier S'il y a un bourrage de papier en cours d'impression, le - Sony UP-DP10 | Operating Instructions / Mode d’emploi - Page 69
plus voir la bande cellophane. Bande cellophane Remarques • S'il n'est pas possible de retirer le papier coincé, contacter le revendeur ou le service après-vente Sony le plus proche. • Ne pas essayer d'imprimer de nouveau alors que le papier coincé n'est pas encore dégagé. AVERTISSEMENT Ne jamais - Sony UP-DP10 | Operating Instructions / Mode d’emploi - Page 70
Accessoires Plateau d'alimentation/éjection du papier (1) Cordon d'alimentation (1) Supports (2) Boîtier du plateau (1) Cartouche ruban d'encre (suffisante pour Pack d'impression cartes photos UPC- 10P23 Pack d'impression cartes photos UPC- 10P34 Pack d'impression stickers photos brillants UPC-10S01 - Sony UP-DP10 | Operating Instructions / Mode d’emploi - Page 71
35 Non défini 36 E nSelectln IEEE 1284 Active IEEE 1284 Active Dans la norme d'interface parallèle bidirectionnelle (IEEE STD 1284-1994), la UPDP10 accepte les modes Compatible, Reverse Nibble et ECP. Interface USB Méthode de transfert de données Conforme à la révision 1.0 des spécifications de - Sony UP-DP10 | Operating Instructions / Mode d’emploi - Page 72
Sony Corporation Printed in Japan
-
 1
1 -
 2
2 -
 3
3 -
 4
4 -
 5
5 -
 6
6 -
 7
7 -
8
-
9
-
10
-
11
-
12
-
13
-
14
-
15
-
16
-
17
-
18
-
19
-
20
-
21
-
22
-
23
-
24
-
25
-
26
-
27
-
28
-
29
-
30
-
31
-
32
-
33
-
34
-
35
-
36
-
37
-
38
-
39
-
40
-
41
-
42
-
43
-
44
-
45
-
46
-
47
-
48
-
49
-
50
-
51
-
52
-
53
-
54
-
55
-
56
-
57
-
58
-
59
-
60
-
61
-
62
-
63
-
64
-
65
-
66
-
67
-
68
-
69
-
70
-
71
-
72
 |
 |

2000 Sony Corporation
3-203-973-
11(1)
Operating Instructions
Page 2
Mode d’emploi
Page 37
GB
FR
UP-DP10
Digital Photo Printer