Sony XAV-W651BT Operating Instructions - Page 35
Installation, Mounting the unit in a Japanese car
 |
View all Sony XAV-W651BT manuals
Add to My Manuals
Save this manual to your list of manuals |
Page 35 highlights
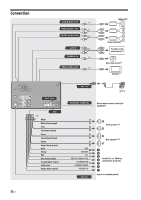
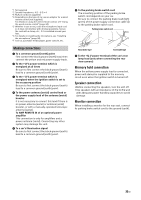
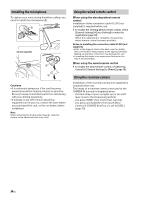
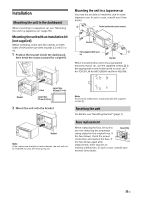
Installation Mounting the unit in the dashboard When mounting in a Japanese car, see "Mounting the unit in a Japanese car" (page 35). Mounting the unit with an installation kit (not supplied) Before installing, make sure the catches on both sides of the bracket are bent inwards 3.5 mm (5/32 in). 1 Position the bracket inside the dashboard, then bend the claws outward for a tight fit. Mounting the unit in a Japanese car You may not be able to install this unit in some Japanese cars. In such a case, consult your Sony dealer. To the dashboard/center console Bracket Parts supplied with your car Bracket When mounting this unit to the preinstalled brackets of your car, use the supplied screws in the appropriate screw holes based on your car: T for TOYOTA, M for MITSUBISHI and N for NISSAN. Bracket Catch Larger than 182 mm (7 1/4 in) Larger than 111 mm (4 3/8 in) 2 Mount the unit onto the bracket. Bracket Note If the catches are straight or bent outwards, the unit will not be installed securely and may spring out. Note To prevent a malfunction, install only with the supplied screws . Resetting the unit For details, see "Resetting the Unit" (page 7). Fuse replacement When replacing the fuse, be sure to Fuse (10 A) use one matching the amperage rating stated on the original fuse. If the fuse blows, check the power connection and replace the fuse. If the fuse blows again after replacement, there may be an internal malfunction. In such a case, consult your nearest Sony dealer. 35GB
-
 1
1 -
2
-
3
-
4
-
5
-
6
-
7
-
8
-
9
-
10
-
11
-
12
-
13
-
14
-
15
-
16
-
17
-
18
-
19
-
20
-
21
-
22
-
23
-
24
-
25
-
26
-
27
-
28
-
29
-
 30
30 -
 31
31 -
 32
32 -
 33
33 -
 34
34 -
 35
35 -
 36
36 -
 37
37 -
 38
38 -
 39
39 -
 40
40 -
41
-
42
-
43
-
44
-
45
-
46
-
47
-
48
-
49
-
50
-
51
-
52
-
53
-
54
-
55
-
56
-
57
-
58
-
59
-
60
-
61
-
62
-
63
-
64
-
65
-
66
-
67
-
68
-
69
-
70
-
71
-
72
-
73
-
74
-
75
-
76
-
77
-
78
-
79
-
80
-
81
-
82
-
83
-
84
-
85
-
86
-
87
-
88
-
89
-
90
-
91
-
92
-
93
-
94
-
95
-
96
-
97
-
98
-
99
-
100
-
101
-
102
-
103
-
104
-
105
-
106
-
107
-
108
 |
 |
