Sony XR-CA300 Primary User Manual - Page 5
Location of controls - installation manual
 |
View all Sony XR-CA300 manuals
Add to My Manuals
Save this manual to your list of manuals |
Page 5 highlights
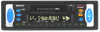
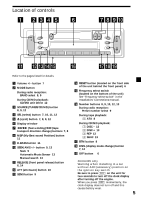
Location of controls RELEASE SOURCE SRC MODE SEL ATT SENS DISC 1 2 DIR REP SHUF 3 4 5 MBP D-BASS D OFF SEEK AMS ATA 6 BTM DSPL XR-CA300/CA305 Refer to the pages listed for details. 1 Volume +/- button 7 2 MODE button During radio reception: BAND select 8, 9 During CD/MD playback: CD/MD unit select 12 3 SOURCE (TUNER/CD/MD) button 8, 9, 12 4 SEL (select) button 7, 10, 11, 12 5 Z (eject) button 7, 8, 9, 12 6 Display window 7 m/M (fast winding)/DIR (tape transport direction change) buttons 7, 8 8 MBP (My Best sound Position) button 11 9 D-BASS button 11 q; SEEK/AMS +/- button 9, 13 Seek 9 Automatic Music Sensor 13 Manual search 13 qa RELEASE (front panel release) button 6, 14 qs ATT (attenuate) button 10 qd SENS button 9 qf RESET button (located on the front side of the unit behind the front panel) 6 qg Frequency select switch* (located on the bottom of the unit) See "Frequency select switch" in the Installation/Connections manual. qh Number buttons 8, 9, 10, 12, 13 During radio reception: Preset number select 9 During tape playback: (6) ATA 8 During CD/MD playback: (1) DISC - 13 (2) DISC + 13 (3) REP 13 (4) SHUF 13 qj BTM button 8 qk DSPL (display mode change) button 7, 12 ql OFF button** 6 * XR-CA305 only ** Warning when installing in a car without ACC (accessory) position on the ignition key switch Be sure to press (OFF) on the unit for two seconds to turn off the clock display after turning off the engine. When you press (OFF) momentarily, the clock display does not turn off and this causes battery wear. 5
-
 1
1 -
 2
2 -
 3
3 -
 4
4 -
 5
5 -
 6
6 -
 7
7 -
 8
8 -
 9
9 -
 10
10 -
 11
11 -
12
-
13
-
14
-
15
-
16
-
17
-
18
-
19
-
20
 |
 |
