Symphonic ST424FF Owner's Manual - Page 2
Preparation For Use, Operations - tv
 |
View all Symphonic ST424FF manuals
Add to My Manuals
Save this manual to your list of manuals |
Page 2 highlights
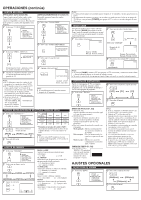
PREPARATION FOR USE CONNECTIONS Cables used here are available on the market. [ANTENNA CONNECTION] UHF/VHF Rod Antenna (Not supplied) [CATV/SATELLITE CONNECTION] INSTALLING THE BATTERIES 1 2 3 Install two AA batteries (supplied) matching the polarity indicated inside battery compartment of the remote control. CATV Box * or Satellite Box OR VHF/UHF RF Cable OR VHF UHF Flat twinlead cable VHF/UHF Combiner VIDEO 1 IN PUT VIDEO L S-VIDEO R ANT. IN ANT. IN OUT IN From Cable System or Satellite 75-ohm Antenna Coaxial Cable OR From Cable RF Cable System *Some cable TV systems use scrambled signals and require a special converter to receive these channels. Consult your local cable company. CAUTION: TO PREVENT ELECTRIC SHOCK, MATCH WIDE BLADE OF PLUG TO WIDE SLOT, FULLY INSERT. ATTENTION: POUR ÉVITER LES CHOC ÉLECTRIQUES, INTRODUIRE LA LAME LA PLUS LARGE DE LA FICHE DANS LA BORNE CORRESPONDANTE DE LA PRISE ET POUSSER JUSQU'AU FOND. Note: ● For your safety and to avoid damages to the unit, unplug the antenna cable from the ANT. IN jack before moving the unit. [EXTERNAL CONNECTION] VIDEO1 input (Rear) S-Video Cable ex. (OUT) (IN) OR (OUT) Video Cable (IN) Video Cassette Recorder (OUT) (IN) Audio Cable Rear of this TV VIDEO 1 INPUT VIDEO L S-VIDEO R ANT. IN [BATTERY PRECAUTIONS] • Be sure to follow the correct polarity as indicated in the battery compartment. Reversed batteries may cause damage to the device. • Do not mix different types of batteries together (e.g. Alkaline and Carbon-Zinc) or old batteries with fresh ones. • If the device is not to be used for a long period of time, remove the batteries to prevent damage or injury from possible battery leakage. • Do not try to recharge batteries not intended to be recharged; they can overheat and rupture. OPERATIONS REMOTE CONTROL AND FRONT PANEL FUNCTION POWER button To turn TV on/off Channel number buttons CH(ANNEL) ▲/▼ buttons To select channels MENU button To view on-screen menu POWER GAME SLEEP DISPLAY 1 2 3 4 5 6 CHANNEL RETURN 7 8 9 0 +100 INPUT SELECT CH VOL VOL CH MUTE MENU GAME button SLEEP button DISPLAY button To display CH No./Audio Status CHANNEL RETURN button To return previous screen INPUT SELECT button To select TV or external input MUTE button VOL(UME) ▲/▼ buttons To adjust volume Notes: ● The AUDIO L jack is for mono input. The sound is heard from both speakers. Use this jack for connecting monaural audio equipment. ● The S-VIDEO jack is given priority over the VIDEO jack on the rear panel. VIDEO2 input (Front) ex. Front of this TV VIDEO L - AUDIO - R VIDEO L - AUDIO - R HEADPHONE MENU L VOLUME K L CHANNEL K POWER Video Cable VIDEO L - AUDIO - R HEADPHONE MENU L VOLUME K L CHANNEL K POWER (OUT) (IN) Video Camera Video Game (OUT) (IN) Audio Cable Note: ● The AUDIO L jack is for mono input. The sound is heard from both speakers. Use this jack for connecting monaural audio equipment. SELECTING AUDIO/VIDEO INPUT When you use the AUDIO/VIDEO input jacks, select "VIDEO1" or "VIDEO2" mode by hitting [INPUT SELECT] on the remote control. The input mode changes by hitting the button as following: INPUT TV channel VIDEO1 (Rear) VIDEO2 (Front) SELECT Infrared Sensor Window POWER button To turn TV on/off CHANNEL ▲/▼ buttons To select channels VOLUME ▲/▼ buttons To adjust volume MENU button To view on-screen menu HEADPHONE jack AUDIO L/R input jacks VIDEO input jack Note: ● If some digits appear in the corner of the screen when the unit is turned on for the first time, hit [POWER] without unplugging the power cord. • To use the jacks on the rear of the TV, select "VIDEO1". • To use the jacks on the front of the TV, select "VIDEO2". SLEEP TIMER SETTING 1 SLEEP SLEEP 0 2 SLEEP repeatedly SLEEP 10 The time increases by 10 minutes up to 90. Notes: ● When you disconnect the unit from the AC outlet or when you have a power failure, the sleep time will be lost. ● To cancel the sleep timer, hit [SLEEP] repeatedly until "SLEEP 0" is displayed. ● The Sleep Timer Setting display will disappear automatically after 10 seconds of the operation.
-
 1
1 -
 2
2 -
 3
3 -
 4
4 -
 5
5 -
 6
6 -
 7
7 -
 8
8
 |
 |
