Symphonic ST4819 Owner's Manual - Page 6
Operating, Controls, Functions
 |
View all Symphonic ST4819 manuals
Add to My Manuals
Save this manual to your list of manuals |
Page 6 highlights
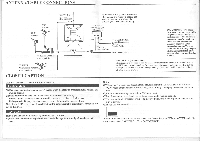
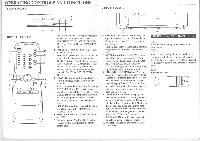
OPERATING CONTROLS AND FUNCTIONS - FRONT PANEL - - REAR PANEL - VOLUME • C.ANNEI. a POWER C ELT E I C EES9 ' 3 'on 1 2 - REMOTE CONTROL - POWER 4 SLEEP 10 DISPLAY CD CD CD 9 6 0 0 CD CHANNEL RETURN CD 0 CD 8 CD tdJ 3 • CH •VOL VOL • 2 CH 2 • 2 GMIOD 7 3 (tEED sascr e sEr () 3 45 1. MENU button- Press to display the menu on the TV screen. (See "PICTURE ADJUSTMENT", "CHANNEL PRESETTING" and "CLOSED CAPTION SELECTION".) 2. VOLUME Down button- Press to control the volume level. VOLUME Up button- Press to control the volume level. (only on the main unit) SELECT button- Press to display picture control menu on the TV screen. (See "PICTURE ADJUSTMENT".) Press to add desired channel, and to erase memorized channel. (See "CHANNEL PRESETTING".) 3. CHANNEL Up/Down buttons- Press to select memorized channel. (only on the main unit) When you press these buttons before setting AUTO MEMO, the TV scans to the next available channel. If the TV is not receiving a signal, the TV will continue to scan channels until you press the MENU button to exit. In this case, check antenna connections. SET +/- buttons- Press to adjust the menu or picture control. (See "PICTURE ADJUSTMENT".) 4. POWER button- Press to turn the TV ON and OFF. 5. Infrared Sensor Window- Receives the infrared control signals from the remote control unit. 12 6. CHANNEL NUMBER button- Press two digits to directly access the desired channel. Remember to press a "0" before a single digit channel. +100 button- Press to select cable channels which are equal or greater than number 100. 7. MUTE button- Press the MUTE button to turn off the sound portion of the TV program. (Volume level display turns LIGHT RED from LIGHT BLUE.) Press the MUTE button again or press the VOL(ume) Up or Down button to restore sound. 8. CHANNEL RETURN button- Press this button to go back to the previously viewed channel. For example, pressing the CHANNEL RETURN button once will change channel display from CH 3 (present channel) to CH 10 (previously viewed channel), and pressing it a second time will return from CH 10 to CH 3. 9. DISPLAY button- Press to display the channel number on the screen. If you press it again, the channel number will disappear. 10.SLEEP button- Press the SLEEP button to display the sleep timer and start the function. The shut off time cah be determined by the number of times you press the button. (0, 10, 20, 30,..90, 0 minutes) 11.ANT(enna). IN jack- Connect to an antenna, cable system, or satellite system. 12.AC cord- Connect to a standard AC outlet (120V/60Hz). 1 INSTALLING THE BATTERIES 1 Slide the battery compartment cover on the remote unit. Insert 2 "AA" penlight batteries into battery compartment in the direction as indicated by the polarity (+ / -) markings. Batteries installed with incorrect polarity may damage the remote unit. rn Replace the cover. 0 0
-
 1
1 -
 2
2 -
 3
3 -
 4
4 -
 5
5 -
 6
6 -
 7
7 -
 8
8
 |
 |
