TEAC AX-505 Firmware Update Manual - Page 1
TEAC AX-505 Manual
 |
View all TEAC AX-505 manuals
Add to My Manuals
Save this manual to your list of manuals |
Page 1 highlights
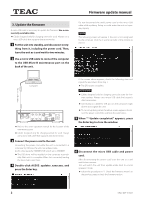
Z Firmware update manual Model covered AX-505 Equipment used Windows computer (with built-in USB 2.0 port) Micro USB cable oo Cables designed only for charging cannot be used. Always use a micro USB cable that supports data transmission. Supported operating systems Windows 7 (32/64-bit) Windows 8 (32/64-bit) Windows 8.1 (32/64-bit) Windows 10 (32/64-bit) (as of September 2020) 2. Install the DFU driver Set the unit's STANDBY/ON switch to STANDBY, and begin the following operations before connecting it with the computer. NOTE oo After installing the DFU driver on the computer once, installing it again will not be necessary. If installation is complete, proceed to "3. Update the firmware". oo The screens used in these instructions are from Windows 10. 1 Uncompress the downloaded file. The following files will be created. oo Win_DFU_driver.exe oo AX505_updater_xxxx.exe (xxxx is the firmware version) 2 Double-click Win_DFU_driver.exe, and press the Enter key. 1. Check the firmware version 1 Turn the unit on. 2 Press and hold the remote control DIMMER button (for three seconds). The blinking INPUT SELECTOR knob indicators show the version. Version 1.00 1.01 1.02 1.03 1.04 LINE 1 Blinking Blinking Blinking Blinking Unlit LINE 2 Unlit Blinking Blinking Blinking Blinking LINE 3 Unlit Unlit Blinking Blinking Blinking XLR Unlit Unlit Unlit Blinking Blinking NOTE If a "User Account Control" pop-up message appears during installation, click "Yes". 3 When the Device Driver Installation Wizard appears, click "Next". 4 Click "Finish". Microsoft and Windows are either registered trademarks or trademarks of Microsoft Corporation in the United States and/or other countries. Other company names and product names in this document are the trademarks or registered trademarks of their respective owners. Continued on the next page e 1
-
 1
1 -
 2
2
 |
 |