TEAC US-1800 US-1800 owners manual - Page 8
Rear panel - usb 2 0
 |
View all TEAC US-1800 manuals
Add to My Manuals
Save this manual to your list of manuals |
Page 8 highlights
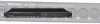
2 − Names and Functions of Parts Rear panel 0 USB port Use the included USB cable to connect the unit to a computer. (Only compatible with USB 2.0.) q DIGITAL IN (coaxial) jack This coaxial digital input jack is compatible with the IEC60958-3 (S/PDIF) standard. w DIGITAL OUT (coaxial) jack This coaxial digital output jack is compatible with the IEC60958-3 (S/PDIF) and AES3-2003 (AES/EBU) standards. This jack outputs the same signals as LINE OUTPUTS 1/2 or LINE OUTPUTS 3/4. Set this using the control panel. The digital signal format can also be set using the control panel. NOTE This unit's DIGITAL IN and OUT jacks can input and output signals at 24-bit/96 kHz. e MIDI OUT connector This standard 5-pin DIN connector can be used to output MIDI signals. r MIDI IN connector This standard 5-pin DIN connector can be used to input MIDI signals. t INPUTS (BALANCED) jacks and LEV switches INPUTS (11-14) are standard TRS balanced input jacks. Use the LEV switches to set the nominal level to either -10 dBV (−10) or +4 dBu (+4). NOTE The gain of these jacks cannot be adjusted. y LINE OUT (BALANCED) jacks (1-4) These standard TRS jacks are balanced analog line output jacks. The nominal output level is +4 dBu. These jacks output signals sent from a computer to the unit by USB. Use the audio application on the computer to set which signals to output. Connect these outputs to an external mixer, recorder or other device. (Tip: HOT, Ring: COLD, Sleeve: GND) u MONITOR (BALANCED) jacks (L/R) These standard TRS jacks are balanced analog jacks that output the monitoring signals. These can output both a mono mix of signals from the unit inputs (1-14) and the signals output from the computer for monitoring. Use the MIX knob on the front panel to adjust the balance of these two sources. Use the MONITOR knob on the front panel to adjust the output level. Connect these jacks to monitor speakers, for example. (Tip: HOT, Ring: COLD, Sleeve: GND) i Cord holder Loop the cord of the included TASCAM PS-1225L AC adaptor here to prevent the plug from being disconnected accidentally. o DC IN 12V jack Connect the included TASCAM PS-1225L AC adaptor to this Jack. 8 TASCAM US-1800
-
 1
1 -
2
-
 3
3 -
 4
4 -
 5
5 -
 6
6 -
 7
7 -
 8
8 -
 9
9 -
 10
10 -
 11
11 -
 12
12 -
 13
13 -
14
-
15
-
16
-
17
-
18
-
19
-
20
-
21
-
22
-
23
-
24
 |
 |
