Thermador HMWB30FS User Manual - Page 7
Trouble, Shooting
 |
View all Thermador HMWB30FS manuals
Add to My Manuals
Save this manual to your list of manuals |
Page 7 highlights
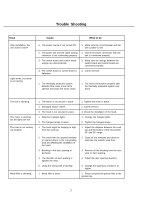
Trouble Shooting Issue After installation, the unit doesn't work? Light works, but motor is not turning. Cause What to do 1. The power source is not turned ON. 2. The power line and the cable locking connector is not connecting properly. 3. The switch board and control board wirings are disconnected. 4. The switch board or control board is defective. 1. Make sure the circuit breaker and the unit's power is ON. 2. Check the power connection with the unit is connected properly. 3. Make sure the wirings between the switch board and control board are connected properly. 4. Call for Service 1. The thermally protected system detects if the motor is too hot to operate and shuts the motor down. 1. The motor will function properly after the thermally protected system cool down. The unit is vibrating. The motor is working, but the lights are not. The hood is not venting out properly. Metal filter is vibrating. 1. The motor is not secure in place. 2. Damaged blower wheel. 3. The hood is not secured in place. 1. Defective halogen lights. 2. The halogen lamps is loose. 1. The hood might be hanging to high from the cook top. 2. The wind from the opened windows or opened doors in the surrounding area are affecting the ventilation of the hood. 3. Blocking in the duct opening or ductwork. 4. The direction of duct opening is against the wind. 5. Using the wrong size of ducting. 1. Metal filter is loose. 1. Tighten the motor in place. 2. Call for Service 3. Check the installation of the hood. 1. Change the halogen lights. 2. Tighten the halogen lamps. 1. Adjust the distance between the cook top and the bottom of the hood within 30" and 36" range. 2. Close all the windows and doors to eliminate the outside wind flow. 3. Remove all the blocking from the duct work or duct opening. 4. Adjust the duct opening direction. 5. Change the ducting to at least 8" or higher. 1. Secure properly the grease filter to the grease tray. 7
-
 1
1 -
 2
2 -
 3
3 -
 4
4 -
 5
5 -
 6
6 -
 7
7 -
 8
8 -
 9
9 -
 10
10 -
 11
11 -
 12
12 -
13
-
14
-
15
-
16
-
17
-
18
-
19
-
20
-
21
-
22
-
23
-
24
-
25
-
26
-
27
-
28
-
29
 |
 |
