Thermador VCI29CS Installation Instructions - Page 8
Service
 |
View all Thermador VCI29CS manuals
Add to My Manuals
Save this manual to your list of manuals |
Page 8 highlights
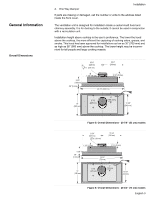
Service Install Housing Connect to Ductwork Connect Electric Install the Unit See "General Information" on page 3 for recommended installation height and "Mounting Requirements" on page 4 for information on mounting specifications. Install housing as directed by the manufacturer. Connect ventilation unit to ductwork in house. Plug electrical cord into grounded outlet. Before you plug in an electrical cord, be sure all controls are in the OFF position. Press unit up into housing until plastic clips on front and rear snap into the housing. Install 4 screws through tapholes into housing. Final Steps Test The Installation Service Before Calling Service Product Data Plate Figure 9: Install the Unit Install Filters. See Use and Care manual for detailed instructions. Test the operation of the blower and the lights. Note: Be sure to check for backdraft. With the blower on high, close the windows and doors to the area to ensure that fan does not cause back drafting in any outlet vent for another appliance. See Use and Care Manual for troubleshooting information. Refer to the Warranty in the Use and Care Manual. Please be prepared with the information printed on your product data plate when calling. The data plate shows the model and serial number. It is located under the filter. English 6
-
 1
1 -
2
-
 3
3 -
 4
4 -
 5
5 -
 6
6 -
 7
7 -
 8
8 -
 9
9 -
 10
10 -
 11
11 -
 12
12 -
 13
13 -
14
-
15
-
16
-
17
-
18
-
19
-
20
-
21
-
22
-
23
-
24
-
25
-
26
-
27
-
28
 |
 |
