Timex T617S User Manual - Page 6
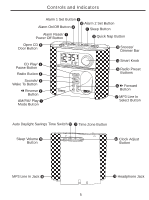
Installation and Maintenance, Daylight-Saving Time and Leap Year Adjustments, Auto-Set and Manual - clock radio
 |
View all Timex T617S manuals
Add to My Manuals
Save this manual to your list of manuals |
Page 6 highlights
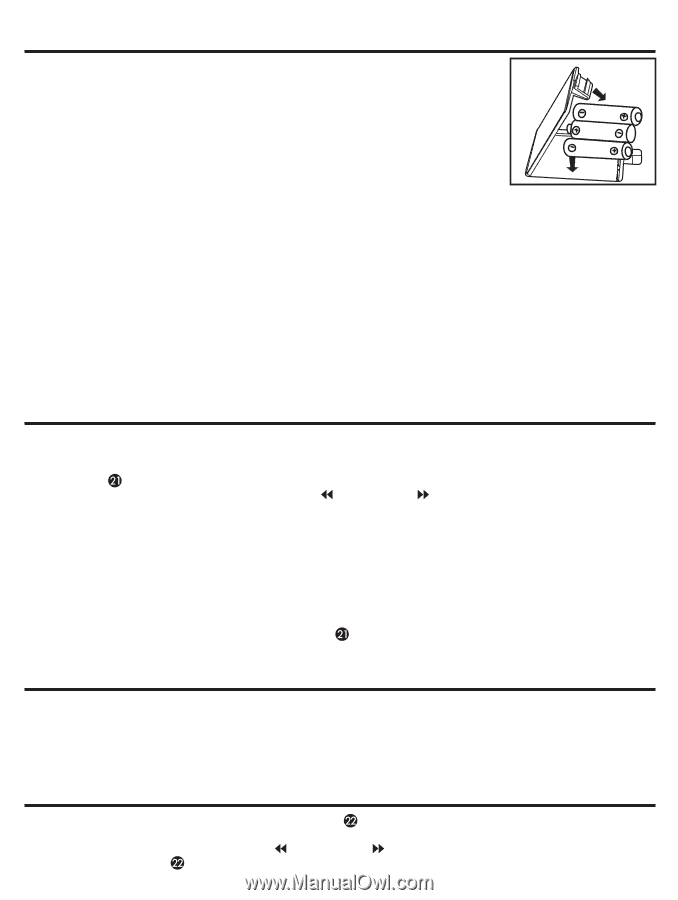
Installation and Maintenance Battery Backup Installing 1. Gently turn the unit over and open the battery compartment door. 2. Install 3 AA (LR6) batteries. We recommend using an alkaline battery for ᕃ ᕅ longest dependable life. The battery will maintain the correct time in the event of power failure or accidental line cord disconnection, even though the display is darkened. 3. Close the battery compartment door, turn the unit right side up, and plug in the AC cord. ᕄ Battery Backup System The backup batteries will maintain the time and alarm settings in the event of a temporary power interruption. If the power goes out, the CD, nature sounds and radio will not play but the clock will continue to run. All set alarms will default to buzzer alarm during power interruption. If a power failure occurs and backup battery is not installed or dead, all settings will be lost. When the power is restored the display will read "12:00" and continue to run. Maintenance 1. Place the unit on a level surface away from direct sunlight or sources of excessive heat. 2. Protect your furniture when placing the unit on natural wood or wood with a lacquered finish. A cloth or other protective material should be placed between the unit and the furniture. 3. Clean the casing with a soft cloth moistened only with mild soap and water. Stronger cleaning agents, such as thinner or similar materials, are not recommended as they may damage the surface of the case. 4. If the unit is not to be used for a prolonged period, such as a month or longer, remove the batteries to prevent possible corrosion. Should the battery compartment become corroded or dirty, clean the compartment thoroughly and replace the battery. Auto-Set and Manual Time and Date Settings This model is equipped with the Auto-Set feature, meaning that the time and date have been programmed at the factory and will already be set when you first plug the model in. Auto-Set is programmed for Eastern Standard Time. To change your time zone setting, perform steps below. 1. Press the Time Zone Button,located on the back of the unit. The current Auto-Set Time Zone will flash. Turn the Smart Knob or press the ᕢ Button or ƻ Button to select your time zone. The display will show each zone's current time setting. There are seven zones: Auto-Set Time Zones ZO1: Atlantic Standard Time ZO2: Eastern Standard Time ZO3: Central Standard Time ZO4: Mountain Standard Time ZO5: Pacific Standard Time ZO6: Alaska Standard Time ZO7: Hawaii Standard Time 3. Once you've selected your time zone, press the Time Zone Button to confirm. Daylight-Saving Time and Leap Year Adjustments When the ƿ Auto DST Switch (located on the back of the unit) is set to ON, this unit automatically advances the time one hour at the start of Daylight-Saving Time (the first Sunday of April), and moves it back one hour at the end of Daylight-Saving Time (the last Sunday of October). During Daylight Savings Time, "DST" will be displayed on screen. If you live in an area that does not observe Daylight-Saving Time, turn the ƿ Auto DST Switch to OFF. This unit will also automatically adjust the month/day display for leap year. Manual Time and Date Setting 1. To change the time and date settings, press the Clock Adjust Button located on the back of the unit. The year display will flash. 2. Turn the Smart Knob or press the ᕢ Button or ƻ Button to select the correct year. When it is displayed, press the Clock Adjust Button. 6
-
 1
1 -
 2
2 -
 3
3 -
 4
4 -
 5
5 -
 6
6 -
 7
7 -
 8
8
 |
 |