Toshiba 26DF56 Owner's Manual - English - Page 20
Adding channels to the TV's memory, Image tilt correction - please wait
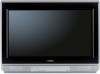 |
View all Toshiba 26DF56 manuals
Add to My Manuals
Save this manual to your list of manuals |
Page 20 highlights
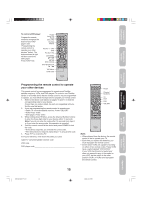
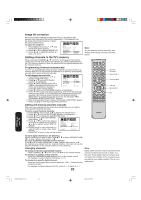
Image tilt correction When you install or change the direction of the TV, the picture may become tilted (caused by the Earth's magnetism). If this happens, use the image tilt correction feature to obtain the best possible picture. To adjust the image tilt: 1. Press MENU, then press or until the SETUP menu appears. 2. Press ▲ or ▼ to highlight IMAGE TILT. 3. Press or to adjust the picture tilt (from -10 to 10). SETUP CLOSED CAPTION CC ADVANCED PICTURE SIZE PICTURE SCROLL IMAGE TILT SIGNAL METER :SELECT OFF 0 :ADJUST Adding channels to the TV's memory When you press CHANNEL ▲ / ▼ on the TV or CH M/? on the remote control, your TV will stop only on the channels you have programmed into the TV's channel memory. Follow the steps below to program channels into the channel memory. Programming channels automatically Your TV can automatically detect all active channels and store them in its memory. After the TV has stored the channels in its memory automatically, you can add or erase channels manually. To add channels automatically: 1. Press MENU, then press or to display the SETUP menu. SETUP 2. Press ▲ or ▼ until the TV/CABLE selection is highlighted. 3. Press or to highlight either TV or LANGUAGE CLOCK SET TV / CABLE CH PROGRAM ADD / ERASE ENGLISH TV / CABLE CABLE, depending on which you use. If you use an antenna, choose TV. :SELECT :ADJUST If you use cable, choose CABLE. 4. Press ▼ until the CH PROGRAM selection is highlighted. 5. Press or to start channel programming. The TV will automatically cycle through all the TV or Cable channels (depending on which you selected), and store all active channels in the channel memory. While the TV is cycling through the channels, the message "PRO- GRAMMING NOW PLEASE WAIT" appears. 6. When channel programming is complete, the message "COMPLETED" appears. 7. Press CH M/? to view the programmed channels. Note: You can add the channel manually (see "Adding and erasing channels manually," below). Channel Numbers Dash (100/-) Channel M/? Menu/Enter Exit Adding and erasing channels manually After you have programmed the channels automatically, you can add or erase specific channels manually. To add or erase channels manually: 1. Press MENU, then press or to display the SETUP menu. 2. Press ▲ or ▼ until the ADD/ERASE selection is highlighted. 3. Press or to display the ADD/ERASE menu. 4. Press ▲ or ▼ to select ADD/ERASE, then press or . 5. Press ▲ or ▼ to select the desired channel to be added or erased.Press or to select either ADD or ERASE. SETUP LANGUAGE CLOCK SET TV / CABLE CH PROGRAM ADD / ERASE ENGLISH CABLE 6. Repeat step 5 for other channels you want to add or erase, then press :SELECT :ADJUST ENTER. 7. Press EXIT to return to the normal screen. To add a digital channel you are watching: Select a channel you want to add. Press ▲ or ▼ to select ADDING CHANNEL in step 4 above, then press or . To erase all channels from the channel memory: Press ▲ or ▼ to select CLEAR ALL in step 4 above, then press or . All channels are erased from the channel memory. (You can still use the Channel Numbers on the remote control to tune a channel.) Changing channels To change to the next programmed channel: Press CHANNEL ▲ / ▼ on the TV or CH M/? on the remote control. To change to a specific analog channel: Press the CHANNEL Number buttons (0-9) on the remote control. For example, to select channel 125, press 1, 2, 5. To change to a specific digital channel: Press the first 3 digits, then press the dash key (100/-), followed by the remaining 3 digits. For example, to select channel 015-001, press 0, 1, 5, Dash, 0, 0, 1. 20 Note: Digital cable channels may be represented by channel numbers that include a "dash" (e.g., 85-002). These digital channel numbers may not match the numbers in the channel line-up provided by your cable company. This is not a malfunction. Setting up your TV 3Y90121A(E)_P14-21 20 4/6/06, 3:13 PM
-
 1
1 -
2
-
3
-
4
-
5
-
6
-
7
-
8
-
9
-
10
-
11
-
12
-
13
-
14
-
 15
15 -
 16
16 -
 17
17 -
 18
18 -
 19
19 -
 20
20 -
 21
21 -
 22
22 -
 23
23 -
 24
24 -
 25
25 -
26
-
27
-
28
-
29
-
30
-
31
-
32
-
33
-
34
-
35
-
36
-
37
-
38
-
39
-
40
-
41
-
42
-
43
-
44
-
45
-
46
-
47
-
48
-
49
-
50
-
51
-
52
-
53
-
54
-
55
-
56
-
57
-
58
-
59
-
60
-
61
-
62
-
63
-
64
-
65
-
66
-
67
-
68
-
69
-
70
-
71
-
72
-
73
-
74
-
75
-
76
-
77
-
78
-
79
-
80
 |
 |
