Toshiba 36HFX73 Owners Manual - Page 25
Selecting the antenna input, Adding channels into the channel memory
 |
View all Toshiba 36HFX73 manuals
Add to My Manuals
Save this manual to your list of manuals |
Page 25 highlights
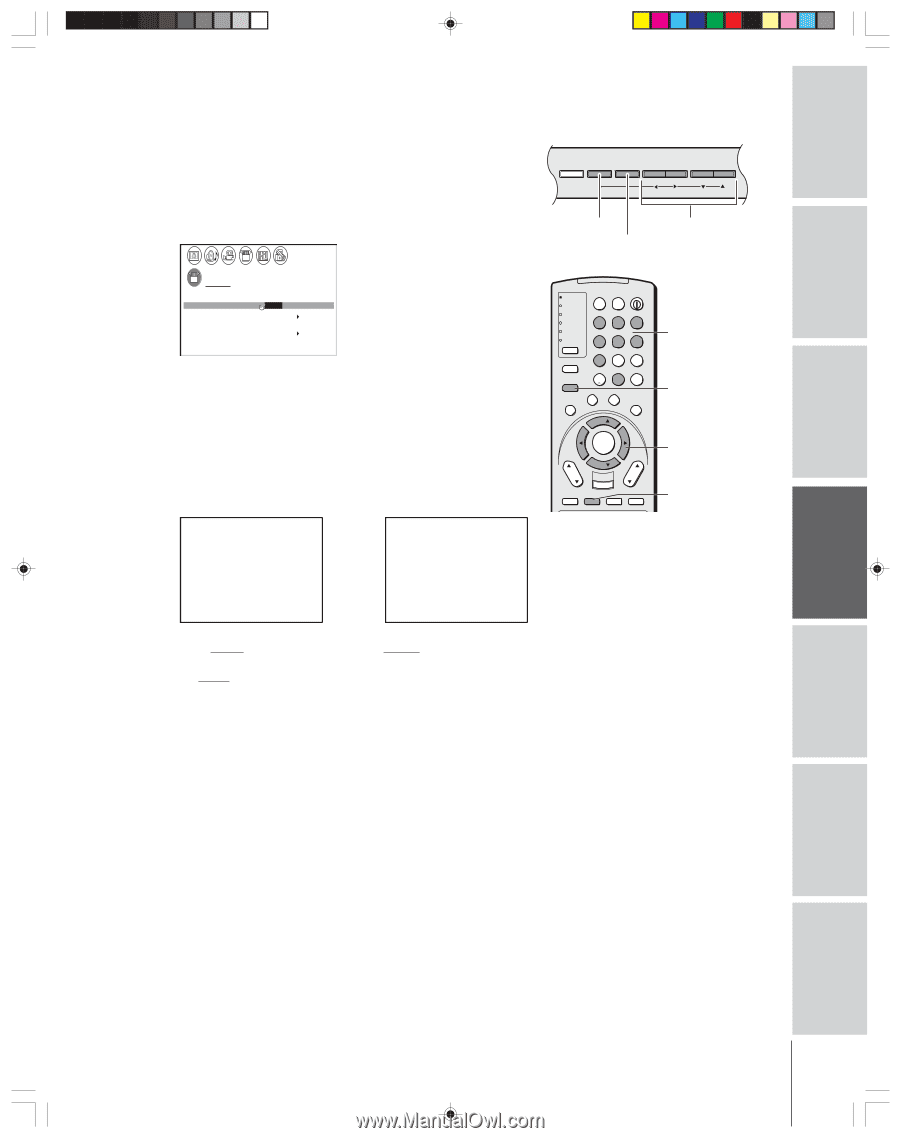
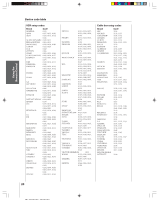
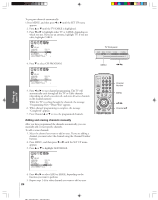
Introduction Connecting your TV Using the Remote Control Selecting the antenna input You can connect to two different antenna input sources (ANT 1 or ANT 2). To select the antenna input using the menu system: 1. Press MENU, and then press x or • to highlight the SET UP menu. 2. Press y or z to highlight ANT 1/2. TV front panel DEMO MENU TV/VIDEO VOLUME CHANNEL MENU x •zy TV/VIDEO SET UP LANGUAGE ENGL I SH CLOCK SET --:-- ANT 1 / 2 ANT1 / ANT2 TV / CABLE CABLE CH PROGRAM ADD / ERASE ADD T I L T CORRECT I ON 0 QU I C K CONNECT GU I DE 3. Press x or • to highlight either ANT 1 or ANT 2, depending on the antenna terminal you wish to use. To select the antenna input using the INPUT or TV/VIDEO button: 1. Press the INPUT button on the remote control or TV/VIDEO button on the TV (see illustrations below). The current signal source displays in purple. 2. Continue pressing INPUT or TV/VIDEO to select ANT 1 or ANT 2. POWER TV CABLE/SAT LIGHT SLEEP VCR DVD 123 AUDIO1 AUDIO2 MODE 456 789 S PIC SIZE ACTION MENU GUIDE ETUP +10 100/ 0 ENT INFO FAVORITE TLHINEKATER TITLE SUB TITLE FAV AUDI O ENTER FAV CH VOL EXIT DVD RTN DVD CLEAR CH RTN INPUT RECALL MUTE SLOW/DIR SKIP/SEARCH Number MENU yzx • INPUT SOURCE SELECT I ON 0 : ANT 1 1 : V I DEO 1 2 : V I DEO 2 3 : V I DEO 3 4 : Co l o r S t r eam HD1 5 : Co l o r S t r eam HD2 6 : DVI 7 : ANT 2 0- 7 : TO SELECT Pressing INPUT on the remote control displays the current signal source (press INPUT again or 07 to change) SOURCE SELECT I ON ANT 1 V I DEO 1 V I DEO 2 V I DEO 3 Co l o r S t r eam HD1 Co l o r S t r eam HD2 DVI ANT 2 TV / V I DEO : TO SELECT Pressing TV/VIDEO on the TV changes the current signal source Please note the following regarding the DVI source selection: This TV is not intended for connection to and should not be used with a PC (personal computer). See "Connecting a device to the DVI/HDCP input" on page 13 for details. Adding channels into the channel memory When you press Channel y or z, your TV will stop only on the channels stored in the channel memory. Follow the steps below and on the next page to program all active channels into the memory. Programming channels automatically Your TV can automatically detect all active channels in your area and store them in the channel memory. After the channels are stored automatically, you can manually add or erase individual channels (see "Adding and erasing channels manually," below). Note: To tune the TV to a channel not programmed in the channel memory, you must use the Channel Number buttons on the remote control. Setting up your TV Using the TV's Features Appendix Index (continued on next page) 25
-
 1
1 -
2
-
3
-
4
-
5
-
6
-
7
-
8
-
9
-
10
-
11
-
12
-
13
-
14
-
15
-
16
-
17
-
18
-
19
-
 20
20 -
 21
21 -
 22
22 -
 23
23 -
 24
24 -
 25
25 -
 26
26 -
 27
27 -
 28
28 -
 29
29 -
 30
30 -
31
-
32
-
33
-
34
-
35
-
36
-
37
-
38
-
39
-
40
-
41
-
42
-
43
-
44
-
45
-
46
-
47
-
48
-
49
-
50
-
51
-
52
-
53
-
54
-
55
-
56
-
57
-
58
-
59
-
60
-
61
-
62
-
63
-
64
 |
 |