Toshiba DR420 Owner's Manual - English
Toshiba DR420 Manual
 |
UPC - 022265002216
View all Toshiba DR420 manuals
Add to My Manuals
Save this manual to your list of manuals |
Toshiba DR420 manual content summary:
- Toshiba DR420 | Owner's Manual - English - Page 1
VIDEO L R DV IN L2 L3 Please contact Toshiba Customer Solutions at (800) 319 - 6684 with any additional questions. EN E7PCAUD_QSG_EN.indd 1 DVD VIDEO RECORDER DR420KU Be sure to read the safety precautions in the owner's manual carefully before using this unit. 1 Connections Supplied - Toshiba DR420 | Owner's Manual - English - Page 2
HDMI .@/: ABC DEF GHI JKL MNO 1080p 1080i 720p 480p DVD -RW/-R/+RW/+R RECORDING HDMI indicator rear of your TV HDMI cable To HDMI input jack Note : • Because HDMI is an evolving technology, it is possible that some devices with an HDMI input may not operate properly with this DVD recorder
-
 1
1 -
 2
2
 |
 |

DR420KU
DVD VIDEO RECORDER
Be sure to read the safety precautions in the owner’s manual carefully before using this unit.
Follow to the back side of this sheet.
1
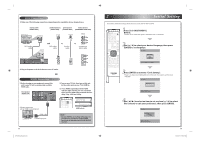
Connections
Note :
• All devices should be turned off and disconnected from the power outlet, when you make the connections.
Please contact Toshiba Customer Solutions at (800) 319 - 6684 with any additional questions.
1)
Make the connection as illustrated below.
2)
Plug in the power cords of the devices to the AC outlet.
Connecting to an External Tuner
Good
Poor
18 min
36 min
72 min
108 min
144 min
60 min
120 min
240 min
360 min
480 min
8cm Disc
12cm Disc
XP
SP
LP
EP
SLP
Video/sound
quality
Recording
mode
Recording
time
3
DVD Recording
SP
1:53
2
Press [REC MODE] to select a
recording mode.
5
Press [REC
I
] to start recording.
6
Press [STOP
C
] to stop recording.
•
For how to set up timer recording, refer to pages 38 to 41 in the owner’s manual.
1
Press [OPEN/CLOSE
A
] to open the disc tray and
insert your disc with its label facing up.
This unit can record to DVD-RW, DVD-R, DVD+RW and DVD+R.
DVD-R and DVD+R can only be recorded to once. DVD-RW and
DVD+RW can be recorded to and erased many times.
4
Select the channel you wish to record on your external tuner.
L1 (Rear)
3
Select the input of the recorder (L1-rear or L2-front) to which
the external tuner is connected by pressing [INPUT SELECT
].
*Make sure the external tuner is connected to L1 or L2 input.
Connection with a Digital Video Camcorder (DVC)
front of this unit
I/
y
ON/STANDBY
DV IN
S-VIDEO VIDEO
L
R
L2
L3
1080p
1080i
720p
480p
SKIP
STOP
PLAY
REC
S-VIDEO
VIDEO
L
R
DV IN
AUDIO OUT
DV-OUT
L
R
VIDEO
OUT
S-VIDEO
OUT
S-video
cable
DV cable
(4-pin)
RCA
video
cable
RCA
audio
cable
to L2 & L3
or
or
or
L2
L3
Connect a DVC with the Front DV input with a
commercially available mini DV/Firewire cable.
Or connect a DVC via the S±video or Composite video
input and Audio inputs.
•
For how to record from DVC, refer to pages 46 to 48 in
the owner's manual.
Supplied cables
• RCA audio cable (L/R) x 1
• RCA video cable x 1
HDMI, DV, component video, S±video and RF coaxial cables are commercially available.
SE-R0265
OPEN/
CLOSE
INPUT
SELECT
HDMI
.@/:
ABC
GHI
PQRS
TUV
SPACE
SETUP
DISPLAY
AUDIO
TOP MENU
CLEAR
RETURN
MENU/LIST
WXYZ
JKL
MNO
DEF
ENTER
SKIP
REV
PLAY
REC MODE
ZOOM
REC
REPEAT
PAUSE
TIME SLIP
1.3x / 0.8x PLAY
INSTANT SKIP
STOP
FWD
SKIP
TIMER
PROG.
SATELLITE
LINK
OPEN/
CLOSE
REC
REC MODE
STOP
INPUT
SELECT
VIDEO IN
AUDIO IN
L
R
VIDEO
VIDEO
OUT
OUT
VIDEO
VIDEO
IN
IN
IN
L
R
L
R
VIDEO
IN
VIDEO
OUT
S-VIDEO
AUDIO IN
(L1)
AUDIO OUT
ANT. IN
ANT.OUT
L
R
VIDEO OUT
AUDIO OUT
rear of this unit
external tuner
RCA video
cable
RCA audio
cable
RCA audio
cable
RCA video cable
satellite
dish
ANT. IN
cable TV
company
RF coaxial cable
or
VIDEO
VIDEO
OUT
OUT
IN
Y
P
/C
P
/C
L
R
VIDEO
OUT
S-VIDEO
AUDIO OUT
HDMI OUT
COMPONENT
VIDEO OUT
COAXIAL
DIGITAL AUDIO OUTPUT
PCM / BITSTREAM
OUT
S-VIDEO
VIDEO
VIDEO
IN
IN
VIDEO
IN
L
R
AUDIO IN
(L1)
RF coaxial cable
1VMN26774 / E7PCAUD_QG
★★★★
Printed in China
EN
EN
3)
After making the connection as described above, make sure to select the appropriate input type by
following the steps on page 26 in the owner's manual.
E7PCAUD_QSG_EN.indd 1
E7PCAUD_QSG_EN.indd
1
2/5/2009 10:59:04 AM
2/5/2009
10:59:04 AM