Toshiba DR420 Owner's Manual - English - Page 2
Press [ENTER] to activate Clock Setting. - manual
 |
UPC - 022265002216
View all Toshiba DR420 manuals
Add to My Manuals
Save this manual to your list of manuals |
Page 2 highlights
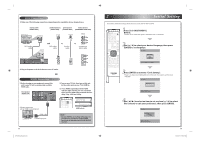
Basic Connection 1) Make one of the following connections, depending on the capabilities of your display device. analog audio (AUDIO OUT) standard picture good picture better picture (VIDEO OUT) (S-VIDEO OUT) (COMPONENT VIDEO OUT) rear of your TV RCA audio cable rear of this unit VIDEO VIDEO IN OUT L Y L PB/CB R AUDIO IN (L1) IN R PR/CR S-VIDEO AUDIO OUT COMPONENT VIDEO OUT OUT S-VIDEO HDMI OUT COAXIAL DIGITAL AUDIO OUTPUT PCM / BITSTREAM AUDIO IN L R VIDEO OUT L R AUDIO OUT VIDEO IN S-VIDEO IN and or or RCA video cable S-video cable COMPONENT VIDEO IN Y (Green) PB/CB (Blue) PR/CR (Red) component video cable VIDEO OUT L R AUDIO OUT OUT S-VIDEO (Green) Y (Blue) PB/CB (Red) PR/CR COMPONENT VIDEO OUT 2) Plug in the power cords of the devices to the AC outlet. OR HDMI Connection 1) Before turning on any equipment, connect this unit to your TV with a commercially available HDMI cable. best picture (HDMI OUT) VIDEO VIDEO IN OUT L Y L PB/CB R AUDIO IN (L1) IN R PR/CR S-VIDEO AUDIO OUT COMPONENT VIDEO OUT OUT S-VIDEO HDMI OUT COAXIAL DIGITAL AUDIO OUTPUT PCM / BITSTREAM A display equipment with an HDMI compatible port 2) Turn on your TV first, then turn on this unit. Set the video input on your TV to HDMI in. 3) Press [HDMI] repeatedly until the HDMI indicator light matches your TV's resolution. There are four HDMI video resolution choices 480p, 720p, 1080i and 1080p. OPEN/ INPUT CLOSE SELECT HDMI .@/: ABC DEF GHI JKL MNO 1080p 1080i 720p 480p DVD -RW/-R/+RW/+R RECORDING HDMI indicator rear of your TV HDMI cable To HDMI input jack Note : • Because HDMI is an evolving technology, it is possible that some devices with an HDMI input may not operate properly with this DVD recorder. EN E7PCAUD_QSG_EN.indd 2 2 Initial Setting You need to follow these steps when you turn on this unit for the first time. OPEN/ INPUT CLOSE SELECT HDMI .@/: ABC DEF GHI JKL MNO PQRS TUV SATELLITE WXYZ LINK SPACE TIMER PROG. SETUP DISPLAY AUDIO TOP MENU MENU/LIST CLEAR ENTER RETURN SKIP REV FWD SKIP PAUSE PLAY STOP TIME SLIP 1.3x / 0.8x PLAY INSTANT SKIP REPEAT REC MODE REC ZOOM 1Press [I/y ON/STANDBY]. Before: Turn the TV on. Select the input to which the unit is connected. 2Use [K / L] to select your desired language, then press [ENTER] to set language. Initial Setting OSD Language English Français Español Select the language for Setup display. SE-R0265 3Press [ENTER] to activate "Clock Setting". *There is no Auto Clock Setting function in the unit. You need to set the clock manually. Initial Setting Clock Setting ENTER: Set Clock. RETURN: Exit Initial Setting. 4Use [{ / B] to select an item to set, and use [K / L] to select the contents to suit your preference, then press [ENTER]. Initial Setting Clock Setting JAN / 01 / 2009 ( THU ) 12 : 00 AM ENTER: Setting Clock. RETURN: Exit Initial Setting. EN 2/5/2009 10:59:05 AM
-
 1
1 -
 2
2
 |
 |
