Toshiba P42LSA Owners Manual - Page 19
Installation
 |
View all Toshiba P42LSA manuals
Add to My Manuals
Save this manual to your list of manuals |
Page 19 highlights
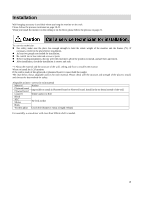
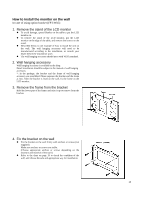
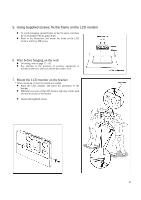
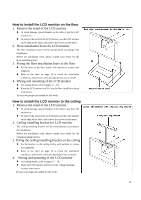
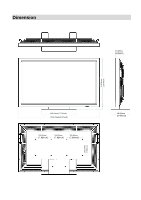
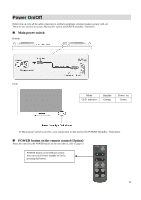
Installation Wall hanging accessory is available when you hang the monitor on the wall. Please follow the process mentioned on page 20-22. When you install the monitor on the ceiling or on the floor, please follow the process on page 23. To a service technician For safety, make sure the place has enough strength to hold the whole weight of the monitor and the frames (*1). If necessary, reinforce the place before installation. At least two people are needed for installation. Be careful not to lose removed screws or parts. Before starting installation, discuss well with customers about the position to install, and get their agreement. After installation, check the installation is correct and safe. *1: About the material and the structure of the wall, ceiling and floor to install LCD monitor Where to install the LCD monitor If the wall is made of thin plywood or plastered board, it cannot hold the weight. The chart below shows adaptable anchors for each material. Please check well the structure and strength of the place to install, and choose the best method for safety. Adaptable anchors / screws for each material Material Anchor Plastered board Plywood board Impossible to install in Plastered board or Plywood board. Install in the tie beam instead of the wall. Concrete Whole anchor or Bolt Block ALC Mortar Tie lock anchor Brick Wooden pillar Coach bolt (diameter: 6mm x length: 60mm) For assembly, a screwdriver with more than 300mm shaft is needed. 19
-
 1
1 -
2
-
3
-
4
-
5
-
6
-
7
-
8
-
9
-
10
-
11
-
12
-
13
-
 14
14 -
 15
15 -
 16
16 -
 17
17 -
 18
18 -
 19
19 -
 20
20 -
 21
21 -
 22
22 -
 23
23 -
 24
24 -
25
-
26
-
27
-
28
-
29
-
30
-
31
 |
 |