Toshiba SD-K531SU2 Owners Manual - Page 8
Tuner setting continued, Loading and unloading a cassette tape, Cassette tape playback, Special
 |
View all Toshiba SD-K531SU2 manuals
Add to My Manuals
Save this manual to your list of manuals |
Page 8 highlights
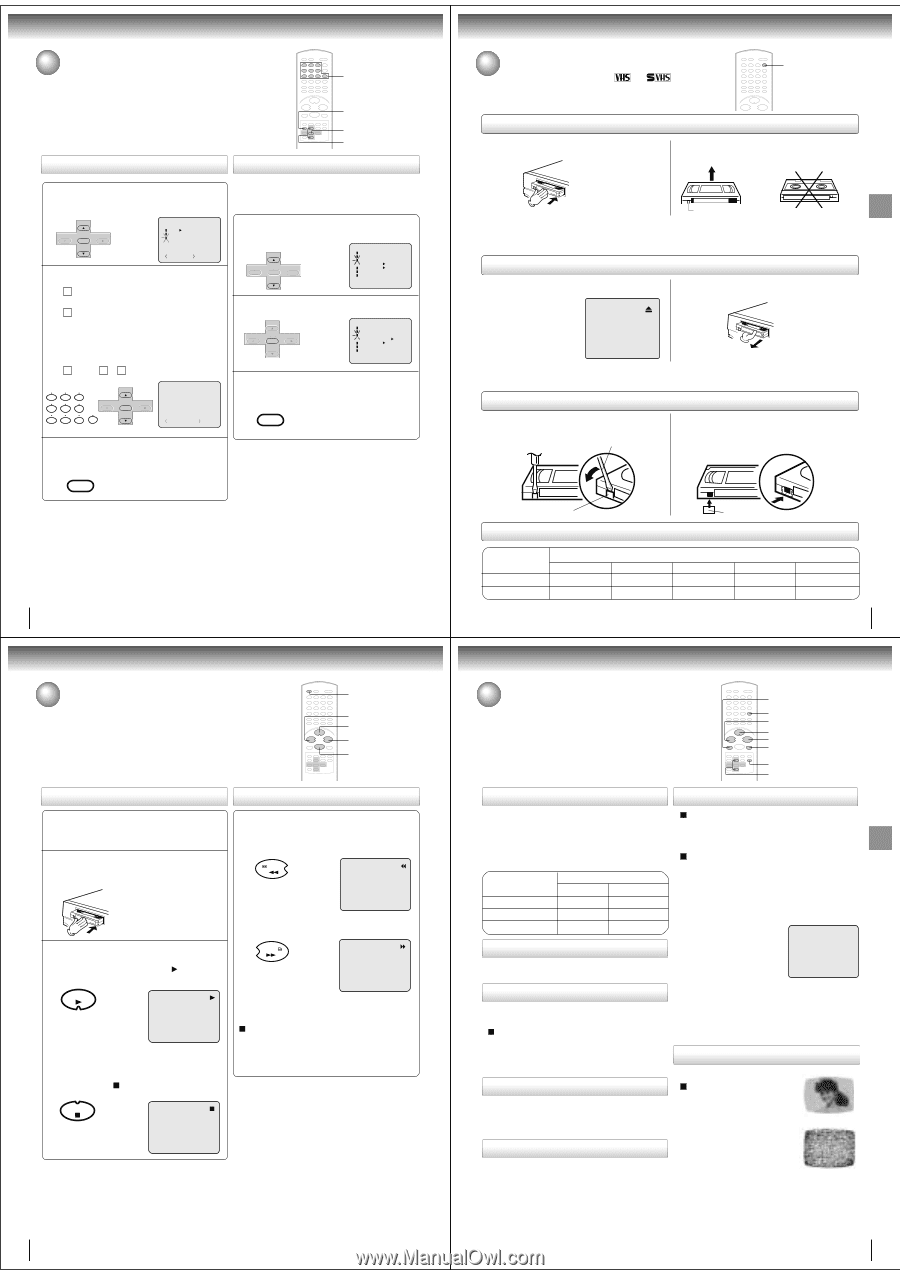
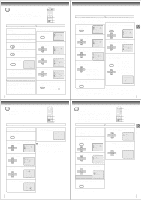
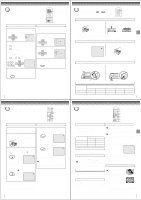
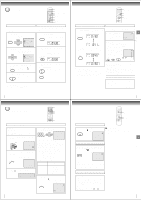
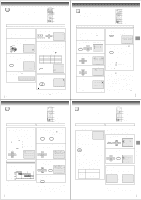
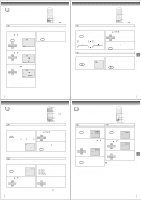
Basic setup Tuner setting (continued) NUMBER BUTTONS To ADD/DELETE channels 1 Repeat the step 1 on page 27. Then press SET + or - to select the "ADD/DELETE" and press ENTER. CH - SET + ENTER SET - CH + CH SETUP TV CABLE AUTO CH MEMORY ADD/DELETE +/-/ENTER/MENU 2 To Add or Delete desired channels 1 Press Number buttons or SET + or - to select a channel number you want to add or delete. 2 To add channels Press ENTER until "ADD" appears on the screen. To delete channels Press ENTER until "DELETE" appears on the screen. The channel number will blink. 3 Repeat 1 to 2 to add or delete other channel. SET + 123 456 CH - ENTER CH + 7890 SET - ADD CH 003 +/-/0-9/ENTER/MENU 3 1,2 1,2 Noise elimination When you don't want to receive a weak signal broadcast, a Blue back screen can be obtained by selecting the NO NOISE BACKGROUND "ON". When the unit is shipped from the factory, the NO NOISE BACKGROUND is set to "ON". 1 Repeat the steps 1~2 on page 26 and press SET + or - to select "NO NOISE BACKGROUND". SET + CH - ENTER SET - CH + SYSTEM SETUP CLOCK SET LANGUAGE/IDIOMA/LANGUE NO NOISE BACKGROUND ON OFF AUTO CLOCK ON OFF STANDARD TIME DAYLIGHT SAVING TIME 〈+/-/ENTER/MENU 〉 2 Press ENTER to select "ON" or "OFF" position. CH - SET + ENTER SET - CH + SYSTEM SETUP CLOCK SET LANGUAGE/IDIOMA/LANGUE NO NOISE BACKGROUND ON OFF AUTO CLOCK ON OFF STANDARD TIME DAYLIGHT SAVING TIME 〈+/-/ENTER/MENU 〉 3 Press VCR MENU until the menu screen is cleared. VCR MENU SETUP 3 Press VCR MENU until the menu screen is cleared. VCR MENU SETUP 28 Playback (VCR) Cassette tape playback To play a prerecorded tape. VCR DVD REW PLAY FWD STOP Playback Preparation: • Turn ON the TV and select the corresponding video input. • Press VCR DVD selector to select the VCR mode. (The VCR indicator will light). 1 Load a prerecorded tape (When loading a cassette tape without the erase prevention tab, playback will start automatically). Rewind or forward the tape Stop the playback or recording via STOP on remote. To rewind the tape: Press REW. REW 2 To start playback Press PLAY. Playback will start. " " will appear on the screen for about 4 seconds. PLAY To stop playback Press STOP once. The tape will stop but remain fully loaded and ready to play. " " will appear on the screen for about 4 seconds. STOP To forward the tape: Press FWD. FWD To discontinue the tape-winding, press STOP. To switch to playback directly (without STOP), press PLAY. Forward/Reverse picture search mode When the tape is being winded, you can switch to picture search mode (see next page). To do this, press REW or FWD and hold it down. The unit will resume the tape advance or rewinding as soon as the button is released. Notes: • This VCR selects the playback tape speed SP, LP or SLP au- tomatically. • The Cassette tape and DVD disc can be played back simulta- neously. If you press VCR DVD selector, the tape playback and DVD playback alternate with each other on the screen (via CH3, 4 or video connection). 30 Playback (VCR) Loading and unloading a cassette tape Use only video cassette tapes marked and . EJECT Loading Push the center of the tape until it is automatically inserted. Insert the cassette tape with its labeled side facing up and the erase prevention tab positioned at your left. An inverted cassette tape cannot be inserted. Erase prevention tab Automatic power ON When you insert a cassette tape the DVD/VCR power will turn ON automatically. Automatic playback When loading a cassette tape without an erase prevention tab, playback will start automatically. Unloading 1 2 Press EJECT on the front panel or on the Remote. Remove the cassette tape. Automatic tape eject This DVD/VCR will automatically rewind the tape when the tape has ended. Once the tape is rewound to its beginning, the cassette tape will be ejected automatically. To prevent accidental erasure To prevent accidental erasure Remove the erase prevention tab with a screwdriver. Screwdriver To record again Cover the hole with a piece of adhesive tape. Erase prevention tab Tape speed and maximum recording time Adhesive tape Tape Speed SP (Standard Play) SLP (Super Long Play) T-160 2-2/3 hours 8 hours T-120 2 hours 6 hours Video cassette tape T-90 1-1/2 hours 4-1/2 hours T-60 1 hour 3 hours T-30 30 minutes 1-1/2 hours 29 Special playback SLOW ATR REW PLAY FWD PAUSE/STILL CM SKIP SET +/- Picture search Reverse picture search function Press REW once or twice during playback. Forward picture search function Press FWD once or twice during playback. To return to playback, press PLAY. SPEED SEARCH TIMES TAPE SPEED PICTURE SEARCH SPEED PRESS ONCE PRESS TWICE SP (Standard Play) 3 X 5 X LP (Long Play) 7 X 9 X SLP (Super Long Play) 9 X 15 X Adjusting tracking condition Automatic tracking adjustment Whenever you insert a tape and start playback, the automatic tracking feature continuously analyzes the signal to enable optimum picture quality during playback. Manual tracking adjustment If automatic tracking cannot eliminate noises well during playback, press SET +/- to eliminate the noise. "MANUAL TR." will appear on the screen. Press it briefly for a fine adjustment, or press and hold for a coarse adjustment. Press ATR to reactivate automatic tracking again. "AUTO TR." will appear on the screen. Still picture Press PAUSE/STILL during playback. To resume normal playback, press PLAY or PAUSE/STILL. Slow motion During playback press SLOW. To return to playback, press PLAY or SLOW. Slow tracking and vertical lock adjustment If noise bars appear in the picture during slow motion, press the SET + /- to reduce the noise bars. If the still picture jitters excessively, press SET +/- to stabilize the still picture. Frame by frame picture Press PAUSE/STILL during playback. Press SLOW repeatedly: The picture advances frame by frame. To return to playback, press PLAY or PAUSE/STILL. CM skip Press CM SKIP during playback. The DVD/VCR will search forward through approximately 30 seconds of the tape (e.g. unwanted commercial time) for each press of CM SKIP (maximum six presses) and then resume normal playback. For example : 1 press: 30 seconds of tape 2 press: 60 seconds of tape 3 press: 90 seconds of tape AUTO TR. Notes: • The audio output is muted during SPEED SEARCH, STILL, FRAME ADVANCE and SLOW MOTION. • During picture search mode there will be noise bars. This is not a defect. • Playback will commence after approx. 5 minutes to protect the video tape against excessive wear during pause mode. Video head cleaning Video head clogging The video heads are the means by which the DVD/VCR reads the picture from the tape during playback. In the unlikely event that the heads become dirty enough to be clogged, no picture will be displayed. This can easily be Good Picture determined if, during playback of a known good tape, there is good sound, but no picture (picture is extremely snowy). If this is the case, have the DVD/VCR checked and cleaned by qualified service personnel. Snowy Picture Notes: • DO NOT ATTEMPT TO CLEAN THE VIDEO HEADS OR SERVICE THE UNIT BY REMOVING THE REAR COVER. • Video heads may eventually wear out and should be replaced when they fail to produce clear pictures. • To help prevent video head clogging, use only good quality VHS tapes. Discard worn out tapes. 31 Playback (VCR) Basic setupPlayback (VCR)
-
 1
1 -
2
-
 3
3 -
 4
4 -
 5
5 -
 6
6 -
 7
7 -
 8
8 -
 9
9 -
 10
10 -
 11
11 -
 12
12 -
 13
13 -
14
-
15
-
16
-
17
-
18
 |
 |