Toshiba TDP-D2 Owners Manual - Page 15
Using the menu Continued - lamp life
 |
View all Toshiba TDP-D2 manuals
Add to My Manuals
Save this manual to your list of manuals |
Page 15 highlights
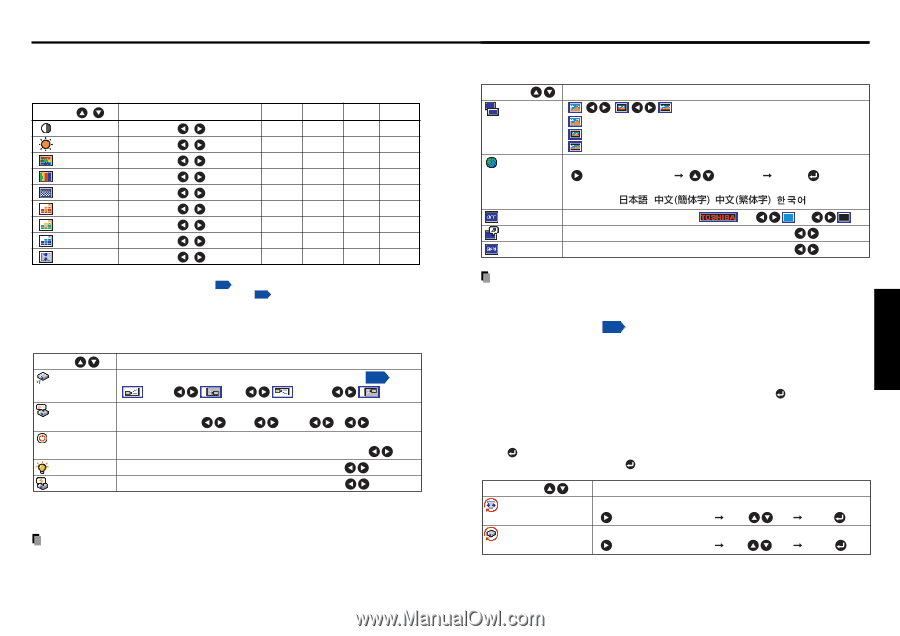
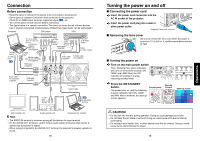
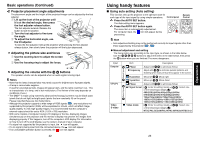
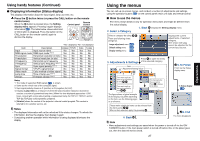
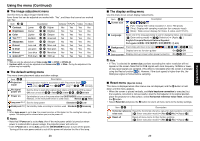
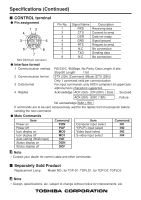
Using the menu (Continued) I The image adjustment menu Use this menu to adjust image-related items. Items Items that can be adjusted are marked with "Yes", and those that cannot are marked with "No". Item Contrast Brightness Color Tint [Note 1] Sharpness R-level G-level B-level Up/down shift [Note 2] Description Lower Higher Darker Brighter Lighter Deeper Reddish Greenish Softer Sharper Less red More red Less green More green Less blue More blue Shift down Shift up Computer Y/PB/PR Yes Yes Yes Yes No Yes No No No Yes Yes Yes Yes Yes Yes Yes No Yes Video Yes Yes Yes Yes Yes Yes Yes Yes Yes S-video Yes Yes Yes Yes Yes Yes Yes Yes Yes Notes 1: Tint can only be adjusted when Video mode p.23 is NTSC or NTSC4.43. 2: Up/down shift can only be adjusted when Screen size p.29 is Wide. During the adjustment, the picture may be instability. I The default setting menu This menu shows placement status and other settings. Item Projection mode No signal power off Power on Description Set projection mode in accordance with Placement Style p.21 (Placed on floor) (Rear) (Hung from ceiling) (Back hung from ceiling) Set the time to wait after signal input stops until turning off the power: Off (not turned off) 1 min 2 min ... 60 min Set whether to turn on the power when the ON/STANDBY button is pressed (Manual), or the main power switch is used (Auto). Manual Auto Lamp power [Note 1] Set the lamp power Standard Low Standby mode [Note 2] Set standby mode according to functions used Standard Economy Note 1: When lamp power is set to low, the screen becomes a little darker, but the cooling fan noise gets quieter. This setting will be cleared when you turn the power off. Notes • Note that if Power on is set to Auto, then if the main power switch is turned on when power is restored after a power outage, the projector power will come on. • Even if Power on is set to Auto, press the ON/STANDBY button to turn off the power. Turning off the main power switch to cut off the power will shorten the life of the lamp. 28 I The display setting menu Use this menu to set screen display-related items. Item Screen size Description (Full): Display with native resolution (1,024 x 768 pixels) (Thru): Display with sampling resolution (for computer input) (Wide): Wide-screen display (for Video, S-video, and Y/PB/PR) Language Select one of the languages below to use for displaying menus and messages [ : Enter setting mode] [ :Selection] [Apply: ] English/Français/Deutsch/Italiano/Español/ Português/ / / / Background Screen to display when there is no input signal (Logo) (Blue) (None) Icon Display icons as function guides On Off Start-up screen Display start-up screen when power turned on On Off Note • If "Thru" is selected for screen size, portions exceeding the native resolution will not appear on the screen. Note that for RGB signals with clock frequency 140MHz or lower, all input pixel signals are sampled. (This effect is noticeable when the screen is enlarged using the Resize function p.36 ). However, if the clock speed is higher than this, the RGB pixel signal is thinned before sampling. I Reset menu (Special menu) This menu is displayed when other menus are not displayed, and the button is held down until the menu appears. • When the screen is placed vertically, and Auto keystone correction is executed, but the keystone correction is not successful, stow the foot adjuster in its original position, place the projector on a flat surface, select Horizontal reference value reset, and press the button. • Select Reset All and press the button to return all menu items to the factory settings. Item Description Horizontal reference Reset the horizontal reference value for Auto keystone correction value reset [ : Enter execution mode] [Yes No] [Apply: ] Reset all Reset all menu items to their factory settings [ : Enter execution mode] [Yes No] [Apply: ] 29 Operations
-
 1
1 -
2
-
3
-
4
-
5
-
6
-
7
-
8
-
9
-
 10
10 -
 11
11 -
 12
12 -
 13
13 -
 14
14 -
 15
15 -
 16
16 -
 17
17 -
 18
18 -
 19
19 -
 20
20
 |
 |