Toshiba TDP-EW25U Owners Manual - Page 37
Setting on the projector
 |
View all Toshiba TDP-EW25U manuals
Add to My Manuals
Save this manual to your list of manuals |
Page 37 highlights
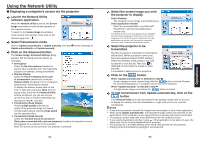
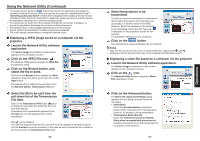
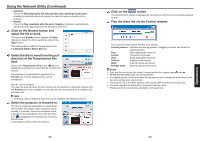
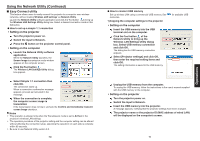
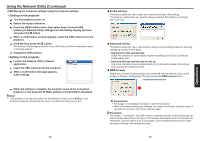
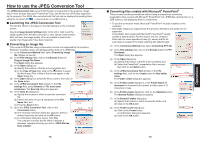
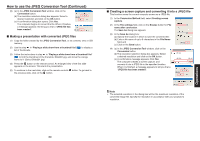
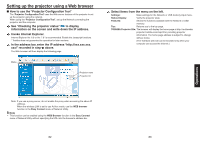
Using the Network Utility (Continued) 2) Modifying the computer settings using the projector settings • Setting on the projector 1 Turn the projector power on. 2 Switch the input to Network. 3 Press the MENU button twice, then select Easy Connect (USB memory) in Network Utility settings from the Setting display (2) menu and press the button. 4 When a confirmation window appears, insert the USB memory into the projector. 5 Click Yes then press the button. The wireless LAN settings are saved to the USB memory. When successfully saved, a message appears. 6 Unplug the USB memory. • Setting on the projector 7 Launch the Network Utility software application. 8 Insert the USB memory into the computer. 9 After a confirmation message appears, make settings. 10 When the setting is complete, the projector name of the connected projector or the projector ID (MAC address of wired LAN) is displayed. Note • This operation is allowed only when the Transmission mode is set to Ad hoc in the projector's wireless LAN settings. Be sure to use Network Utility version 5.0. 72 Profile settings This feature allows the user to save the computer's wireless LAN settings. This feature is useful when you need to change wireless LAN settings according to where you use. Advanced setting This feature allows the user to set details for Easy Connect settings. Make the following settings as required in this dialog. • Registering profile automatically Check this checkbox to automatically register the settings of the Easy Connect as profile setting data. • Switching settings automatically at start-up Check this checkbox to automatically switch to the last used wireless LAN settings when launching the Network Utility. WEB browser Where the computer and the projector are connected over the network, bring up the window of Projector Configuration Tool by pressing the WEB browser button. Precautions • If the page is not displayed correctly, re-select the projector. • When the network settings are changed, the network connection is disconnected. If you wish to reconnect, set up the computer again. Precaution • The simple 1:1 connection, the USB memory connection and the profile setting may not work normally depending on the type of the wireless LAN adapter and the wireless LAN embedded computer. When such a case arises, use the Network Utility menu to make necessary wireless LAN settings manually. 73 Operations
-
 1
1 -
2
-
3
-
4
-
5
-
6
-
7
-
8
-
9
-
10
-
11
-
12
-
13
-
14
-
15
-
16
-
17
-
18
-
19
-
20
-
21
-
22
-
23
-
24
-
25
-
26
-
27
-
28
-
29
-
30
-
31
-
 32
32 -
 33
33 -
 34
34 -
 35
35 -
 36
36 -
 37
37 -
 38
38 -
 39
39 -
 40
40 -
 41
41 -
 42
42 -
43
-
44
-
45
-
46
-
47
-
48
-
49
-
50
 |
 |
