Tripp Lite SMX2200XLRT2U Owner's Manual for 230V SmartPro UPS 932827 - Page 4
Mounting Tower
 |
View all Tripp Lite SMX2200XLRT2U manuals
Add to My Manuals
Save this manual to your list of manuals |
Page 4 highlights
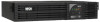
Mounting (Tower) Mount all UPS models in an upright, tower position using included hardware. The user must determine the fitness of hardware and procedures before mounting. 1 Stand your UPS on its side with the LED/Control panel at the top. Attach one rack mounting ear A to each side B of the UPS using included screws B . Attach the rack mounting ears to the floor with user-supplied hardware. A 1 2 Rotate the LED/Control panel to view it easier while the UPS is tower mounted. Insert a small screwdriver, or other tool, in the slots on either side of the panel. Pop the panel out; rotate it; and pop the panel back in place. Note: For additional stability, order the 2-9USTAND expandable tower stand accessory. 2 4
-
 1
1 -
 2
2 -
 3
3 -
 4
4 -
 5
5 -
 6
6 -
 7
7 -
 8
8 -
 9
9 -
 10
10 -
11
-
12
-
13
-
14
-
15
-
16
-
17
-
18
-
19
-
20
-
21
-
22
-
23
-
24
-
25
-
26
-
27
-
28
-
29
-
30
-
31
-
32
-
33
-
34
-
35
-
36
-
37
-
38
-
39
-
40
-
41
-
42
-
43
-
44
-
45
-
46
-
47
-
48
-
49
-
50
-
51
-
52
-
53
-
54
-
55
-
56
-
57
-
58
-
59
-
60
-
61
-
62
-
63
-
64
-
65
-
66
-
67
-
68
-
69
-
70
-
71
-
72
 |
 |

Mounting (Tower)
4
Mount all UPS models in an upright, tower position using included hardware. The user must
determine the fitness of hardware and procedures before mounting.
Stand your UPS on its side with the LED/Control panel
at the top. Attach one rack mounting ear
A
to each side
of the UPS using included screws
B
. Attach the rack
mounting
ears
to
the
floor
with
user-supplied
hardware.
Rotate the LED/Control panel to view it easier while the
UPS is tower mounted. Insert a small screwdriver, or
other tool, in the slots on either side of the panel. Pop the
panel out; rotate it; and pop the panel back in place.
Note: For additional stability, order the
2-9USTAND expandable tower stand accessory.
A
B
1
2
1
2