Troy-Bilt Big Red Technical Manual - Page 21
Pinion, Shaft, Assembly
 |
View all Troy-Bilt Big Red manuals
Add to My Manuals
Save this manual to your list of manuals |
Page 21 highlights
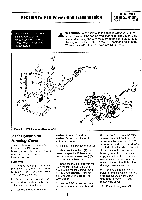
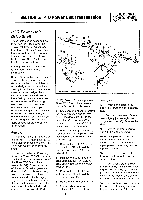
SECTION 5: PTO Power Unit Transmission PTO HORSE MODEL TECHNICAL MANUAL Page 5-5 4/90 c. Lightly lubricate the new bearings with #30 weight oil. 5. Insert the drive shaft (17) into the front of the housing. 6. Install the bearing cup (20) on the front bearing. 7. Place the front bearing cap (14) over the bore opening and seat it by tapping it with a mallet. A gasket (16) should not be on the bearing cap at this time. Hold the bearing cap firmly in place with one hand while you check the drive shaft for end play by pulling and pushing the drive shaft. Correct end play is between .005 and .010 of an inch. a. If there is less than .005 of an inch play or if the end play is between .005 and .010 of an inch, then remove the bearing cap and place a gasket (16) on the cap. Check for end play again. If the end play is correct, go to step 8. b. If there is more than .010 of an inch play, then remove the bearing cap and shim (18) accordingly. Test for end play again. If the end play is correct, remove the bearing cap and place a gasket (16) on the cap. Then go to step 8. 8. Install the front bearing cap and secure it with bolts (12) and lockwashers (13). If lockwashers are not available, apply a coating of non-hardening gasket sealer to the tip of the bolts. 9. Apply a layer of nonhardening gasket sealer to the outer sealing edge of the front bearing cap oil seal (15). Install the seal flush with the bearing cap. 10. Apply a layer of nonhardening gasket sealer to the outer sealing edge of the rear drive shaft oil seal (11). Install the seal and stop when you feel the seal hit the snap ring. 11. Apply a heavy coating of grease to the dog clutch (5), including the groove in the outer surface. Slide the dog clutch on the drive shaft, making sure the three "ears" point to the rear of the transmission. 12. Align the keyway in the shaft and the keyway in the dog clutch and insert the key (10) all the way forward. 13. Using snap ring pliers, install the (external) snap ring (4) that retains the dog clutch to the drive shaft. The flat side of the snap ring should face the rear of the transmission. Although not easy to observe, the snap ring has a flat side and a rounded side. 14. Stick your finger in the eccentric shaft assembly hole and position the groove on the dog clutch in the center of the hole. 15. Apply a thin coating of grease to the socket head screw (or ball bearing assembly on earlier models) on the eccentric shaft assembly and the shifting arm (6-9). Then insert the assembly into the hole. Hold the assembly so that the socket head screw is at 12 o'clock. 16. Using your fingers, gently turn the hex nut/bushing (6) until the hex nut is snug against the power unit housing. Note: The hex nut/bushing should turn freely at all times until the nut is against the housing. Do not use force; you can damage the eccentric shaft or socket head screw. If necessary, back the nut off a few turns and rotate the eccentric shaft a fraction of a turn. Then try to thread the nut inward again. 17. Make sure that you have properly seated the screw head in the clutch groove. Rotate the eccentric shaft back and forth while looking through the rear of housing. The screw is properly seated if the clutch moves back and forth with each turn of the eccentric shaft. 18. Tighten the hex nut/bushing securely with a wrench. 19. Fill the dog clutch cavity with grease. Stop where the housing bore widens to accept the tiller attachment sleeve. 20. Attach the Tines/PTO Clutch Lever (2) and finger tighten the bolt (1) that holds the lever. 21. Install the PTO power unit housing cover. See the instructions in this section. 22. Install the drive shaft pulley by reversing steps 5 and 6 of the drive shaft removal instructions. Pinion Shaft Assembly These instructions describe how to service the pinion shaft assembly. Before you can service the pinion shaft assembly you must first drain the transmission gear oil and remove the PTO power unit drive shaft assembly. See the drive shaft removal instructions in this section. Use Figure 5-4 as a reference for part locations in these instructions. Removal 1. Using a 3/16-inch punch and a hammer, knock out the spirol roll pins (1) from the pinion bearing retaining plugs (2) on each side of the housing. 2. Using pump pliers or screw-in pullers, remove the pinion bearing retaining plugs. 3. Cut and discard the O-ring (3) from each retaining plug. 4. Remove the shims (4) from either side of the housing.
-
 1
1 -
2
-
3
-
4
-
5
-
6
-
7
-
8
-
9
-
10
-
11
-
12
-
13
-
14
-
15
-
 16
16 -
 17
17 -
 18
18 -
 19
19 -
 20
20 -
 21
21 -
 22
22 -
 23
23 -
 24
24 -
 25
25 -
 26
26 -
27
-
28
-
29
-
30
-
31
-
32
-
33
-
34
-
35
-
36
-
37
-
38
-
39
 |
 |