Troy-Bilt CS 4265 Service Manual - Page 5
Cleaning the Reduction, Chamber., - wood shredder
 |
View all Troy-Bilt CS 4265 manuals
Add to My Manuals
Save this manual to your list of manuals |
Page 5 highlights
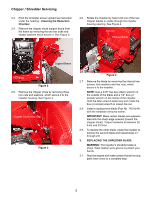
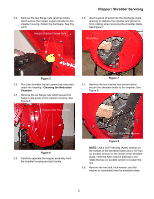
3.2. Remove the two flange nuts (and hex bolts) which secure the hopper support bracket to the impeller housing. Retain the hardware. See Figure 5. Hopper Bracket Flange Nuts Chipper / Shredder Servicing 3.6. Insert a piece of wood into the discharge chute opening to stabilize the impeller and prevent it from rotating when removing the shredder blade. See Figure 7. Wood Stop Figure 5 3.3. Pivot the shredder screen upward as instructed under the heading - Cleaning the Reduction Chamber. 3.4. Remove the six flange nuts which secure the hopper inlet guide to the impeller housing. See Figure 6. Hopper Inlet Flange Nuts Figure 7 3.7. Remove the two internal hex screws which secure the shredder blade to the impeller. See Figure 8. Figure 6 3.5. Carefully separate the hopper assembly from the impeller housing and set it aside. Shredder Blade Hex Screws Figure 8 NOTE: Use a 3/16" hex key (Allen) wrench on the outside of the shredder blade and a 1/2" box (or socket) wrench on the inside of the shredder blade. Hold the Allen wrench stationary and rotate the box (or socket) wrench to loosen the nut. 3.8. Remove the hex bolt, lock washer, and flat washer to completely free the shredder blade. 3
-
 1
1 -
 2
2 -
 3
3 -
 4
4 -
 5
5 -
 6
6 -
 7
7 -
 8
8
 |
 |
