Uniden BC370CRS English Owners Manual - Page 14
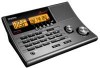
Volume Control, Squelch Control, ALARM Select, Radio, SNOOZE/Backlight Key, TIME Set, Alarm Set, - radio scanner
 |
UPC - 050633650479
View all Uniden BC370CRS manuals
Add to My Manuals
Save this manual to your list of manuals |
Page 14 highlights
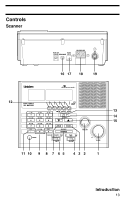
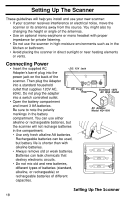
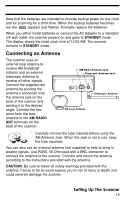
1 Volume Control - Lets you raise or lower the level of the sound. 2 Squelch Control - Lets you set the signal level required to receive a transmission. If you open the squelch all the way, you will hear hissing between transmissions. This lets you hear weak signals, but prevents scanning. As you close squelch, a stronger signal is required to stop scanning and open audio. You normally set the control to a point just where hissing on all channels stops between transmissions. 3 SCAN - Press to begin scanning the channels or to resume scanning. 4 ALARM Select - Set to Off to disable alarm; Set to Radio to enable the radio alarm; Set to Tone to enable the tone alarm. 5 SNOOZE/Backlight Key - Backlight: Tap to turn the LCD backlight on for 15 seconds. Press and hold to permanently turn on the backlight. Press and hold again to turn off the backlight. Snooze: Press while the alarm sounds to silence the alarm for 5 minutes. 6 TIME Set - Use to select your desired operation: Alarm Set; Clock Set; Clock. 7 HOLD - Press to temporarily stop scanning, limit searching, or weather scanning and remain on the channel. The scanner displays the channel on hold. Press again to resume searching or scanning. 8 E/PGM - Press to enter the Program Mode. In Program Mode, enter the desired frequency using the number buttons. Then press E/PGM to store that frequency into the memory. In Limit Search Mode, after entering the frequency, press E/PGM to program the upper and lower limit frequency. 9 0 to 9 - Use the number buttons in four basic operations: • press a number button to enter a frequency. • press a number button to change a channel using the Direct Channel Access feature. • press a number button while scanning to enable or disable the associated scanning bank memory bands. 10 POWER - Press to turn power on and off. The time and date display when power is off (standby mode). Introduction 14
-
 1
1 -
2
-
3
-
4
-
5
-
6
-
7
-
8
-
 9
9 -
 10
10 -
 11
11 -
 12
12 -
 13
13 -
 14
14 -
 15
15 -
 16
16 -
 17
17 -
 18
18 -
 19
19 -
20
-
21
-
22
-
23
-
24
-
25
-
26
-
27
-
28
-
29
-
30
-
31
-
32
-
33
-
34
-
35
-
36
-
37
-
38
-
39
-
40
 |
 |