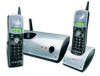
Uniden DCT4960-2 English Owners Manual - Page 3
Eference - 2 line phone
 |
View all Uniden DCT4960-2 manuals
Add to My Manuals
Save this manual to your list of manuals |
Page 3 highlights
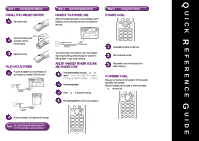
Step 1 Charging the Battery INSTALL THE HANDSET BATTERY Remove the cover. Connect the battery pack connector with the correct polarity. Replace the cover. PLUG INTO AC POWER Plug the AC adapter cord into the base unit and charger to a standard 120V AC outlet. Place the handset on the base and the charger. Note: You must charge the battery pack for 12-15 hours before using the phone. Step 2 Connecting/Adjusting CONNECT TO A PHONE LINE When the handset battery pack is fully charged, plug the telephone cord into the base unit then into a telephone wall jack. Step 3 Using the Phone TO MAKE A CALL hone book end caller id talk flash 1 2 abc 3 def 4 ghi 5 jkl 6mno 7pqrs 8 tuv 9wxyz tone 0oper Press talk and listen for dial tone. Your phone is set for tone dialing. If your local network requires pulse dialing, please see page 10 "Choose the dialing mode" in your owner's manual. Dial the desired number. ADJUST HANDSET RINGER VOLUME Press end or return the handset to the AND RINGER TONE base to hang up. 12-15 hours before using the phone. Press menu/enter and press v or w to select "Line Ring", "Ringer Volume" or "Ringer Tone". Press menu/enter. Press v or w to change the setting. TO ANSWER A CALL Press any number key on the handset or lift the handset (AutoTalk) from the base. Adjust the handset volume louder or softer by pressing v or w during a call. phone book end caller id Press menu/enter to confirm your selection. phone book end caller id talk flash talk flash 1 2 abc 3 def 4 ghi 5 jkl 6mno 7pqrs 8 tuv 9wxyz tone 0oper 1 2 abc 3 def 4 ghi 5 jkl 6mno hold menu redial int'com format enter pause delete 7pqrs 8 tuv 9wxyz tone 0oper hold menu redial int'com format enter pause delete QUICK REFERENCE GUIDE
-
 1
1 -
 2
2 -
 3
3 -
 4
4 -
 5
5 -
 6
6 -
 7
7 -
 8
8 -
 9
9 -
10
-
11
-
12
-
13
-
14
-
15
-
16
-
17
-
18
-
19
-
20
-
21
-
22
-
23
-
24
-
25
-
26
-
27
-
28
-
29
-
30
-
31
-
32
-
33
-
34
-
35
-
36
-
37
-
38
-
39
-
40
-
41
-
42
-
43
-
44
-
45
-
46
-
47
-
48
-
49
-
50
-
51
-
52
-
53
-
54
 |
 |
