Uniden OCEANUSDSC-BK English Owners Manual
Uniden OCEANUSDSC-BK Manual
 |
UPC - 050633500538
View all Uniden OCEANUSDSC-BK manuals
Add to My Manuals
Save this manual to your list of manuals |
Uniden OCEANUSDSC-BK manual content summary:
- Uniden OCEANUSDSC-BK | English Owners Manual - Page 1
- Uniden OCEANUSDSC-BK | English Owners Manual - Page 2
Maritime Radio Services Operation Warning! This transmitter will operate on channels/frequencies that have restricted use in the United States. The channel assignments include frequencies assigned for exclusive - Uniden OCEANUSDSC-BK | English Owners Manual - Page 3
Contents Uniden OCEANUS DSC 2 Included with your OCEANUS DSC 3 Controls and Indicators 4 Installation 8 Choosing a Location 8 Engine Noise Suppression 9 Antenna Considerations 9 Antenna Selection and Installation 9 Installing the OCEANUS DSC 10 Operation 11 Power On/Off 11 Last Channel - Uniden OCEANUSDSC-BK | English Owners Manual - Page 4
Channel and Functions (USA Channels 55 Channel and Functions (International Channels 56 Channel and Functions (Canadian Channels 57 NWR-SAME Event Code 58 Specification 59 Troubleshooting 60 Care and Maintenance 61 Three Year Limited Warranty 64 - Uniden OCEANUSDSC-BK | English Owners Manual - Page 5
Uniden OCEANUS DSC The Uniden OCEANUS DSC VHF marine radio has been designed to give you a rugged, reliable instrument that will provide you with years of trouble-free service encouraged to thoroughly read the rest of this Operating Guide to acquaint yourself with the characteristics and operation of - Uniden OCEANUSDSC-BK | English Owners Manual - Page 6
Included with your OCEANUS DSC OCEANUS DSC Owner s Manual OCEANUS DSC Radio Microphone Hanger and Screws Mounting Bracket and Knobs DC Cord Mounting Hardware Accessory Cable 3 Spare Fuse 250V 6A - Uniden OCEANUSDSC-BK | English Owners Manual - Page 7
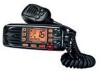
Controls and Indicators Front panel/Microphone 5 678 9 1 2 3 4 10 11 12 13 14 15 1. PTT Switch - Press to transmit and release to receive. 2.13. 16/9/TRI - Press this key instantly change to Channel 16, Channel 9 or current channel. Pressing and holding this key for 2 seconds will activate - Uniden OCEANUSDSC-BK | English Owners Manual - Page 8
Rear Panel Connectors 1 2 3 1. DC Jack 2. ACC Connector 3. Remote Connector 4. Antenna Connector 4 ACC Connector To OCEANUS DSC Note: DC13.8V and GND are for GPS ANT. 5 - Uniden OCEANUSDSC-BK | English Owners Manual - Page 9
. ("ALT" Icon) - Indicates Weather Alert Mode has been activated. 13. CH TAG - This area is used for Channel Tag, Menu, and message of SAME, DSC, GPS, and frequency of weather channel. These messages will continually scroll from right to the left. 14. (GPS Icon) - It appears while GPS module is - Uniden OCEANUSDSC-BK | English Owners Manual - Page 10
Flow Chart for Menu Operation MENU DSC CALL INDIVIDUAL GROUP ALL SHIPS POS REQUEST POS SEND STANDBY CALL WAIT EXIT of these modes are cancelled. The Menu mode will be cancelled if the radio receives a DSC call or any key is pressed besides the Up arrow, Down arrow, or select keys are pressed. 7 - Uniden OCEANUSDSC-BK | English Owners Manual - Page 11
must all be taken into account. You should select the optimum relationship among these considerations. Keep in mind the flexibility designed into the OCEANUS DSC so that you can most conveniently use it. Features which should be considered are: 1. The universal mounting bracket may be installed on - Uniden OCEANUSDSC-BK | English Owners Manual - Page 12
by the electrical systems of engines is sometimes a problem with radios. The OCEANUS DSC has been designed to be essentially impervious to quality suppliers. It is recommended you draw upon the advice of your Uniden dealer in determining a suitable antenna for your vessel and range requirements. - Uniden OCEANUSDSC-BK | English Owners Manual - Page 13
Installing the OCEANUS DSC After you have carefully considered the various factors affecting your choice of location, position the radio (with the bracket, microphone, power cord, antenna and any - Uniden OCEANUSDSC-BK | English Owners Manual - Page 14
. Note: When you turn On the radio for the first time after purchase, the channel 16 will appear on the LCD. Last Channel Memory The OCEANUS DSC memorizes the last channel selected before you turn Off the radio. For example, if you turn Off the radio on CH 12, it will be - Uniden OCEANUSDSC-BK | English Owners Manual - Page 15
SQUELCH Turn SQUELCH fully clockwise. This raises the "Squelch Gate" so high that only very strong signals can get through. Strong Signals Medium Signals Weak Signals Noise Turn SQUELCH fully counterclockwise until you hear a hiss. This lowers the "Squelch Gate" so that everything gets through - - Uniden OCEANUSDSC-BK | English Owners Manual - Page 16
COAST GUARD CHANNEL 16/CHANNEL 9 COMMUNICATIONS To access Coast Guard Channel 16 or Channel 9 communications, press 16/9/TRI. You can access Coast Guard 16 CH instantly while tuned to another channel. Press 16/9/TRI again for Channel 9 Calling communications. Press 16/9/TRI a third time to return to - Uniden OCEANUSDSC-BK | English Owners Manual - Page 17
TUNING To manually select a channel, press CH L or M. Communication channels are located on channel 01-28 and 60-88. Weather channels are located on channels WX 0-9. WEATHER CHANNELS - Uniden OCEANUSDSC-BK | English Owners Manual - Page 18
To cancel the channel in Memory, press and hold UIC/MEM for 2 seconds. The MEM icon disappears. Note: The Memory channel can be set independently in 3 regional modes (USA, INT, and CAN). You cannot use this feature in WX mode or for channel 70. Triple Watch Scan To turn Triple Watch Scan On, - Uniden OCEANUSDSC-BK | English Owners Manual - Page 19
area (such as a county) affected by the emergency. The OCEANUS DSC was developed with the SAME (Specific Area Message Encoding) technology. This FIPS code identifies a specific geographic area (defined by the National Weather Service), so your radio sounds an alert only when an emergency/weather - Uniden OCEANUSDSC-BK | English Owners Manual - Page 20
The icon indicates the Weather Alert mode is activated. To activate the Weather Alert mode: 1. Press and hold WX/ALERT for 2 seconds when WX ALERT is Off. The radio turns the WX ALERT On and the icon appears. 2. If the radio receives a 1050Hz tone, the icon will blink every other second and the - Uniden OCEANUSDSC-BK | English Owners Manual - Page 21
The OCEANUS DSC transmits on fifty-four marine frequencies and receives on eighty marine frequencies. Channel 70 of the USA, International, and Canadian frequencies, and channel 15 of the USA frequencies, and WX CH - are for receiving only. The radio transmits on channel 70 when sending DSC - Uniden OCEANUSDSC-BK | English Owners Manual - Page 22
. Otherwise, sender's MMSI is displayed. Latitude, longitude, and time information will also be displayed if the GPS module is carried in the vessel that transmitted a DSC Distress call. 19 - Uniden OCEANUSDSC-BK | English Owners Manual - Page 23
MARINE DISTRESS PROCEDURE Speak slowly - clearly - calmly. 1. Make sure your radio is On. 2. Tune to Channel 16. 3. Press the PTT button on the microphone and say: "MAYDAY - MAYDAY - MAYDAY." 4. Give your ship ID. 5. Say "MAYDAY [your ship name]." 6. Give your location: (what navigational aids or - Uniden OCEANUSDSC-BK | English Owners Manual - Page 24
has also been selected as part of the Global Maritime Distress and Safety System (GMDSS). This service will let you instantly send a Distress call with GPS position (when optional GPS receiver is connected to the OCEANUS DSC) to the US Coast Guard and other vessels within range of the transmission - Uniden OCEANUSDSC-BK | English Owners Manual - Page 25
contact using CH L and M. Press SELECT to transmit the individual DSC signal. 4. WAITING appears followed by the individual you have selected, cannot proceed to the 2nd step. See the SETUP section for directory, setup instructions. Select an open (unused) working channel first, then make the call. - Uniden OCEANUSDSC-BK | English Owners Manual - Page 26
call the group members. Press SELECT to call. When you finish calling, the radio returns to the channel display screen. 1-C. ALL SHIPS 1. Press SELECT at DSC CALL (To enter DSC CALL, see page 21). INDIVIDUAL appears. 2. Press CH M twice to select ALL SHIPS. 3. Press SELECT. URGENCY appears. 23 - Uniden OCEANUSDSC-BK | English Owners Manual - Page 27
call using CH L and M (URGENCY, SAFETY, ROUTINE). Note: ROUTINE calls tune to the previously selected channel. 5. Press SELECT to transmit the ALL SHIPS DSC signal. When sending either an URGENCY or SAFETY message, all radios will automatically move to channel 70 until all of the data is received - Uniden OCEANUSDSC-BK | English Owners Manual - Page 28
individual. You can see the time and the position. Note: The requested radio must have the ability to transmit the position information (such as having a OCEANUS DSC radio). 25 - Uniden OCEANUSDSC-BK | English Owners Manual - Page 29
to send the position of your vessel to another vessel using a VHF marine radio equipped with DSC. Note: Position send is only available when it is connected to the GPS. 1. Press SELECT at DSC CALL (To enter DSC CALL, see page 21). INDIVIDUAL appears. 2. Press CH M four times to select POS SEND - Uniden OCEANUSDSC-BK | English Owners Manual - Page 30
STANDBY function allows the OCEANUS DSC to answer DSC calls with the UNATTENDED message and record the calls for response at another time. When you set the radio to DSC STANDBY mode, voice traffic may still be active on any chosen channel. 1. Press SELECT at DSC CALL (To enter DSC CALL, see page 21 - Uniden OCEANUSDSC-BK | English Owners Manual - Page 31
records 10 received distress calls, and records 20 individual calls that are received and not answered within 5 minutes or while the radio is set to DSC Standby. Calls will be recorded while you are busy with other communications as long as the transmitter is not keyed at the time of the - Uniden OCEANUSDSC-BK | English Owners Manual - Page 32
5. Press SELECT. 6. If a DISTRESS call is received in Call Wait, the following display appears. If an INDIVIDUAL call is received in Call Wait, the following display appears. At this point, you can call back any of the radios in the log. 7. Press SELECT. Received data appears. 8. Using CH L and M - Uniden OCEANUSDSC-BK | English Owners Manual - Page 33
2. SETUP 1. Press and hold H/L/MENU for 2 seconds to enter Menu Operation. 2. Press CH M once to display SETUP, and press SELECT. SETUP has 9 options as follows. To exit, select EXIT. 2-A. ALARM CLOCK This feature is only available when the GPS is connected to the NMEA0183 Accessory Wires. If it is - Uniden OCEANUSDSC-BK | English Owners Manual - Page 34
6. Select AM or PM using CH L or M, then press SELECT. 7. A confirmation screen appears. 2-A-2. ALARM ON This feature allows you to turn the alarm ON. 1. Press SELECT at SETUP (To enter SETUP, see page 30). 2. ALARM CLOCK appears. Then, press SELECT. 3. Press SELECT again. 4. Select On. Using CH - Uniden OCEANUSDSC-BK | English Owners Manual - Page 35
2-A-3. ALARM OFF This feature allows you to turn the alarm OFF. 1. Press SELECT at SETUP (To enter SETUP, see page 30). 2. ALARM CLOCK appears. 3. Press SELECT. 4. Select OF using CH L or M, then press SELECT. 5. Press SELECT. The radio returns to the channel display screen and the icon disappears. - Uniden OCEANUSDSC-BK | English Owners Manual - Page 36
2-B. DIRECTORY This function will allow you to send an individual call, etc. The Directory function memorizes the name and MMSI number of 20 other vessels. The following screen will allow you to setup an alphanumeric identity as well as the corresponding MMSI number. 1. Press SELECT at SETUP (To - Uniden OCEANUSDSC-BK | English Owners Manual - Page 37
2-B-1. NEW This function will allow you to enter new information into the directory. 1. Press SELECT at NEW. The registering screen appears. 2. You can now enter the person's name. Press CH L repeatedly to choose the alphabet. The character will be entered when SELECT is pressed, and the blinking - Uniden OCEANUSDSC-BK | English Owners Manual - Page 38
2-B-2. EDIT If you want to edit the DIRECTORY 1. Press SELECT at the individual you want to edit. 2. EDIT appears, then press SELECT. 3. You can now edit the person's name. Press CH L repeatedly, and press SELECT to choose the alphabet. See the step 2 of 3-E-1 for detail. 4. After you edit the - Uniden OCEANUSDSC-BK | English Owners Manual - Page 39
2-B-3. DELETE If you want to delete the directory 1. Press SELECT at the individual you want to delete. 2. Press CH M once. DELETE appears, then press SELECT. 3. The radio displays the next individual. If no more code remains, EXIT appears. 36 - Uniden OCEANUSDSC-BK | English Owners Manual - Page 40
2-C. FIPS The 6-digit Federal Information Processing System (FIPS) code established by the National Weather Service (NWS) identifies geographic areas in the United States. Programming FIPS codes are necessary to receive SAME alerts about weather occurring in a particular area. To obtain - Uniden OCEANUSDSC-BK | English Owners Manual - Page 41
2-C-1. NEW If you want to register a new FIPS code 1. Press SELECT at NEW. The registering screen appears. 2. You can now enter the new FIPS code. Press CH L to increase the number, CH L to decrease. The number will be entered when SELECT is pressed, and the blinking digit moves to the right. When - Uniden OCEANUSDSC-BK | English Owners Manual - Page 42
4. When you finished editing the last digit, the confirmation screen appears. 2-C-3. DELETE If you want to delete a directory entry 1. Press SELECT at the code that you want to delete. 2. Press CH M once. DELETE appears, then press SELECT. 3. The radio displays the next code. If no more code remains - Uniden OCEANUSDSC-BK | English Owners Manual - Page 43
. This feature is useful when engaged in bridge - to - bridge or other safety related calls. When you have completed these calls, all of the incoming DSC calls received are available in the call log. 1. Press SELECT at SETUP (To enter SETUP, see page 30). 2. Display AUTO CH SW using CH L and - Uniden OCEANUSDSC-BK | English Owners Manual - Page 44
2-E. POSITION REPLY When the calling radio has requested the position information of your radio, you can decide to transmit an acknowledgment automatically or on a call by call basis. 1. Press SELECT at SETUP (To enter SETUP, see page 30). 2. Display POS REPLY using CH L and M. 3. Press SELECT to - Uniden OCEANUSDSC-BK | English Owners Manual - Page 45
Example: On When the radio receives a position request, the following screen appears. Example: OF When the radio receives a position request, the following screen appears. You can select whether reply the request or not. If you wants to reply press SELECT. 5. Press SELECT. The radio returns to the - Uniden OCEANUSDSC-BK | English Owners Manual - Page 46
SELECT. The channels and its names appear. 4. Press CH L and M repeatedly to select the channel that you would like to EDIT or DELETE. Note: The OCEANUS DSC radio comes pre-programmed with default channel names. 43 - Uniden OCEANUSDSC-BK | English Owners Manual - Page 47
2-F-1. EDIT If you want to edit the channel name 1. Press SELECT at the individual channel you want to edit. 2. You can edit the name. Press CH L or M to select the alphabet, numeric, or symbols. The character will be entered when SELECT is pressed, and the blinking digit moves to the right. 3. - Uniden OCEANUSDSC-BK | English Owners Manual - Page 48
allow you to connect the WHAM. Note: When you use the WHAM in addition to the OCEANUS DSC wired mic, please set the BASE ID for the WHAM the same as your OCEANUS DSC. (Please refer to the Owner's Manual for the WHAM). 1. Press SELECT at SETUP (To enter SETUP, see page 30). 2. Display WHAM - Uniden OCEANUSDSC-BK | English Owners Manual - Page 49
yourself. This feature allows you to set the Base ID. To use the WHAM, you must set the same Base ID for your OCEANUS DSC and WHAM, which enables your OCEANUS DSC and WHAM to communicate with one another. 1. Press SELECT at BASE ID, the following screen appears. 2. Press CH L to increase the number - Uniden OCEANUSDSC-BK | English Owners Manual - Page 50
2-G-2. LINK CH This feature allows you to change the channel between your OCEANUS DSC and the WHAM if you encounter interference. 1. Press CH M once at BASE ID. LINK CH appears. 2. Press SELECT to enter the editing mode. 3. Press CH L - Uniden OCEANUSDSC-BK | English Owners Manual - Page 51
2-H. GROUP MMSI 1. Press SELECT at SETUP (To enter SETUP, see page 30). 2. Display GROUP MMSI using CH L and M. 3. Press SELECT. The group MMSI ID screen appears. 4. You can now enter the GROUP MMSI code. Press CH L to increase the number, CH M to decrease. The number will be entered when SELECT is - Uniden OCEANUSDSC-BK | English Owners Manual - Page 52
into the OCEANUS DSC. The Uniden dealer or visit one of the following websites: http://wireless.fcc.gov/marine/fctsht14.html, www.boatus.com/mmsi/, or www.maritel.com This portion of the SETUP menu will allow you to program an MMSI, (Maritime Mobile Service Identity) for sending and receiving DSC - Uniden OCEANUSDSC-BK | English Owners Manual - Page 53
. The radio returns to USER MMSI screen. Note: You can only program your radio twice with an MMSI number. After that, send your radio to Uniden for factory service. 50 - Uniden OCEANUSDSC-BK | English Owners Manual - Page 54
3. SYSTEM 1. Press and hold H/L/MENU for 2 seconds to enter Menu Operation. 2. Press CH M twice to display SYSTEM, and press SELECT. SYSTEM has 3 options as follows. To exit, select EXIT. 3-A. CONTRAST 1. Press SELECT at SYSTEM. CONTRAST appears. 2. Press SELECT to enter the setting mode. (Default - Uniden OCEANUSDSC-BK | English Owners Manual - Page 55
3-B. LAMP ADJUST 1. Press SELECT at SYSTEM. 2. Press CH M once to select LAMP ADJUST. 3. Press SELECT to enter the setting mode. 4. Press CH L and M to select the backlight brightness level. (Default is set to 2). 5. When you find the most favorable brightness, press the SELECT. The radio returns - Uniden OCEANUSDSC-BK | English Owners Manual - Page 56
3-C. KEY BEEP 1. Press SELECT at SYSTEM. 2. Press CH M twice to select KEY BEEP. 3. Press SELECT to enter the setting mode. 4. Press CH L and M to select ON or OFF. 5. Press SELECT. The radio returns to the KEY BEEP screen. 53 - Uniden OCEANUSDSC-BK | English Owners Manual - Page 57
Bits - Set the Stop Bits to 1. 5. GPRMC Command - This command is used by the OCEANUS DSC and includes the UTC Time, Latitude, Longitude, Speed, Direction, and Date information. The data amplitude dash" installation. (White = FMB322W, Black = FMB322B) Contact your Uniden Dealer for information. 54 - Uniden OCEANUSDSC-BK | English Owners Manual - Page 58
CCG USCG USCG TELEPHONE TELEPHONE TELEPHONE TELEPHONE TELEPHONE CCG VTS COMMERCIAL Yes PORT OPR Yes PORT OPR No BRG/BRG Yes SHIP-SHIP Yes PLEASURE DSC Yes PLEASURE No SHIP-SHIP Yes PORT OPR Yes PORT OPR No PORT OPR Yes SHIP-SHIP Yes SHIP-SHIP Yes SHIP-SHIP Yes CCG - Uniden OCEANUSDSC-BK | English Owners Manual - Page 59
SAR INTL INTL PORT OPR INTL INTL INTL TELEPHONE TELEPHONE TELEPHONE TELEPHONE TELEPHONE TELEPHONE INTL INTL INTL TELEPHONE INTL INTL BRG/BRG SHIP-SHIP PLEASURE DSC PLEASURE SHIP-SHIP PORT OPR PORT OPR PORT OPR INTL INTL INTL INTL INTL INTL TELEPHONE TELEPHONE TELEPHONE TELEPHONE TELEPHONE - Uniden OCEANUSDSC-BK | English Owners Manual - Page 60
USCG INTL TELEPHONE TELEPHONE TELEPHONE TELEPHONE TELEPHONE TELEPHONE CCG INTL COMMERCIAL Yes PORT OPR Yes PORT OPR No BRG/BRG Yes SHIP-SHIP Yes PLEASURE DSC Yes PLEASURE No SHIP-SHIP Ye PORT OPR Ye PORT OPR No PORT OPR Yes SHIP-SHIP Yes SHIP-SHIP Yes SHIP-SHIP Yes CCG - Uniden OCEANUSDSC-BK | English Owners Manual - Page 61
NWR-SAME EVENT CODE Event Code Emergency Action Notification Emergency Action Termination National Information Center Tornado Warning # Severe Thunderstorm Warning # Flash Flood Warning Flood Warning Winter Storm Warning Blizzard Warning High Wind/Dust Storm Warning Radiological Hazard Warning - Uniden OCEANUSDSC-BK | English Owners Manual - Page 62
: Transmit 54 Receive 80 Marine/10 Weather : On-Off/Volume, Squelch : TX (Transmit), TRI (Triple Watch), HI (High), LO (Low), U, C, I, MEM, WX, DSC, (Alarm), (Alert), (GPS), (WHAM), and Channel Display : LCD with Orange backlight : 16/9/TRI, DISTRESS, PA, UIC/MEM, SELECT, STEP/SCAN, H/L/MENU, WX - Uniden OCEANUSDSC-BK | English Owners Manual - Page 63
Troubleshooting If the OCEANUS DSC does not perform to your expectations, try the suggestions listed below. If you cannot get satisfactory results, call the Uniden Technical Support at (800) 586-0409, 8:00 a.m. to 5:00 p.m., Central Standard Time, Monday through Friday. SYMPTOM Won't power On. - Uniden OCEANUSDSC-BK | English Owners Manual - Page 64
Care and Maintenance Your OCEANUS DSC is a precision of electronic equipment and you should treat it accordingly. Due to the rugged design, very little continued FCC technical compliance of your radio. • You are urged to arrange for periodic performance checks with your Uniden Marine dealer. 61 - Uniden OCEANUSDSC-BK | English Owners Manual - Page 65
Note 62 - Uniden OCEANUSDSC-BK | English Owners Manual - Page 66
Note 63 - Uniden OCEANUSDSC-BK | English Owners Manual - Page 67
than an authorized Uniden service center for a defect or malfunction covered by this warranty, (E) used in any conjunction with equipment or parts or as part of any system not manufactured by Uniden, or (F) installed or programmed by anyone other than as detailed by the Operating Guide for this - Uniden OCEANUSDSC-BK | English Owners Manual - Page 68
-
 1
1 -
 2
2 -
 3
3 -
 4
4 -
 5
5 -
 6
6 -
 7
7 -
8
-
9
-
10
-
11
-
12
-
13
-
14
-
15
-
16
-
17
-
18
-
19
-
20
-
21
-
22
-
23
-
24
-
25
-
26
-
27
-
28
-
29
-
30
-
31
-
32
-
33
-
34
-
35
-
36
-
37
-
38
-
39
-
40
-
41
-
42
-
43
-
44
-
45
-
46
-
47
-
48
-
49
-
50
-
51
-
52
-
53
-
54
-
55
-
56
-
57
-
58
-
59
-
60
-
61
-
62
-
63
-
64
-
65
-
66
-
67
-
68
 |
 |
