ViewSonic DSM3210 User Guide - Page 8
Getting Started - manual
 |
UPC - 766907311013
View all ViewSonic DSM3210 manuals
Add to My Manuals
Save this manual to your list of manuals |
Page 8 highlights
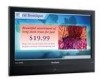
ENGLISH Getting Started Congratulations on your purchase of a ViewSonic® Digital Signage Multimedia. Important! Save the original box and all packing material for future shipping needs. Package Contents Your Digital Signage Multimedia package includes: • Digital Signage Multimedia • VGA HD-15 Cable • Power Cord • Remote Control with batteries • ViewSonic User Guide & Quick Start Guide Mounting ViewSonic Digital Signage Multimedia to the wall The Digital Signage Multimedia can be used in a free standing position or wall-mounted. Before installing the product to the wall, please consider the following guidelines: • Read the Important Safety Instructions, at the start of this manual. • Do not install in a moist or wet environment. This equipment is intended for indoor use. • Do not install near heat source, or strong magnetic fields. • Use only ViewSonic approved wall-mounting brackets to support the Digital Signage Multimedia weight. • Before attaching the wall mount plate to the back cover, ensure the product is working. • If your Digital Signage Multimedia is already set up for free-standing operation, you need to first remove the stand before mounting the device to the wall. To attach the wall-mount bracket to Digital Signage Multimedia safely, please use the following guidelines: • Disconnect the power and any other cables that might hinder moving the Digital Signage Multimedia. • Set the Digital Signage Multimedia on a table or work surface, placing the screen face down on a towel or woolen blanket to protect the screen surface from damage while installing plate. • Before installing the Digital Signage Multimedia on the wall, ensure you have recorded the product serial number on page 4 of the User Guide, as you will need the serial number to request service should there be a service need. • Install the wall mount plate to the Digital Signage Multimedia using screws NO LONGER than 10mm, as longer screws found in universal (non-ViewSonic) wall mount kits may damage the power supply causing the unit to fail. The wall-mount screw type is M6 x L10. • Mount the wall mount bracket to the wall ensuring use of proper screws to support the installation. Ensure there is at least 3cm of space surrounding any air-vents of your Digital Signage Multimedia to allow adequate cooling during operation. • Hang the Digital Signage Multimedia wall mount plate to the wall mount bracket, completing installation. Enjoy your ViewSonic Digital Signage Multimedia! ViewSonic 6 DSM3210
-
 1
1 -
2
-
 3
3 -
 4
4 -
 5
5 -
 6
6 -
 7
7 -
 8
8 -
 9
9 -
 10
10 -
 11
11 -
 12
12 -
 13
13 -
14
-
15
-
16
-
17
-
18
-
19
-
20
-
21
-
22
-
23
-
24
-
25
-
26
-
27
-
28
-
29
-
30
-
31
-
32
-
33
-
34
-
35
-
36
-
37
 |
 |
