ViewSonic PJ501 Service Manual - Page 10
White balance adjustment visual inspection, NRSH adjustment vertical stripe adjustment, PJ551 ONLY
 |
UPC - 766907692815
View all ViewSonic PJ501 manuals
Add to My Manuals
Save this manual to your list of manuals |
Page 10 highlights
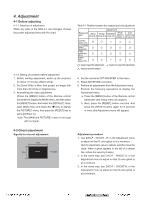
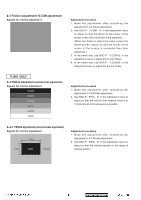
PJ551 ONLY 4-4 NRSH adjustment (vertical stripe adjustment) Signals for internal adjustment Adjustment procedure 1. Make this adjustment after completing the adjustment in 4-3 Flicker adjustment. 2. Use DAC-P - NRSH - R: in the Adjustment menu to adjust so that the vertical lines spaced every 6 dots are as inconspicuous as possible. (Reduce the adjustment value when black stripes appear in the 2nd or 3rd tone from the black side. Note that when the adjustment value is lowered, white stripes may appear in the 2nd or 3rd tone from the bright side. Should this happen, adjust so that the stripes are as inconspicuous as possible.) 3. In the same way, use DAC-P - NRSH - G: in the Adjustment menu to adjust vertical stripes of G color. 4. In the same way, use DAC-P - NRSH - B: in the Adjustment menu to adjust vertical stripes of B color. 4-5 White balance adjustment (visual inspection) Preparations 1. Perform these adjustments after the PSIG adjustment described in Section 4-4. 2. Reset gamma correction before adjustment. Place the cursor on [GAMMA] in the Adjustment menu, press the [RESET] key and select [DEFAULT]. Adjustment procedure 1. First, adjust the G color. 2. Select GAMMA, SUB-CONTRAST, and G: in the Adjust menu. If the background is white solid, press the [MENU SELECT] key on the Remote control transmitter to change to [G] monochrome in the 28-tone grayscale. 3. Adjust GAMMA, SUB-CONTRAST, and G: in the Adjust menu so that brightness of 28 steps is best. 4. Don't adjust GAMMA, SUB-BRIGHT, and G: in the Adjust menu. Because we want to keep the best contrast ratio. 5. Then adjust colors R and B. 6. Select GAMMA, SUB-CONTRAST, and G: in the Adjust menu. If the background is white solid, press the [MENU SELECT] key on the Remote control trasmitter to change to [W] monochrome in the 28-tone grayscale. 7. Adjust GAMMA, SUB-BRIGHT, R: and B: in the Adjust menu so that low-brigtness white balance is best. 8. Adjust GAMMA, SUB-CONTRAST, R: and B: in the Adjust menu so that middle-brightness white balance is best. 9. Repeat steps 7 to 8 above, and adjust so that brightness white balance of 28 steps is best. ViewSonic Corporation 7 Confidential - Do Not Copy PJ501/PJ551
-
 1
1 -
2
-
3
-
4
-
 5
5 -
 6
6 -
 7
7 -
 8
8 -
 9
9 -
 10
10 -
 11
11 -
 12
12 -
 13
13 -
 14
14 -
 15
15 -
16
-
17
-
18
-
19
-
20
-
21
-
22
-
23
-
24
-
25
-
26
-
27
-
28
-
29
-
30
-
31
-
32
-
33
-
34
-
35
-
36
-
37
-
38
-
39
-
40
-
41
-
42
-
43
-
44
-
45
-
46
-
47
-
48
-
49
-
50
-
51
-
52
-
53
-
54
-
55
-
56
-
57
-
58
-
59
-
60
-
61
-
62
 |
 |
