ViewSonic PM-FCP Instruction Manual
ViewSonic PM-FCP Manual
 |
View all ViewSonic PM-FCP manuals
Add to My Manuals
Save this manual to your list of manuals |
ViewSonic PM-FCP manual content summary:
- ViewSonic PM-FCP | Instruction Manual - Page 1
INSTALLATION INSTRUCTIONS PM-FCP Suspended Ceiling Tile Adapter Copyright © 2018, ViewSonic Corporation All rights reserved [20219-00E-10/18] ViewSonic Corporation 10 Point Dr Ste. 200 Brea, CA 92821 USA USA and Canada - Phone: 888-881-8781 [email protected] - ViewSonic PM-FCP | Instruction Manual - Page 2
. THE SURFACE MUST BE CAPABLE OF SUPPORTING 250LBS. IF NOT, THE SURFACE STRUCTURE MUST BE REINFORCED. DO NOT HAND OR ATTACH MORE THAN 50LBS. TO THIS PRODUCT. PROPER INSTALLATION PROCEDURE BY A QUALIFIED SERVICE TECHNICIAN, AS OUTLINED IN THE INSTALLATION INSTRUCTIONS, MUST BE ADHERED TO. FAILURE TO - ViewSonic PM-FCP | Instruction Manual - Page 3
Head Screw (Qty 1) EMT Conduit Pipe (Optional - Qty 2) Commercially Available Rubber Caps (Qty 4) ¼" x 2.4" Concrete Anchors (Qty 4) Installation Tools Phillips Head Screwdriver Wire Cutters Ladder Installation Instructions Page 3 - ViewSonic PM-FCP | Instruction Manual - Page 4
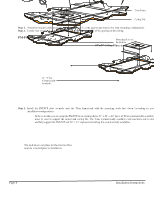
the bottom of the tile. Step 1. Carefully remove the 24" x 24" or, depending on your ceiling configuration, the 24" x 48" suspended ceiling tiles. Page 4 Installation Instructions - ViewSonic PM-FCP | Instruction Manual - Page 5
. Step 4. Run the open end through the loop. Step 5. Pull the open end down until the braided cable tightens around the eye lag screw. Installation Instructions Page 5 - ViewSonic PM-FCP | Instruction Manual - Page 6
event that you are using the PM-FCP in an opening that is 24" x 48", a 24" piece of T-bar (commercially available) must be used to support the mount and ceiling tile. The T-bar (commercially available) will run from side to side and help - ViewSonic PM-FCP | Instruction Manual - Page 7
and four (4) M8 nuts. The EMT conduit pipe must cross over two sections of the T-bar framework on both sides of the pipe clamps. Installation Instructions Page 7 - ViewSonic PM-FCP | Instruction Manual - Page 8
Input Arrows Release Pin Directional Input Arrows Release Pin 6" Excess Directional Input Arrows Release Pin Release Pin Mounting Hole Mounting Hole Mounting Hole Page 8 Installation Instructions - ViewSonic PM-FCP | Instruction Manual - Page 9
ceiling tiles where the EMT conduit pipe crosses over must be installed prior to installing the EMT conduit pipe. Step 7. Reinstall the ceiling tile. Installation Instructions Page 9 - ViewSonic PM-FCP | Instruction Manual - Page 10
base box laterally. Ceiling Tile PM-FCP M8 Flat Washer M8 x 20mm Phillips Head Screw Please refer to the purchased base box for further operating instructions. Page 10 Installation - ViewSonic PM-FCP | Instruction Manual - Page 11
screw must be used to stabilize the 1½" (NPT) pipe. M5 x 16mm Screw 1-1/2" Pipe Opening PM-FCP Technical Specifications All measurements are in inches (mm). Installation Instructions Page 11 - ViewSonic PM-FCP | Instruction Manual - Page 12
ABOVE LIMITATION OR EXCLUSION MAY NOT APPLY TO YOU. What Customers Must Do for Limited Warranty Service If you discover a problem that you think may be covered by the warranty you MUST REPORT it in writing to the RIGHTS WHICH VARY FROM STATE TO STATE. Page 12 Installation Instructions
-
 1
1 -
 2
2 -
 3
3 -
 4
4 -
 5
5 -
 6
6 -
 7
7 -
8
-
9
-
10
-
11
-
12
 |
 |

INSTALLATION INSTRUCTIONS
PM-FCP
Suspended Ceiling Tile Adapter
ViewSonic Corporation
10 Point Dr Ste. 200
Brea, CA 92821 USA
USA and Canada –
Phone: 888-881-8781
Copyright © 2018, ViewSonic Corporation
All rights reserved
[20219-00E-10/18]