ViewSonic PS600W - 3700 Lumens WXGA Networkable Short Throw Projector Quick St - Page 1
ViewSonic PS600W - 3700 Lumens WXGA Networkable Short Throw Projector Manual
 |
View all ViewSonic PS600W - 3700 Lumens WXGA Networkable Short Throw Projector manuals
Add to My Manuals
Save this manual to your list of manuals |
Page 1 highlights
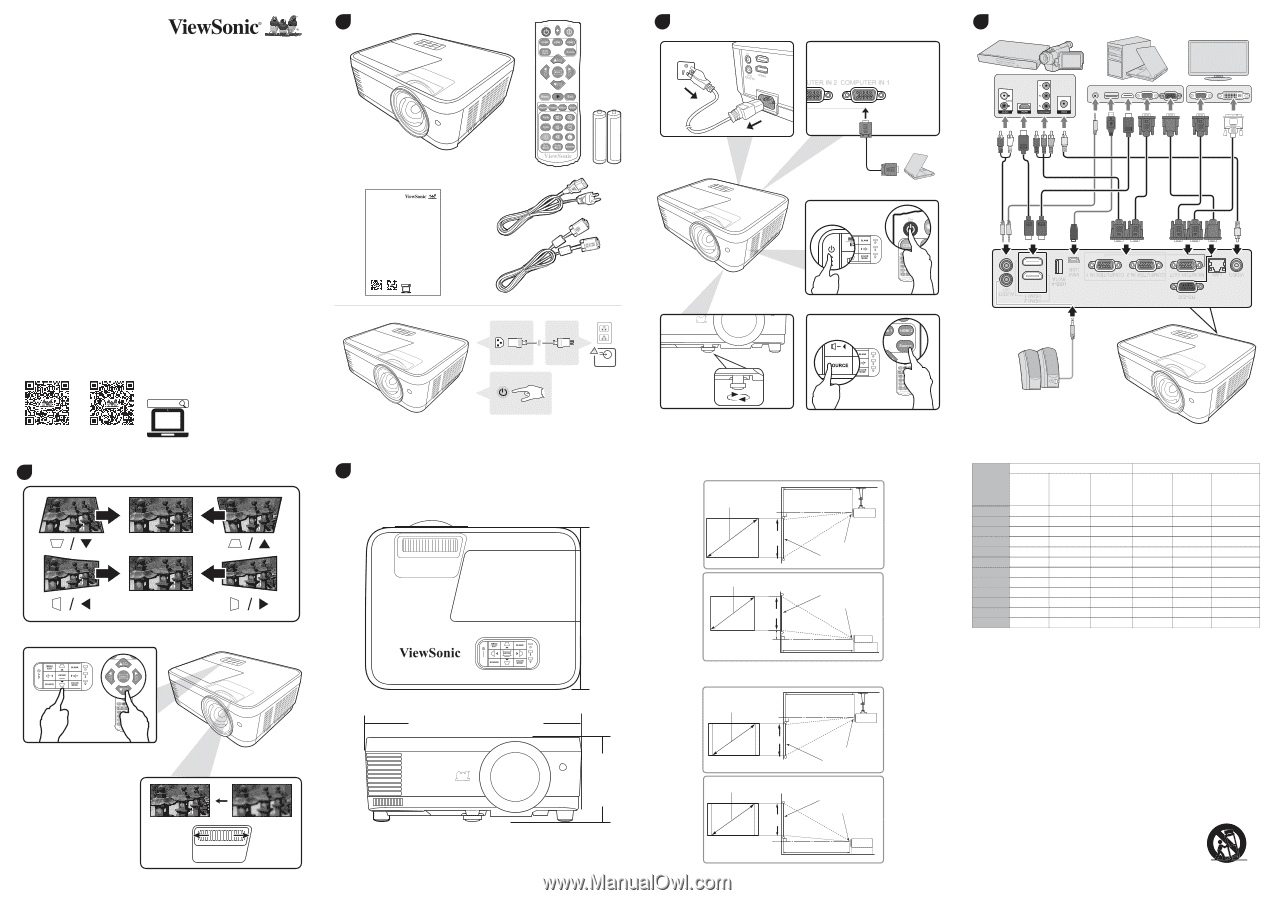
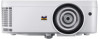
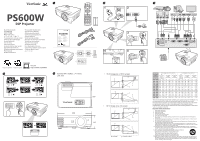
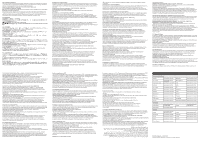
1 PS600W DLP Projector Quick Start Guide Vodič za brzo pokretanje Úvodní příručka Aan de slag Pika-aloitusopas Guide de démarrage rapide Schnellstarthandbuch Első lépések Guida introduttiva Przewodnik Szybki start Guia de Início Rápido Ghid de pornire rapid Vodič za brzi početak Príručka so stručným návodom Vodnik za hitri začetek Guía de inicio rápido Snabbstartsguide Hızlı Başlangıç Kılavuzu Panduan Mulai Cepat PS600W DLP Projector Quick Start Guide Vodič za brzo pokretanje Úvodní příručka Aan de slag Pika-aloitusopas Guide de démarrage rapide Schnellstarthandbuch Első lépések Guida introduttiva Przewodnik Szybki start Guia de Início Rápido Ghid de pornire rapid Vodič za brzi početak Príručka so stručným návodom Vodnik za hitri začetek Guía de inicio rápido Snabbstartsguide Hızlı Başlangıç Kılavuzu Panduan Mulai Cepat Projector Distance Projector Expert http://vsweb.us UG Link http://vsweb.us/ps600w http://vsweb.us Projector Distance Projector Expert UG Link http://vsweb.us/ps600w 4 5 Screws: M4 x 8 (Max. L = 8 mm) Unit: mm 239 2 1 2 100-240 Vac 50/60 Hz 4 3 5 220 115 • 16:10 image on a 16:10 screen (b) (a) (d) (c) (f) (e) (a) (c) (d) (e) (f) (b) • 16:10 image on a 4:3 screen (b) (a) (d) (c) (f) (e) (a) (e): Screen (e) (f) (c) (d) (b) (f): Center of lens 3 (a) Screen Size [inch (m)] 16:10 image on a 16:10 Screen (b) Projection distance [m (inch)] (c) Image height [cm (inch)] (d) Vertical offset [cm (inch)] 40 (1.0) 0.42 (17) 54 (21) 2.7 (1.1) 50 (1.3) 0.53 (21) 67 (26) 3.4 (1.3) 60 (1.5) 0.63 (25) 81 (32) 4.0 (1.6) 70 (1.8) 0.74 (29) 94 (37) 4.7 (1.9) 80 (2.0) 0.84 (33) 108 (42) 5.4 (2.1) 90 (2.3) 0.95 (37) 121 (48) 6.1 (2.4) 100 (2.5) 1.05 (41) 135 (53) 6.7 (2.6) 120 (3.0) 1.26 (50) 162 (64) 8.1 (3.2) 150 (3.8) 1.58 (62) 202 (79) 10.1 (4.0) 200 (5.1) 2.11 (83) 269 (106) 13.5 (5.3) 250 (6.4) 2.63 (104) 337 (132) 16.8 (6.6) 300 (7.6) 3.16 (124) 404 (159) 20.2 (7.9) 16:10 image on a 4:3 Screen (b) Projection distance [m (inch)] (c) Image height [cm (inch)] (d) Vertical offset [cm (inch)] 0.40 (16) 51 (20) 2.5 (1.0) 0.50 (20) 64 (25) 3.2 (1.3) 0.60 (23) 76 (30) 3.8 (1.5) 0.70 (27) 89 (35) 4.4 (1.8) 0.79 (31) 102 (40) 5.1 (2.0) 0.89 (35) 114 (45) 5.7 (2.3) 0.99 (39) 127 (50) 6.4 (2.5) 1.19 (47) 152 (60) 7.6 (3.0) 1.49 (59) 191 (75) 9.5 (3.8) 1.99 (78) 254 (100) 12.7 (5.0) 2.48 (98) 318 (125) 15.9 (6.3) 2.98 (117) 381 (150) 19.1 (7.5) There is 3% tolerance among these numbers due to optical component variations. It is recommended that if you intend to permanently install the projector, you should physically test the projection size and distance using the actual projector in situ before you permanently install it, so as to make allowance for this projector's optical characteristics. This will help you determine the exact mounting position so that it best suits your installation location. Important Safety Instructions 1. Read these instructions. 2. Keep these instructions. 3. Heed all warnings. 4. Follow all instructions. 5. Do not use this unit near water. 6. Clean with a soft, dry cloth. 7. Do not block any ventilation openings. Install the unit in accordance with the manufacturer's instructions. 8. Do not install near any heat sources such as radiators, heat registers, stoves, or other devices (including amplifiers) that produce heat. 9. Do not defeat the safety purpose of the polarized or grounding-type plug. A polarized plug has two blades with one wider than the other. A grounding type plug has two blades and a third grounding prong. The wide blade and the third prong are provided for your safety. If the provided plug does not fit into your outlet, consult an electrician for replacement of the obsolete outlet. 10. Protect the power cord from being walked on or pinched particularly at plugs. Convenience receptacles and the point where they exit from the unit. Be sure that the power outlet is located near the unit so that it is easily accessible. 11. Only use attachments/accessories specified by the manufacturer. 12. Use only with the cart, stand, tripod, bracket, or table specified by the manufacturer, or sold with the unit. When a cart is used, use caution when moving the cart/unit combination to avoid injury from tipping over. 13. Unplug this unit when unused for long periods of time. 14. Refer all servicing to qualified service personnel. Servicing is required when the unit has been damaged in any way, such as: if the power-supply cord or plug is damaged, if liquid is spilled onto or objects fall into the unit, if the unit is exposed to rain or moisture, or if the unit does not operate normally or has been dropped.
-
 1
1 -
 2
2
 |
 |