Viking DTWN4248SS Installation Instructions - Page 18
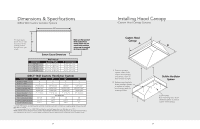
Installing Hood Canopy, Clearance Dimensions
 |
View all Viking DTWN4248SS manuals
Add to My Manuals
Save this manual to your list of manuals |
Page 18 highlights
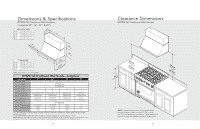
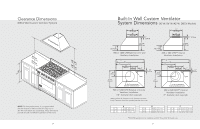
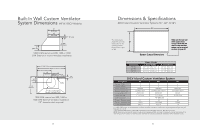
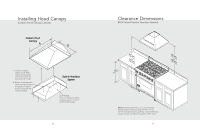
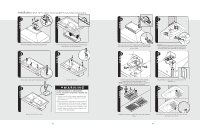
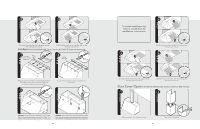
Installing Hood Canopy (Custom Hood Canopy Cutouts) Custom Hood Canopy A B 1) Position ventilator system inside of the custom hood canopy and center it front to back and left to right. 2) Bottom mounting holes fasten ventilator system to bottom of custom hood canopy with the screws provided. Built-In Ventilator System 3) OPTIONAL Rear mounting holes fasten ventilator system to rear of custom hood canopy. 34 Clearance Dimensions (DICV Island Custom Ventilator System) (913.46"cm) (Custom Hood) ((7611268672""t..mmo69 accinmmx..)) 33((796061""..t24mmoccaimmnx.)). NOTE: For best performance, it is recommended that the bottom of the hood be 30" (76.2 cm) to 36" (91.4 cm) above the countertop. These dimensions provide for safe and efficient operation of the hood. 35
-
 1
1 -
2
-
3
-
4
-
5
-
6
-
7
-
8
-
9
-
10
-
11
-
12
-
 13
13 -
 14
14 -
 15
15 -
 16
16 -
 17
17 -
 18
18 -
 19
19 -
 20
20 -
 21
21 -
 22
22 -
 23
23 -
24
-
25
-
26
-
27
-
28
 |
 |
