Vivitar 5118 v2 Camera Manual - Page 8
After the ViviLink Video option is confirmed the camera is now ready to use.
 |
View all Vivitar 5118 manuals
Add to My Manuals
Save this manual to your list of manuals |
Page 8 highlights
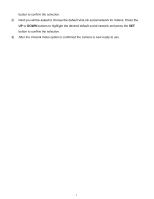
button to confirm the selection. 2) Next you will be asked to choose the default ViviLink social network for Videos. Press the UP or DOWN buttons to highlight the desired default social network and press the SET button to confirm the selection. 3) After the ViviLink Video option is confirmed the camera is now ready to use. 7
-
 1
1 -
2
-
 3
3 -
 4
4 -
 5
5 -
 6
6 -
 7
7 -
 8
8 -
 9
9 -
 10
10 -
 11
11 -
 12
12 -
 13
13 -
14
-
15
-
16
-
17
-
18
-
19
-
20
-
21
-
22
-
23
-
24
-
25
-
26
-
27
-
28
-
29
-
30
-
31
-
32
-
33
-
34
-
35
-
36
-
37
-
38
-
39
-
40
-
41
-
42
-
43
-
44
-
45
-
46
-
47
-
48
-
49
-
50
-
51
-
52
-
53
-
54
-
55
-
56
-
57
-
58
 |
 |

7
button to confirm the selection.
2)
Next you will be asked to choose the default ViviLink social network for Videos. Press the
UP
or
DOWN
buttons to highlight the desired default social network and press the
SET
button to confirm the selection.
3)
After the ViviLink Video option is confirmed the camera is now ready to use.