Vivitar 8025 VC8025 User Manual
Vivitar 8025 Manual
 |
View all Vivitar 8025 manuals
Add to My Manuals
Save this manual to your list of manuals |
Vivitar 8025 manual content summary:
- Vivitar 8025 | VC8025 User Manual - Page 1
ViviCam 8025 Digital Camera Owner Manual © 2009 Sakar International, Inc. All rights reserved. Windows and the Windows logo are registered trademarks of Microsoft Corporation. All other trademarks are the property of their respective companies. - Vivitar 8025 | VC8025 User Manual - Page 2
Camera for Use ...6 Install lithium battery...6 Installing SD Memory Card ...7 Starting Your Digital Camera ...9 This is the default mode when you power on your camera 11 Taking Photos...11 Installing PhoTags Express Software ...34 Everything you need to get the most from your photos 39 Download - Vivitar 8025 | VC8025 User Manual - Page 3
Detecting y SD memory card slot compatible with memory card up to 8GB. y Built in Flash y PhoTags Express software for managing and enhancing your photos, printing, sending photos by e-mails and much more. What your camera includes y Digital Camera y PhoTags Express software Installation CD y USB - Vivitar 8025 | VC8025 User Manual - Page 4
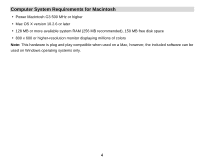
for Windows Vista To be able to download photos to your PC your will need the following minimum configuration: y Windows Vista y 800MHz processor and 512 MB of system memory y 20GB hard driver with at least 15GB of available space y Support for Super VGA graphics y Available USB Interface - Vivitar 8025 | VC8025 User Manual - Page 5
y 800 x 600 or higher-resolution monitor displaying millions of colors Note: This hardware is plug and play compatible when used on a Mac, however, the included software can be used on Windows operating systems only. 4 - Vivitar 8025 | VC8025 User Manual - Page 6
A Quick Look at Your Camera 5 - Vivitar 8025 | VC8025 User Manual - Page 7
message will appear on the LCD when the battery power is insufficient. Shortly thereafter your camera will power off. 2. Please remove your battery when you don't intend to use your camera for a long time. 3. Test photos taken with the camera should be downloaded otherwise they will be lost when the - Vivitar 8025 | VC8025 User Manual - Page 8
off when charge full. B. Charge with supplied charger Your camera is supplied a compatible charger for you, you are only required to put the battery into charger and charge the lithium battery directly from electrical outlet Installing SD Memory Card Your camera has a memory card slot that enables - Vivitar 8025 | VC8025 User Manual - Page 9
images. The image will be deleted when camera power is turned off. Please download the images before power off .SD memory card is required for normal use. 2. An external memory card is required for normal use. Your camera supports any compatible SD memory card (up to 8GB). 3. If there is a photo - Vivitar 8025 | VC8025 User Manual - Page 10
it unusable. 6. When your card is full, download the media on the SD card to your PC and delete the photos and videos from it in order to continue using your camera Starting Your Digital Camera Power on Press the Power button on the top of the camera once to turn on your camera. The LCD will light - Vivitar 8025 | VC8025 User Manual - Page 11
Mode selection Your digital touch screen camera has 4 main modes - Still Image mode, Video mode, Playback mode and Set up mode. The Still Image mode is for you to take still photos. - Vivitar 8025 | VC8025 User Manual - Page 12
area to enter Playback mode. function area to enter Still Image (Camera) mode. 4. Touch the icon function area to enter Movie (Video the default mode when you power on your camera. Taking Photos 1. Compose your shot using the LCD screen. 2. Hold the camera steady and press the shutter button to - Vivitar 8025 | VC8025 User Manual - Page 13
on the LCD screen. When the camera's memory (photo capacity) is full, the LCD screen will display a message - "Memory Full, Insert a SD memory card to Transfer and Take More Photos!" Either download the photo to your computer using the Photags Express software as described below in the section - Vivitar 8025 | VC8025 User Manual - Page 14
screen. This 2. Touch the icon function area again until the icon appears on the LCD screen. This means the flash function has been "forced on" (manual flash). Note: If the flash is not ready, a LED will light up and the icon will flash repeatedly - wait until the flash is ready before - Vivitar 8025 | VC8025 User Manual - Page 15
4. To turn off the flash function touch the icon function area repeatedly until the icon shutter button and when the photo is actually taken. It is recommended that you use a tripod or place the camera on a flat and sturdy surface when using the self-timer. 1. Press the Menu/OK button. 2. Touch the - Vivitar 8025 | VC8025 User Manual - Page 16
to confirm. The self-timer icon (per your selection) will now appear on the screen. 6. Press the Shutter button to start the self-timer. Your camera will count down 2, 5 or 10 seconds as per your choice and then automatically take the photo. Scene Your - Vivitar 8025 | VC8025 User Manual - Page 17
you want to use. 5. Press the Menu/OK button to confirm, save and exit to the camera standby mode. Image Size The image size and quality settings determine the number of photos that can be saved and the amount of memory required for each photo. The higher the photo quality the more - Vivitar 8025 | VC8025 User Manual - Page 18
1. The image size icon will appear on the LCD screen. 2. Your camera has "7M" and "2M" high definition image size. Anti-Shake Your Digital Camera has a function that prevents photos coming out blurry as a result of trembling or shaking when taking the photo. You are not required to use a tripod - Vivitar 8025 | VC8025 User Manual - Page 19
Face Detection Your camera supports face detecting that allows you to take better portrait photos. 1. to select the Face Detection On/Off. 5. Press the Menu/OK button to confirm and exit to the camera standby mode. Note: The Face Detection icon will appear on the LCD screen. Setup Menu You can - Vivitar 8025 | VC8025 User Manual - Page 20
" option. 2. Touch the icon function area to select an exposure value (from +3 to -3). 3. Press the Menu/OK button to confirm, save and exit to the camera standby mode. 19 - Vivitar 8025 | VC8025 User Manual - Page 21
Touch the icon function area to select the white balance option you desire. 4. Press the Menu/OK button to confirm, save and exit to the camera standby mode. Sharpness This setting allows you to adjust the sharpness of your images, making edges more or less distinct. 1. Touch the icon function - Vivitar 8025 | VC8025 User Manual - Page 22
setting. 3. Touch the icon function area to select one of Normal/Soft/Sharp. 4. Press the Menu/OK button to confirm, save and exit to the camera standby mode. Quality The quality of your photos also affects the number of shots you can take. A HIGH setting means you can take fewer photos - Vivitar 8025 | VC8025 User Manual - Page 23
/120S/180S/None. 4. Press the Menu button to confirm, save and exit to the camera standby mode. Date This allows you to set the system time which will be displayed on repeatedly to select and highlight the digit. 2. Touch the icon and function area repeatedly to set the current date and time. 22 - Vivitar 8025 | VC8025 User Manual - Page 24
This function will format the memory card and will erase all files in memory including files that have been protected. Important: Please use this function with caution. Once formatted all the images stored in the memory will be erase. This process is irreversible. Please download all images to the - Vivitar 8025 | VC8025 User Manual - Page 25
select Yes or No. 7. Press the Menu/OK button to confirm, save and exit to the camera standby mode. Video Mode Please refer to Mode selection for how to select modes. Note: An SD card needs to be inserted in order to use this video mode. The icon will appear on the - Vivitar 8025 | VC8025 User Manual - Page 26
1. Press the Shutter button to begin shooting videos. 2. The elapse time will be shown on the top right of the LCD screen and the icon LCD screen. will flash on the 3. Press the Shutter button again to stop and save this file in AVI format. Note: You can play this AVI file in playback mode or on - Vivitar 8025 | VC8025 User Manual - Page 27
best white balance for shooting. 4. Press the Menu/OK button to confirm, save and exit to the video standby mode. Image Size Your camera supports 2 video resolutions- 640x480 (VGA) pixels, 320x240 (QVGA) pixels. 1. Press the Menu/OK button. 2. Touch the "MP" function area to enter Image Size menu - Vivitar 8025 | VC8025 User Manual - Page 28
are no photos or videos in your camera. Press the Home button to return to the Still Image mode and begin to take photos. Full screen to Thumbnail display When the camera is in the Playback Mode and an a photo or video. 4. Press the Menu/OK button to display the photo or video in full screen. 27 - Vivitar 8025 | VC8025 User Manual - Page 29
Delete current photo or video In full screen display mode: 1. Touch the icon function area to delete the current photo or video displayed on the LCD screen. 2. Touch the or icon function - Vivitar 8025 | VC8025 User Manual - Page 30
cannot rotate a protected file when "This File is Write-Protected" appears on the screen. 2. "No card inserted" will appear on the screen if no SD card is insert. Please insert an SD memory card to use this function. Protect You can protect your photos/videos from accidental deletion by selecting - Vivitar 8025 | VC8025 User Manual - Page 31
. You can delete one image or video clip at a time or delete all except the protected photos and videos that are currently recorded on the memory card. 1. Press the Menu/OK button. 2. Touch the icon function area until you see the Delete option. 3. Touch the icon function area to enter the Delete - Vivitar 8025 | VC8025 User Manual - Page 32
of an image or to highlight certain focal points. The Crop feature lets you zoom in on an image and then save that part of the image as a new photo. 1. Press the Menu/OK button. 2. Touch the icon function area until you see the Crop option. 3. Touch the icon function area to - Vivitar 8025 | VC8025 User Manual - Page 33
, , or icon function area to move the rectangle over and select the part of the photo that you would like to crop. 9. Press the Shutter button. 10. Press the Shutter button again to confirm and save it as a new photo or you can press the Menu/OK button to exit without saving - Vivitar 8025 | VC8025 User Manual - Page 34
that appears select Print or Cancel 7. Press the Menu/OK button to confirm. "Please connect to device" will appear on the LCD screen. 8. Connect your camera with the USB cord to the compatible printer for printing. Note: 1. you can select Cancel in step 6 and press the Menu/OK button to exit - Vivitar 8025 | VC8025 User Manual - Page 35
will affect the install process and can cause a failed installation of the camera software and drivers. In order to install the Software and drivers to download and edit the photos and videos captured using this camera, you need to install the CD installation disk. Insert the installation CD into - Vivitar 8025 | VC8025 User Manual - Page 36
2. On the "PhoTags Express" screen, click the "Next" button. 3. Please review the license terms and click the "I Agree" button to continue. 35 - Vivitar 8025 | VC8025 User Manual - Page 37
4. Let the "PhoTags Express" installer create the folder where the program will be installed to, and then click "Install". 5. Please wait while the application is being installed on your computer. 36 - Vivitar 8025 | VC8025 User Manual - Page 38
6. Once the application has been installed on your computer, click the "Finish" button to let the "PhoTags Express" installer finish the installation program. If you selected the option for the application to start after pressing the Finish button, the application will automatically launch. 37 - Vivitar 8025 | VC8025 User Manual - Page 39
order to complete the installation process you are required to register. Registering your product entitles you to discounts on upgrades as well as Free Customer Support. If you choose to register at a later time click the "Continue" button to open the Photags Express application. 38 - Vivitar 8025 | VC8025 User Manual - Page 40
into a USB port on your computer. 3. Wait for your computer to recognize that new hardware has been installed and the ready to use message pops up on the task bar. 4. If the Camera is off it will automatically be turned on when the USB cable is properly connected. If you have not already - Vivitar 8025 | VC8025 User Manual - Page 41
. Enhance your photos; Auto Enhance, Crop, Correct Red Eye, Manually Adjust and add Special Effects. Add Active Captions- add Text Captions online. Workshops feature allows you to Create Calendars, two-sided Greeting Cards and Postcards on standard photo paper... Create Photo Albums and Slide Shows - Vivitar 8025 | VC8025 User Manual - Page 42
your TV using your DVD player. Add background music to your slideshow. Download photos and videos to your PC Transfer Photos and video images from your camera to your PC using PhoTags Express. Select the "Get Photos" button from the top of the PhoTags Express Main Menu screen. The Get Photos Wizard - Vivitar 8025 | VC8025 User Manual - Page 43
Select the device (removable disk) option in the Active Devices window on the left and then select either the "Custom" or "Express" copy radial button in the Copy methods box. CUSTOM COPY METHOD Select the "Custom" copy radial button. Click the "Next" button. Add Active Captions to your pictures. - Vivitar 8025 | VC8025 User Manual - Page 44
Choose where to place your photos and videos. The default is to place all photos and videos into a folder under the C:\My Documents\ My Pictures folder with the date when the photos were taken as the folder name. 43 - Vivitar 8025 | VC8025 User Manual - Page 45
Click the "Finish" button to start the download process. A photos download progress bar appears showing the number of media (videos included) downloading to your computer. 44 - Vivitar 8025 | VC8025 User Manual - Page 46
please refer to the Help Guide in PhoTags Express. Viewing Videos Make sure that your camera is connected to your computer with the USB cable. Open any application that will enable you to view video files (for example Windows Media Player). Videos created and downloaded - Vivitar 8025 | VC8025 User Manual - Page 47
. Once all the Photos and Videos have been downloaded to the computer it is recommended that you delete them from the camera thereby preparing your camera to take more photos and videos. Transferring photos and videos to your PC manually Turn on your camera, Change your Still Image mode to Playback - Vivitar 8025 | VC8025 User Manual - Page 48
. Transferring photos and videos to your MAC manually The Photags Express software is not compatible and will not install on a Mac. In order to transfer photos and videos from your camera to your computer: 1. Plug the camera into an available USB port 2. A new drive should mount on the desktop which - Vivitar 8025 | VC8025 User Manual - Page 49
package should include: 1. Copy of original bill of sale 2. A detailed written description of the problem. 3. Your return address and telephone number (Daytime) MAIL TO ADDRESS BELOW: Sakar International Attention: Service Department 195 Carter Drive Edison, NJ 08817 You may also visit www.sakar.com - Vivitar 8025 | VC8025 User Manual - Page 50
JPEG/AVI External Memory SD / MMC Card (up to 8GB) LCD Display Lens 2.4 Inch TFT LCD Touch Screen f=7.23mm, F2.8 Zoom 8X Digital Zoom Exposure White Window XP/ Vista/ Mac OS X (10.2.6 or higher) Battery Lithium rechargeable battery Working Temperature 0~40 ℃ Appendix B: Troubleshooting 49 - Vivitar 8025 | VC8025 User Manual - Page 51
says, "No photos in camera." What do I do? A: First ensure that you have in fact taken photos. Press the Shutter/OK button a few times to take some sample photos and then try downloading camera, follow the steps below to reinstall the software. Software Re-installation 1. First install the software. - Vivitar 8025 | VC8025 User Manual - Page 52
if your card gets lost or damaged. The test photos are saved in limited SDRAM, which requires a constant electric current to store your photos. Should your camera lose power (for instance if the battery dies or run out of power) the test pictures will be lost. We recommend always downloading your
-
 1
1 -
 2
2 -
 3
3 -
 4
4 -
 5
5 -
 6
6 -
 7
7 -
8
-
9
-
10
-
11
-
12
-
13
-
14
-
15
-
16
-
17
-
18
-
19
-
20
-
21
-
22
-
23
-
24
-
25
-
26
-
27
-
28
-
29
-
30
-
31
-
32
-
33
-
34
-
35
-
36
-
37
-
38
-
39
-
40
-
41
-
42
-
43
-
44
-
45
-
46
-
47
-
48
-
49
-
50
-
51
-
52
 |
 |

ViviCam 8025 Digital Camera
Owner Manual
© 2009 Sakar International, Inc. All rights reserved.
Windows and the Windows logo are registered trademarks of Microsoft Corporation.
All other trademarks are the property of their respective companies.