Vivitar DVR 610 Camera Manual
Vivitar DVR 610 Manual
 |
View all Vivitar DVR 610 manuals
Add to My Manuals
Save this manual to your list of manuals |
Vivitar DVR 610 manual content summary:
- Vivitar DVR 610 | Camera Manual - Page 1
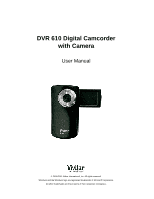
DVR 610 Digital Camcorder with Camera User Manual © 2009-2011 Sakar International, Inc. All rights reserved. Windows and the Windows logo are registered trademarks of Microsoft Corporation. All other trademarks are the property of their respective companies. - Vivitar DVR 610 | Camera Manual - Page 2
of the Camera ...3 Initial Camera Setup...4 Main Camera Modes ...7 Camera Technical Specifications 8 Computer System Requirements - WINDOWS OS 9 Computer System Requirements - MAC OS 9 Powering ON/OFF Your Digital Camcorder 10 Changing Camera Mode ...10 Navigating the Menus...11 Video Capture - Vivitar DVR 610 | Camera Manual - Page 3
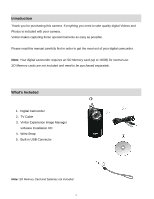
SD Memory card (up to 16GB) for normal use. SD Memory cards are not included and need to be purchased separately. What‟s Included 1. Digital Camcorder 2. TV Cable 3. Vivitar Experience Image Manager software Installation CD 4. Wrist Strap 5. Built-in USB Connector Note: SD Memory Card and batteries - Vivitar DVR 610 | Camera Manual - Page 4
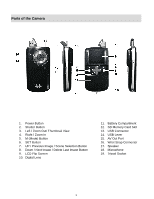
UP / Previous Image / Scene Selection Button 8. Down / Next Image / Delete Last Image Button 9. LCD Flip Screen 10. Digital Lens 11. Battery Compartment 12. SD Memory Card Slot 13. USB Connector 14. USB Lever 15. AV Out Port 16. Wrist Strap Connector 17. Speaker 18. Microphone 19. Tripod Socket 3 - Vivitar DVR 610 | Camera Manual - Page 5
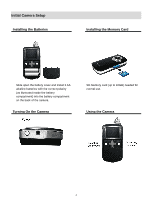
Camera Setup Installing the Batteries Installing the Memory Card Slide open the battery cover and install 2 AA alkaline batteries with the correct polarity (as illustrated inside the battery compartment) into the battery compartment on the back of the camera. Turning On the Camera SD Memory card - Vivitar DVR 610 | Camera Manual - Page 6
batteries are recommended. 2. SD Memory Card Make sure an SD card has been properly inserted into your camera. (SD card not included.) To properly insert the SD Card: Push the SD card into the slot in the direction shown on the camera (see SD icon by the SD card slot). Push the SD card until - Vivitar DVR 610 | Camera Manual - Page 7
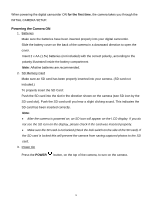
a language for the camera. The Language selection menu will appear. 2. Select the language of your choice by pressing the UP or DOWN direction control buttons. 3. Press the SET button to confirm the selection. After selecting a language, the digital camcorder opens with the Video Capture mode ready - Vivitar DVR 610 | Camera Manual - Page 8
after the camera has been powered ON. Video Capture Mode Use this mode to capture videos with your digital camcorder. This is the default mode when the camera is powered ON. To take a video, aim your camera as desired and press the Shutter button to start the record. A blinking record indicator will - Vivitar DVR 610 | Camera Manual - Page 9
Power Saving Battery Transmission interface Working temperature Computer System Requirements Digital Camcorder 640*480 pixels (30fps) / 320*240 pixels(30fps ) 2M (1600x1200), 1.3M (1280x1024), VGA (640x480) CMOS Sensor 1.8 Inch TFT Limited for test images (3 seconds for video or 2 photos) SD card - Vivitar DVR 610 | Camera Manual - Page 10
Computer System Requirements - WINDOWS OS To be able to download photos and videos to your PC, you will need the following minimum configuration: Microsoft® Windows XP with Service Pack 3, Windows Vista with Service Pack 1 or Windows 7 Pentium® 4 processor (or above) 512 MB of RAM, with 250 - Vivitar DVR 610 | Camera Manual - Page 11
sure the batteries have been inserted properly into your digital camcorder. Make sure an SD card has been inserted into your camera. (SD card up to 16 MB - SD Card not included) Powering the Digital camcorder ON Press the Power button to turn your camera ON. The camera will be in Video Capture - Vivitar DVR 610 | Camera Manual - Page 12
To change the active camera mode, make sure the camera is powered ON and press the MODE (M) button. When in Video Capture Mode, this on the top-left corner of the LCD display Navigating the Menus Each camera mode has a set of menus specific to that mode. 1. Press the SET button to open the menus for - Vivitar DVR 610 | Camera Manual - Page 13
indicator appears on the LCD screen while record is in progress. 5. To STOP the video record, press the Shutter button again. 6. The video will automatically be saved to the camera‟s memory or SD card. 7. You can also capture your videos using the Flip Screen. When you would like to quickly and - Vivitar DVR 610 | Camera Manual - Page 14
Button Functionality Your digital camcorder has a four-directional pad that functions as Quick Function buttons. Quick Function Buttons Action Left Zooms Out Up Scene Selection - Opens the Scene menu Right Zooms In Down Delete - Allows you to delete the last video captured Other Shutter - Vivitar DVR 610 | Camera Manual - Page 15
are the settings that appear in your camera‟s Video Capture Mode: Scene Menu The Scene Menu allows you to choose scene settings that let your camera adapt properly to your current environment. 1. that this setting will be saved by your camera until you manually change the setting or restore the - Vivitar DVR 610 | Camera Manual - Page 16
more of your camera‟s memory. Videos captured in VGA are of a better quality than QVGA videos and therefore take up more memory. 1. Press camera until you manually change the setting or restore the camera‟s default factory settings. White Balance Menu The White Balance feature allows your camcorder - Vivitar DVR 610 | Camera Manual - Page 17
icon reflecting your selection will display on the LCD screen. 9. Remember that this setting will be saved by your camera until you manually change the setting or restore the camera‟s default factory settings. Light Exposure Menu The Light Exposure setting helps you control the amount of light that - Vivitar DVR 610 | Camera Manual - Page 18
mode. 8. Remember that this setting will be saved by your camera until you manually change the setting or restore the camera‟s default factory settings. Auto Power Off Menu You can use the Auto Power Off feature in order to conserve you camera‟s battery life. The designated time represents when your - Vivitar DVR 610 | Camera Manual - Page 19
setting will be saved by your camera until you manually change the setting or restore the camera‟s default factory settings. Format Memory Card Menu You can use the Format Memory Card menu to delete all of the content that is currently on your camera‟s memory card. Keep in mind that formatting the - Vivitar DVR 610 | Camera Manual - Page 20
. Note: Formatting your memory card permanently deletes all images. 6. Press the MODE (M) button to exit the menu and return to your previous mode. Firmware (Factory Default Settings) Menu Use this menu to view the Firmware version on your camera or to reset your camcorder settings to the Factory - Vivitar DVR 610 | Camera Manual - Page 21
(M) button twice to open the Playback Mode. Playing Videos on Your Camera 1. Select your Video: Once in Playback mode, press the UP or DOWN direction buttons to scroll through the images on your digital camcorder‟s memory card until you find the video you would like to view. Each captured image - Vivitar DVR 610 | Camera Manual - Page 22
Mode Button Functionality Your digital camcorder has a four-directional pad that functions as Quick Function buttons. Quick Function Button Left Up Action Opens Thumbnail view (when not playing a selected video). Allows you to scroll through the images while in Thumbnail view. Displays - Vivitar DVR 610 | Camera Manual - Page 23
, select „Yes‟ and press the SET button. To exit the menu without deleting the video, select „No‟ and press the SET button. 5. To delete all the images (including all unlocked photos and videos) on your camera‟s memory card, select "Delete All Images" and press the SET button. You will be asked to - Vivitar DVR 610 | Camera Manual - Page 24
Protect/Lock Menu Pictures and Videos taken with your camera can be protected or "locked" to prevent any deletion or alteration being made to the files. 1. View the the playback mode. Photos that are not locked will not display the lock symbol. Remember: Protected/Locked videos cannot be deleted. 23 - Vivitar DVR 610 | Camera Manual - Page 25
. Taking a Picture 1. Turn on your digital camcorder. 2. Press the Mode (M) button once to select and enter the Photo Capture mode. 3. The camera icon will appear on the top left corner of the LCD. 4. The amount of photos that can be captured with the available memory and as per the selected - Vivitar DVR 610 | Camera Manual - Page 26
Photo Capture Mode Button Functionality Your digital camcorder has a four-directional pad that functions as Quick Function buttons. Quick Left, Up, Right, and Down directions control buttons. Toggles between the Video Capture Mode, Photo Capture Mode, and Playback Mode Exits the menu screen 25 - Vivitar DVR 610 | Camera Manual - Page 27
Photo Capture Mode Menus The following are the menus that appear in your digital camcorder‟s Photo Capture Mode: 26 - Vivitar DVR 610 | Camera Manual - Page 28
manually change the setting or restore the camera‟s default factory settings. Image Resolution Menu The Image Resolution menu allows you to choose the desired size of the images taken by your camera. Keep in mind that images with a higher resolution will also take up more of your camera‟s memory - Vivitar DVR 610 | Camera Manual - Page 29
images taken by your camera. Keep in mind that images with a higher image quality level will also take up more memory on your camera. 1. Press the SET this setting will be saved by your camera until you manually change the setting or restore the camera‟s default factory settings. Self-Timer Menu - Vivitar DVR 610 | Camera Manual - Page 30
reflecting your selection will display on the LCD screen. 9. Remember that this setting will be saved by your camera until you manually change the setting or restore the camera‟s default factory settings. Anti-Shake Menu The Anti-Shake feature reduces image distortion that can be caused by movement - Vivitar DVR 610 | Camera Manual - Page 31
An icon reflecting your selection will display on the LCD screen 9. Remember that this setting will be saved by your camera until you manually change the setting or restore the camera‟s default factory settings. Color Effect Menu You can choose to add a color effect to the images taken with your - Vivitar DVR 610 | Camera Manual - Page 32
An icon reflecting your selection will display on the LCD screen 9. Remember that this setting will be saved by your camera until you manually change the setting or restore the camera‟s default factory settings. Image Sharpness Menu You can set the level of sharpness in the images taken with your - Vivitar DVR 610 | Camera Manual - Page 33
mode. 8. An icon reflecting your selection will display on the LCD screen 9. Remember that this setting will be saved by your camera until you manually change the setting or restore the camera‟s default factory settings. ISO Menu The ISO menu allows you to set the level of sensitivity that your - Vivitar DVR 610 | Camera Manual - Page 34
your previous mode. 8. Remember that this setting will be saved by your camera until you manually change the setting or restore the camera‟s default factory settings. Silent Mode Menu You have the option of activating the camera‟s Silent mode to disable all of the sound effects (except for during - Vivitar DVR 610 | Camera Manual - Page 35
8. Remember that this setting will be saved by your camera until you manually change the setting or restore the camera‟s default factory settings. Auto Power Off Menu You can use the Auto Power Off feature in order to conserve you camera‟s battery life. The designated time represents when your - Vivitar DVR 610 | Camera Manual - Page 36
setting will be saved by your camera until you manually change the setting or restore the camera‟s default factory settings. Format Memory Card Menu You can use the Format Memory Card menu to delete all of the content that is currently on your camera‟s memory card. Keep in mind that formatting the - Vivitar DVR 610 | Camera Manual - Page 37
the menu and return to the previous mode. Note: After RESETTING to the default settings, it is recommended to select your system language using the Video/Photo Capture Mode Menu. If you do not, the next time the digital camcorder is powered on, you will be prompted to select a system language. 36 - Vivitar DVR 610 | Camera Manual - Page 38
Mode. Viewing Photos on Your Camera 1. Select your Photo: Once in Playback mode, press the UP or DOWN direction buttons to scroll through the images on your digital camcorder‟s memory card until you find the image you would like to view. Each captured image (both videos and photos) is displayed - Vivitar DVR 610 | Camera Manual - Page 39
Photo Playback Mode Button Functionality Your digital camcorder has a four-directional pad that functions as Quick Function buttons. Quick , Up, Right, and Down directions control buttons. Toggles between the Video Capture Mode, Photo Capture Mode, and Playback Mode. Exits the menu screen. 38 - Vivitar DVR 610 | Camera Manual - Page 40
, select „Yes‟ and press the SET button. To exit the menu without deleting the video, select „No‟ and press the SET button. 5. To delete all the images (including all unlocked photos and videos) on your camera‟s memory card, select "Delete All Images" and press the SET button. You will be asked to - Vivitar DVR 610 | Camera Manual - Page 41
6. The selected picture now appears rotated in the Playback mode. Crop Image Menu You can crop any picture on your camera with the Crop feature. 1. View the image you would like to Crop. 2. Press the SET button to open to save, the cropped picture is saved as a new picture to your memory card. 40 - Vivitar DVR 610 | Camera Manual - Page 42
Protect/Lock Menu Pictures and Videos taken with your camera can be protected or "locked" to prevent any deletion or mode. Photos that are not locked do not display the lock symbol. Remember: Protected/Locked videos cannot be deleted. Slide Show Menu The Slide Show menu allows you to play the slide - Vivitar DVR 610 | Camera Manual - Page 43
mode, you can preview the subjects you want to record on the TV screen and view the recording on the TV. 7. When the camera is set to Playback mode, you can review all the stored photos and videos on the TV. Connecting the Camera to a Headset The camera has an AV port that is also used as - Vivitar DVR 610 | Camera Manual - Page 44
the internet and then click the "Install Vivitar Experience Image Manager" button to begin the installation. Note: If you do not have internet access, you can still download media from the camera. Click the "How to transfer photos and videos from my camera to my computer" button for instructions. 43 - Vivitar DVR 610 | Camera Manual - Page 45
can run the Vivitar Experience Image Manager from the Programs (PC) or Applications (Mac) menu on your computer. Connecting the Camera to the Computer 1. Make sure the SD Memory Card is inserted in the camera. 2. Slide the lever on the side of the camera to reveal the built-in USB connector. Connect - Vivitar DVR 610 | Camera Manual - Page 46
Getting Photos and Videos from your Camera to Your Computer An SD card needs to be inserted. Do not disconnect the camera‟s built-in USB connector from the computer during transfer. Doing so will cancel the transfer of any files on their way to your computer. 1. Select the "Get Images" - Vivitar DVR 610 | Camera Manual - Page 47
use the Vivitar Experience Image Manager open the Help file or click the "Take a Tour" button on the application‟s Home page. Transfer media from my camera to my computer manually (Using Windows) 1. Slide the lever on the side of the camera to reveal the built-in USB connector. Use the USB built-in - Vivitar DVR 610 | Camera Manual - Page 48
images into the Pictures folder and the videos into the Movies folder. 7. Do not disconnect the camera from the computer during transfer. Doing so will cancel the transfer of any files on their way to your computer. Camera Maintenance The digital camcorder is a delicate device. Please handle your - Vivitar DVR 610 | Camera Manual - Page 49
should include: 1. Copy of original bill of sale 2. A detailed written description of the problem. 3. Your return address and telephone number (Daytime) MAIL TO ADDRESS BELOW: Sakar US Sakar International Attention: Service Department 195 Carter Drive Edison, NJ 08817 Sakar UK/Europe Attention - Vivitar DVR 610 | Camera Manual - Page 50
requires an SD card for normal use. If the camera powers off nothing will happen to the images stored on the SD memory card. We recommend always downloading your photos to your computer as soon as possible to prevent unintentional data loss. Q: I deleted images using the Vivitar Experience Image
-
 1
1 -
 2
2 -
 3
3 -
 4
4 -
 5
5 -
 6
6 -
 7
7 -
8
-
9
-
10
-
11
-
12
-
13
-
14
-
15
-
16
-
17
-
18
-
19
-
20
-
21
-
22
-
23
-
24
-
25
-
26
-
27
-
28
-
29
-
30
-
31
-
32
-
33
-
34
-
35
-
36
-
37
-
38
-
39
-
40
-
41
-
42
-
43
-
44
-
45
-
46
-
47
-
48
-
49
-
50
 |
 |

DVR 610 Digital Camcorder
with Camera
User Manual
© 2009-2011 Sakar International, Inc. All rights reserved.
Windows and the Windows logo are registered trademarks of Microsoft Corporation.
All other trademarks are the property of their respective companies.