Vivitar IPC-222 User Manual
Vivitar IPC-222 Manual
 |
View all Vivitar IPC-222 manuals
Add to My Manuals
Save this manual to your list of manuals |
Vivitar IPC-222 manual content summary:
- Vivitar IPC-222 | User Manual - Page 1
IPC 222 Capture Cam User Manual © 2009-2015 Sakar International, Inc. All rights reserved. Windows and the Windows logo are registered trademarks of Microsoft Corporation. All other trademarks are the property of their respective companies. - Vivitar IPC-222 | User Manual - Page 2
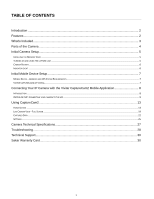
Vivitar CaptureCam2 Mobile Application 8 INTRODUCTION ...8 INITIAL SETUP: CONNECTING YOUR CAMERA TO THE APP...9 Using CaptureCam2 ...13 HOME SCREEN ...13 LIVE CAMERA VIEW - FULL SCREEN...19 CAPTURED DATA ...22 SETTINGS ...25 Camera Technical Specifications 27 Troubleshooting...28 Technical Support - Vivitar IPC-222 | User Manual - Page 3
your Vivitar IPC 222 Capture Cam. Everything you need to stream live video, record in HD and capture still images and videos remotely is included with your camera and the accompanying online application. Please read this manual carefully first in order to get the most out of your Vivitar Capture Cam - Vivitar IPC-222 | User Manual - Page 4
What's Included 1. IP Camera 2. USB cable 3. AC Charger 4. Screws 5. Setup Tool Note: Micro SD Memory Card not included. 3 - Vivitar IPC-222 | User Manual - Page 5
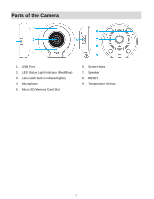
Parts of the Camera 1. USB Port 2. LED Status Light Indicator (Red/Blue) 3. Lens (with built-in infrared lights) 4. Microphone 5. Micro SD Memory Card Slot 6. Screw Holes 7. Speaker 8. RESET 9. Temperature Sensor 4 - Vivitar IPC-222 | User Manual - Page 6
Initial Camera Setup INSTALLING THE MEMORY CARD Make sure a Micro SD Memory card (up to 32 GB) has been properly inserted into your Capture Cam. Micro the memory card has been inserted correctly. TURNING ON AND USING THE CAPTURE CAM Connect one end of the USB cable to your IP camera and the - Vivitar IPC-222 | User Manual - Page 7
camera. To reset the IP Camera, use the Setup Tool to press the RESET button on the back of this indicates that the camera is ready for setup. Blue Steady Indicator Light: When the for 5 seconds to clear the setup data and reset the camera settings via the Capture Cam2 application (Add New Camera - Vivitar IPC-222 | User Manual - Page 8
CAPTURECAM2 APP INSTALL 1. Use your mobile phone or tablet to search for Vivitar CaptureCam2 in Google Play (for Android OS) or the Apple App Store (for iOS). Alternatively, scan the QR codes below to find the application. Android OS iOS 2. Install the application according to the instructions - Vivitar IPC-222 | User Manual - Page 9
Connecting Your IP Camera with the Vivitar CaptureCam2 Mobile Application INTRODUCTION The Vivitar CaptureCam2 application allows you to: your computer. View your captured photos that are saved directly to your iOS and Android devices. Adjust camera settings from your app. Allow other people to - Vivitar IPC-222 | User Manual - Page 10
the settings of your mobile device. 3. LAUNCH MOBILE APP Tap the Vivitar CaptureCam2 application icon on your smartphone or tablet to launch the installed app. 4. WELCOME: SETUP WIZARD The Welcome screen appears with the 'Setup Wizard'. NOTE: The 'Setup Wizard' screen appears only upon first time - Vivitar IPC-222 | User Manual - Page 11
QR code or camera UID/serial code. Tap 'New camera setup' to continue the new camera setup. 6. PLUG IN CAMERA / CAMERA SETUP MODE Next a screen appears with instructions to verify that your camera is in setup mode so that the app can connect to the camera's WiFi. This message is displayed: "Plug - Vivitar IPC-222 | User Manual - Page 12
WiFi password if a password is required to access the network, then tap DONE. NOTE: If the incorrect WiFi password is entered, the camera setup will follow the instructions in the previous section to RESET your camera and follow the instructions on the app to continue initial setup. 9. CONNECTION - Vivitar IPC-222 | User Manual - Page 13
Camera password: The default password is admin. You can tap the default password to change it to a new password and then confirm the password. Camera name: Tap to enter the camera name. A name must be entered to continue the camera setup. Location: Tap to enter the camera location. NOTE: The - Vivitar IPC-222 | User Manual - Page 14
Using CaptureCam2 HOME SCREEN The 'Home' screen displays the Live Camera in the top section and the Camera List on the bottom section. Connected Camera Add New Camera 2 Live Camera 1 Camera List 1. CAMERA LIST The Camera List displays a list of up to four cameras. Cameras can be added or removed - Vivitar IPC-222 | User Manual - Page 15
camera name you entered during the setup. NOTE: You can change 3 Camera Status NOTE: The default thumbnail appears until the application gets select and view the camera's streaming live capture in the Live Camera display on the OFF). NOTE: If an incorrect password is entered as you try to connect - Vivitar IPC-222 | User Manual - Page 16
data: Opens the Captured Data screen. Settings: Opens the Camera Settings screen. Remove camera: Removes camera from the Cameras list and from the app. NOTE: A confirmation window appears. Select 'Yes' to remove the camera, or 'No' to cancel and exit without removing the camera. Cancel - Vivitar IPC-222 | User Manual - Page 17
information to enter includes changing the camera password ('admin' is the default password), entering your location, and selecting the time zone. Tap Done to complete the setup and enter the Home screen. NOTE: Please refer to INITIAL SETUP: CONNECTING YOUR CAMERA TO THE APP for more details. 16 - Vivitar IPC-222 | User Manual - Page 18
Tap to open the scan the QR code screen. Make sure to allow Capture Cam 2 to have access to your camera when the prompt appears. Once successfully scanned, the 'Add camera' setup screens appear. Follow the instructions on the screen to setup the camera. Add camera UID: Tap to open the 'Add camera - Vivitar IPC-222 | User Manual - Page 19
date and time based on the Time Zone settings entered during the camera setup. You can change the time and date via the Camera Menu 'Settings' 5 App Information Tap the App Information button to view the following information regarding the application and camera: About, Help, User Manual, License - Vivitar IPC-222 | User Manual - Page 20
in Portrait and Landscape views. NOTE: Tap on the Live Camera View while in the Landscape view in full screen without the display of the app controls. Tap the screen to return to the Live Camera view Full screen with display of the - Vivitar IPC-222 | User Manual - Page 21
Displays the camera name you entered during the setup. NOTE: You can change the camera name at any time via the Camera Menu 'Settings' option. Tap the back button to return to the previous screen. 3 Captured Data Tap the Captured Data button to open the Capture Data screen where you can view the - Vivitar IPC-222 | User Manual - Page 22
Information 10 Camera Settings Tap the App Information button to view the following information regarding the application and camera: About, Help, User Manual, License Tap the Settings button to open the Settings screen. 11 Speaker Volume (ON/OFF) By default when entering Live Camera Video Stream - Vivitar IPC-222 | User Manual - Page 23
the Camera Live Video view to access your saved images organized by: SNAPSHOTS and VIDEOS By default the Snapshots tab appears, showing the list of saved Snapshots. Tap the Videos tab to view the list of captured videos Each file is listed as a Thumbnail image with the file's date and time next - Vivitar IPC-222 | User Manual - Page 24
saved is shown on the top of the screen. (selected photo/total amount of photos) Date and Time: The date and time the image was captured (based on your Time Zone settings) appears above the photo. Next and Previous: Tap the Previous and Next buttons to scroll between your snapshots. You - Vivitar IPC-222 | User Manual - Page 25
The videos are listed as per the type of captured video: Motion Record - Recording events taken from motion detection record capture. Auto Record - Recording events taken from auto or manual video capture. B. Selecting and Playing Your Videos To select and play your saved video in full - Vivitar IPC-222 | User Manual - Page 26
playback no audio can be heard. NOTE: After you have downloaded your videos, and would like to continue capturing you live streaming video with your IP Camera please follow these instructions: Make sure your IP Camera is unplugged from the power supply. Insert your Micro SD memory card into - Vivitar IPC-222 | User Manual - Page 27
HD 1280x720 NOTE: By default all videos are recorded in HD (1280x720). Playback can be viewed in both SD (64-x360) and HD (1280x720) video quality. Video options: The video capture In order to record, you need to manual tap RECORD. - Motion Detection: Video will be recorded only when motion is detected - Vivitar IPC-222 | User Manual - Page 28
Allows you to show or hide the time and date during recording of your video. By default the boxed is checked off which displays the time and date. Tap the box to uncheck Video Resolution External Memory Lens Interface CMOS - SD 640x360 - HD 1280x720 Micro SD Card (up to 32GB) - Class 4 or higher Fixed - Vivitar IPC-222 | User Manual - Page 29
Troubleshooting ISSUE Reconnecting to Camera: Your camera disconnected for one of the following reasons 1. Wi-Fi on camera or phone was shut off. 2. Other network connection problems instructions below: 1. Disconnect the camera from the power supply. Exit the CaptureCam2 app the initial setup (unless - Vivitar IPC-222 | User Manual - Page 30
lens. 5. Open the app and select "Add Camera" and then tap on "New camera setup" 6. Enter the manually removed the old camera from the app then you will be prompted to enter the desired camera name and location and only then it will connect. Create an album manually on your iPhone named Capture - Vivitar IPC-222 | User Manual - Page 31
issues please visit our website at www.vivitar.com . You can find manuals, software and FAQ's at the website. Can't find what you are looking for? E-mail us at [email protected] and one of our technical support team members will answer your questions. For phone support in the US please call 1-800
-
 1
1 -
 2
2 -
 3
3 -
 4
4 -
 5
5 -
 6
6 -
 7
7 -
8
-
9
-
10
-
11
-
12
-
13
-
14
-
15
-
16
-
17
-
18
-
19
-
20
-
21
-
22
-
23
-
24
-
25
-
26
-
27
-
28
-
29
-
30
-
31
 |
 |
IPC 222
Capture Cam
User Manual
© 2009-2015 Sakar International, Inc. All rights reserved.
Windows and the Windows logo are registered trademarks of Microsoft Corporation.
All other trademarks are the property of their respective companies.