Vizio E320-B2 Download
Vizio E320-B2 Manual
 |
View all Vizio E320-B2 manuals
Add to My Manuals
Save this manual to your list of manuals |
Vizio E320-B2 manual content summary:
- Vizio E320-B2 | Download - Page 1
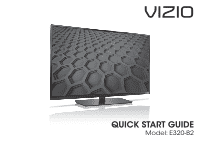
VIZIO QUICK START GUIDE Model: E320-B2 - Vizio E320-B2 | Download - Page 2
TV will not be used for an extended period of time, unplug the power cord. • To reduce risk of electric shock, do not touch the connector with wet hands. • Insert batteries in accordance with instructions. Incorrect polarities may cause the batteries to leak which can damage the remote control - Vizio E320-B2 | Download - Page 3
in the United States. We can help with: • New Product Setup • Connecting Your Devices • Technical Problems • And More Phone: (877) 878-4946 (TOLL-FREE) Email: [email protected] Web: http://store.VIZIO.com/support Hours of operation: Monday - Friday: 5 am to 8 pm (PST) Saturday - Sunday: 7 am to - Vizio E320-B2 | Download - Page 4
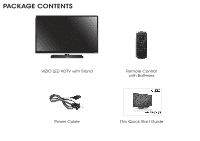
PACKAGE CONTENTS VIZIO LED HDTV with Stand INPUT EXIT BACK OK VOL VOL 1 2 4 5 7 8 WIDE 0 MENU GUIDE CH CH 3 6 9 - Remote Control with Batteries Power Cable This Quick Start Guide - Vizio E320-B2 | Download - Page 5
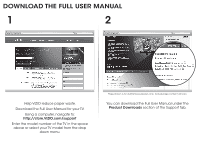
DOWNLOAD THE FULL USER MANUAL 1 2 Help VIZIO reduce paper waste. Download the Full User Manual for your TV. Using a computer, navigate to: http://store.VIZIO.com/support Enter the model number of the TV in the space above or select your TV model from the drop down menu. Page shown is for - Vizio E320-B2 | Download - Page 6
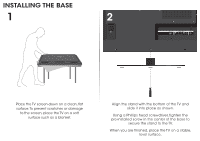
screen-down on a clean, flat surface. To prevent scratches or damage to the screen, place the TV on a soft surface such as a blanket. Align the stand with the bottom of the TV and slide it into place as shown. Using a Phillips head screwdriver, tighten the pre-installed screw in the center of the - Vizio E320-B2 | Download - Page 7
the previous on-screen menu. VOLUME UP/DOWN Increase or decrease loudness of the audio. MUTE Turn the audio off or on. NUMBER PAD Manually enter a channel. WIDE Change the display mode. INPUT EXIT BACK OK VOL VOL 1 2 4 5 7 8 WIDE 0 MENU GUIDE CH CH 3 6 9 - POWER Turn TV on or off. MENU - Vizio E320-B2 | Download - Page 8
FIRST-TIME SETUP 1 Connect all of your devices first. Choose ONE connection type for each device. Match colored connectors to colored ports. BACK OF TV - Vizio E320-B2 | Download - Page 9
HDMI CABLE* BEST • DIGITAL • HD VIDEO (1080p)** • HD AUDIO COMPONENT CABLE* • ANALOG BETTER • HD VIDEO (1080i)** • STEREO AUDIO Match colored connectors to colored ports. COAXIAL CABLE* BETTER • ANALOG • HD VIDEO (1080i)** • STEREO - Vizio E320-B2 | Download - Page 10
pressing gently on the VIZIO logo and sliding away from the remote. Insert the included batteries. Gently slide the battery cover back into place. Connect the power cord to the back of the TV. The flat edge of the connector goes toward the outside of the TV. Plug the power cord into an electrical - Vizio E320-B2 | Download - Page 11
4 5 Turn the TV on by pressing the Power button on the remote. Use the Arrow buttons on the remote to highlight Home Use and press OK. The Setup App is displayed. Follow the on-screen instructions to complete the first-time setup using the Arrow buttons and the OK button on the remote. - Vizio E320-B2 | Download - Page 12
moretrasibveletm. Suesticu,pTVis, asnimdpmleo-viejuestxpelurgienitcine., Sciomnpnleycctotnhneeincct ltuhdeeindcaluuddeiodcaaubdleiotocayboluertToVyaonudr TyVoau'nvde ginodtuplgoewienrfpuol awuedrfiuol,wroitohmm-finlliinmgaal uedffoiort.. Available at www.VIZIO.com This Product Sold Separately - Vizio E320-B2 | Download - Page 13
HDMI® Cable - Extreme Slim Series. Ideal for ultra-thin HDTVs, its built-in smart chip provides picture perfect HD video, 3D and superior audio at up to 10.2 Gbps. This all-in-one cable also supports advanced 7.1 surround sound and audio return channel, eliminating the need for additional cables - Vizio E320-B2 | Download - Page 14
MENU > System > Reset & Admin > Reset TV to Factory Defaults. Enter the Parental Control Passcode (the default code is 0000). Select Reset. Remember that all of your settings will be lost. There is a picture, but no sound. • Press the Volume Up button on the remote. • Press the Mute button on the - Vizio E320-B2 | Download - Page 15
material or packaging that affords an equal degree of protection. VIZIO Technical Support will provide instructions for packing and shipping the covered Product to the VIZIO service center. Limitations and Exclusions VIZIO's one-year limited warranty only covers defects in materials and workmanship - Vizio E320-B2 | Download - Page 16
© 2013 VIZIO INC. ALL RIGHTS RESERVED. 130830OC-NC
-
 1
1 -
 2
2 -
 3
3 -
 4
4 -
 5
5 -
 6
6 -
 7
7 -
8
-
9
-
10
-
11
-
12
-
13
-
14
-
15
-
16
 |
 |
QUICK START GUIDE
Model: E320-B2
VIZIO