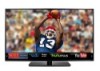
Vizio E500i-A0 E500i-A0 User Manual
Vizio E500i-A0 Manual
 |
View all Vizio E500i-A0 manuals
Add to My Manuals
Save this manual to your list of manuals |
Vizio E500i-A0 manual content summary:
- Vizio E500i-A0 | E500i-A0 User Manual - Page 1
USER GUIDE MMOODDEELSL // E3D320VX // E3ED44270V0Xi-A0 // E3ED54700V0Xi-A0 INSTALLING YOUR new TV CONTROLS & CONNECTIONS CONNECTING YOUR DEVICES USING THE ON-SCREEN MENU USING THE USB MEDIA PLAYER USING VIZIO INTERNET APPS TROUBLESHOOTING & SUPPORT Help, SPECs, warranty & LEGAL - Vizio E500i-A0 | E500i-A0 User Manual - Page 2
This product qualifies for ENERGY STAR in the "factory default" setting and this is the setting in which power savings will be achieved. Changing the factory default picture settings or enabling other features will increase power consumption that could exceed the limits necessary to qualify for - Vizio E500i-A0 | E500i-A0 User Manual - Page 3
• To reduce the risk of electric shock or component damage, switch off the power before connecting other components to your TV. • Read these instructions. • Keep these instructions. • Heed all warnings. • Follow all instructions. • Do not use this apparatus near water. • Clean only with a dry cloth - Vizio E500i-A0 | E500i-A0 User Manual - Page 4
safely. Do not defeat the safety purpose of the grounded plug. • When connected to a power outlet, power is always flowing into your TV. To totally disconnect power, unplug the power cord. • The lightning flash with arrowhead symbol within an equilateral triangle is intended to alert the user to the - Vizio E500i-A0 | E500i-A0 User Manual - Page 5
your TV will not be used for an extended period of time, unplug the power cord. • To reduce risk of electric shock, do not touch the connector with wet hands. • Insert batteries in accordance with instructions. Incorrect polarities may cause the batteries to leak which can damage the remote control - Vizio E500i-A0 | E500i-A0 User Manual - Page 6
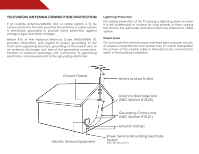
, unplug the TV from the wall outlet and disconnect the antenna or cable system. Power Lines Do not locate the antenna near overhead light or power circuits, or where it could fall into such power lines or circuits. Remember, the screen of the coaxial cable is intended to be connected to earth in - Vizio E500i-A0 | E500i-A0 User Manual - Page 7
TV on a Wall 5 Controls and Connections 6 Rear Panel 6 Side Panel 7 Front Panel 8 Remote Control 9 Replacing the Batteries 10 Connecting Your Devices 11 Connecting A Device 11 Connecting an Audio Device 12 Connecting to your Network 13 Connecting to a Wired Network (Best 13 Connecting - Vizio E500i-A0 | E500i-A0 User Manual - Page 8
Information 34 Resetting the TV Settings 34 Restoring the TV to Factory Default Settings 34 Using Guided Setup 35 Using the Info Window 36 Using the USB Media Player 37 Using the USB Media Player 37 Connecting a USB Thumb Drive to the TV 37 Playing USB Media 37 Using VIZIO Internet Apps 39 - Vizio E500i-A0 | E500i-A0 User Manual - Page 9
wall, using a VESA-standard wall mount (not included) Installing the TV Stand Your TV includes a stand designed to support the weight of the TV and keep it from falling over. However, the TV TV is not properly secured Quick Start Guide Hex Wrench Power Cord Remote Control with Batteries 3 - Vizio E500i-A0 | E500i-A0 User Manual - Page 10
To prevent scratches or damage to the screen, place the TV on a soft surface, such as carpet, rug, or blanket. 2. Align the base with the TV. 3. Insert and tighten the three(3) included hex screws into the base with the included hex wrench. 4. Move the TV with attached stand into an upright position - Vizio E500i-A0 | E500i-A0 User Manual - Page 11
(H) E500i-A0 M6 1.00mm 20mm 400mm (V) x 400mm (H) Be sure the mount you choose is capable of supporting the weight of the TV. After you have determined that you have the correct mount for your TV, you can begin the installation. To install your TV on a wall: 1. Disconnect any cables connected to - Vizio E500i-A0 | E500i-A0 User Manual - Page 12
Controls and Connections 2 Rear Panel USB - Connect USB thumb drive to play photo, music, or video. HDMI - Connect HDMI device. Stereo Audio Out - Connect RCA audio device, such as sound bar. Optical Audio Out - Connect optical/SPDIF audio device, such as home audio receiver. Coaxial - Connect - Vizio E500i-A0 | E500i-A0 User Manual - Page 13
Side Panel 2 INPUT MENU CH ^ CH VOL ^ VOL ^ ^ POWER - Turn TV off or on. INPUT - Change input source. MENU - Open the on-screen menu. CHANNEL UP/DOWN - Change the channel. VOLUME UP/DOWN - Increase or decrease volume level. Side Panel 7 - Vizio E500i-A0 | E500i-A0 User Manual - Page 14
2 Front Panel REMOTE SENSOR When using the remote, aim it directly at this sensor. 8 Front Panel - Vizio E500i-A0 | E500i-A0 User Manual - Page 15
audio off or on. Number Pad Manually enter a channel. Wide Switch the display mode. App launcher Quickly launch the pictured app. Power Turn TV on or off. Info Display the info window. Menu Display the on-screen menu. Arrow Navigate the on-screen menu. Guide Display the info window. V Button Open - Vizio E500i-A0 | E500i-A0 User Manual - Page 16
2 Replacing the Batteries 1. Remove the battery cover. 2. Insert two batteries into the remote control. Make sure that the (+) and (-) symbols on the batteries match the (+) and (-) symbols inside the battery compartment. 3. Replace the battery cover. 10 - Vizio E500i-A0 | E500i-A0 User Manual - Page 17
cable (not included) to the TV and the device. 4. Turn the TV and your device on. Set the TV's input to match the connection you used (HDMI-1, HDMI-2, etc). BACK OF TV 3 Cable/Satellite Box DVD/Blu-ray Player Game Console HDMI CABLE BEST • DIGITAL • HD VIDEO (1080p)* • HD AUDIO Match colored - Vizio E500i-A0 | E500i-A0 User Manual - Page 18
port that matches an available port on the TV (Optical, RCA, etc). 2. Turn the TV and your audio device off. 3. Connect the appropriate cable (not included) to the TV and the device. 4. Turn the TV and your device on. BACK OF TV 3 Home Audio Receiver VIZIO Sound Bar GOOD RCA Stereo Cable BETTER - Vizio E500i-A0 | E500i-A0 User Manual - Page 19
. It can be connected to your home network with a Wired or Wireless connection. Connecting to a Wired Network (Best) 1. Connect an ethernet cable to your router and to the ethernet port on the back of the TV. See below. 2. Use the Guided Network Setup to configure the TV. Connecting to your network - Vizio E500i-A0 | E500i-A0 User Manual - Page 20
, have the network key ready. • If you are connecting to your network with an ethernet cable, connect it to the ethernet port on the TV. To complete the first-time setup: 1. Press the Power/Standby button on the remote. The TV powers on and the Setup App starts. 2. Use the Up/Down Arrow buttons on - Vizio E500i-A0 | E500i-A0 User Manual - Page 21
• Activate the sleep timer • Adjust the picture settings • Adjust the audio settings • Adjust the network settings • Change TV settings • Access the help menu Navigating the On-Screen Menu To open the on-screen menu, press the MENU/OK button on the remote. Use the Arrow buttons to highlight a menu - Vizio E500i-A0 | E500i-A0 User Manual - Page 22
be connected to your TV.To use one of these devices with your TV, you must first change the input source in the on-screen menu. To change the input device: 1. Press the MENU button on the remote. The on-screen menu is displayed. 2. Use the Arrow buttons on the remote to highlight the Settings icon - Vizio E500i-A0 | E500i-A0 User Manual - Page 23
. 3. Use the Up/Down Arrow buttons on the remote to highlight the setting you wish to change, then use the Left/ Right Arrow buttons to change the setting: • Caption Style - Choose Auto to keep default settings or Custom to manually change each setting. • Text Size - Adjust the size of the text - Vizio E500i-A0 | E500i-A0 User Manual - Page 24
Timer menu, use the Up/Down Arrow buttons on the remote to highlight Auto Power Off and press OK. The Auto Power-Off menu is displayed. 2. Highlight Off or 10 min and press OK. Press Exit. Adjusting the Picture Settings Your TV display can be adjusted to suit your preferences and viewing conditions - Vizio E500i-A0 | E500i-A0 User Manual - Page 25
for other sports. • Custom picture mode allows you to manually change each of the picture settings: Backlight - Adjusts the LED brightness to affect the overall brilliance of the picture. Brightness - Adjusts the black level of the picture. When this setting is too low, the picture may be too dark - Vizio E500i-A0 | E500i-A0 User Manual - Page 26
the light levels in the room and automatically adjusts the backlight for the best picture. Select Off, Low, Medium, or High. 4. When you have finished adjusting the Advanced Picture Settings, press the EXIT button on the remote. Adjusting the Color Temperature Adjusting the color temperature will - Vizio E500i-A0 | E500i-A0 User Manual - Page 27
, use the Arrow buttons to highlight More, then press OK. 2. Use the Arrow buttons on the remote to highlight Reset Picture Mode, then press OK. The TV displays, "Are you sure you want to RESET Picture Settings to the factory defaults?" 3. Highlight Yes and press OK. 4. Press the EXIT button on the - Vizio E500i-A0 | E500i-A0 User Manual - Page 28
settings, press the EXIT button on the remote. 3. Use the Arrow buttons to highlight the setting you wish to adjust, then press Left/Right Arrow to change the setting: which delivers an immersive surround sound experience from the TV's internal speakers. Additionally, StudioSound HD completes the - Vizio E500i-A0 | E500i-A0 User Manual - Page 29
PCM. • Analog Audio Out - Sets the volume control properties for the analog RCA (red/white) connectors when connected to a home theater audio system. Select Variable to control the external speakers' volume from the TV's volume controls, or select Fixed to control the external speakers' volume from - Vizio E500i-A0 | E500i-A0 User Manual - Page 30
is being broadcast: If your TV is connected to a network with an Ethernet cable, you will not see the wireless network connection menu. You must disconnect the Ethernet cable to set up a wireless network connection. 1. Press the MENU button on the remote. The on-screen menu is displayed. 2. Use the - Vizio E500i-A0 | E500i-A0 User Manual - Page 31
5 Changing the Advanced Network Settings Advanced users can fine-tune the network settings using the Manual Setup feature. To change advanced network settings: 1. From the Network Connection menu, highlight Manual Setup and press OK. The Change Settings menu is displayed. 2. Use the Arrow and OK - Vizio E500i-A0 | E500i-A0 User Manual - Page 32
menu, you can: • Change the input source • Adjust the Tuner settings • Name the TV inputs • Set up parental controls • Change the on-screen menu language • Set the time • Adjust the CEC settings • Adjust the Power Indicator Changing the Input Source To quickly access the Input Source menu, press - Vizio E500i-A0 | E500i-A0 User Manual - Page 33
7. Press the EXIT button on the remote. To add a single new analog channel: 1. From the Tuner Settings menu, highlight Add Analog Channel and press on the remote to enter the number of the channel you are adding. 3. Highlight Add Channel and press OK. The TV scans for the channel. 4. When the TV is - Vizio E500i-A0 | E500i-A0 User Manual - Page 34
You can remove these channels from the TV's memory with the Skip Channel feature. Controls on page 29. To remove a channel: 1. From the Tuner Settings menu, highlight Skip Channel. The Skip Channel menu is displayed. 2. For each channel you wish to remove, use the Up/Down Arrow buttons on the remote - Vizio E500i-A0 | E500i-A0 User Manual - Page 35
: 1. Press the MENU button on the remote. The on-screen menu is displayed. 2. Use the Arrow buttons on the remote to highlight the Settings icon and press OK. The TV Settings menu is displayed. 3. Use the Arrow buttons on the remote to highlight Parental Controls and press OK. 4. Enter your parental - Vizio E500i-A0 | E500i-A0 User Manual - Page 36
When this is the case, you can use the TV's Rating Block feature to block content based on its rating. For a list of content remote. Resetting the Content Locks To reset the content locks to the factory-default settings: 1. From the Parental Controls menu, highlight RESET LOCKS and press OK. The TV - Vizio E500i-A0 | E500i-A0 User Manual - Page 37
you have a DVD player connected to the Component input, you can rename that input to display "DVD Player". To change the name of an input: 1. Press the MENU button on the remote. The on-screen menu is displayed. 2. Use the Arrow buttons on the remote to highlight the Settings icon and press OK. The - Vizio E500i-A0 | E500i-A0 User Manual - Page 38
cable or a wireless network. Adjusting the CEC Settings The CEC function on your TV enables you to control HDMI-connected devices with the included remote without any additional programming. Not all HDMI devices support CEC. See your device's user manual for details. 1. Press the MENU button on - Vizio E500i-A0 | E500i-A0 User Manual - Page 39
Power Light and press OK. 4. Use the Up/Down Arrow buttons to select On or Off, then press OK. Using the Help Menu You can use the TV's Help menu to: • Display the User Manual • Display system information • Reset the TV settings • Restore the TV to its factory default settings • Get guided setup - Vizio E500i-A0 | E500i-A0 User Manual - Page 40
reviewing the system information, press the EXIT button on the remote. Resetting the TV Settings To reset the TV's picture and audio settings: 1. Press the MENU button on the remote. The on-screen control passcode. If you have not yet set up a parental passcode, enter the default, 0000. The TV - Vizio E500i-A0 | E500i-A0 User Manual - Page 41
OK. The Help menu is displayed. 3. Highlight Guided Setup and press OK. 4. Highlight the guided setup you want to access and press OK: • Tuner Setup - Set up the TV tuner. • Network Setup - Connect the TV to your network. 5. Follow the on-screen instructions. When finished, press the EXIT button on - Vizio E500i-A0 | E500i-A0 User Manual - Page 42
the Info Window The Info Window can be displayed by pressing the INFO or GUIDE button on the remote: • Press the INFO or GUIDE button one time to display channel and input information. • Press the INFO or GUIDE button two times to display the program title and closed captioning information. • Press - Vizio E500i-A0 | E500i-A0 User Manual - Page 43
Player The USB Media Player allows you to connect a USB thumb drive to your TV and play music or photos. USB PORT Connecting a USB Thumb Drive to the TV 1. Turn the TV on. Connect your USB thumb drive to the USB port on the side of the TV. 2. The TV will detect the USB thumb drive. Select Yes - Vizio E500i-A0 | E500i-A0 User Manual - Page 44
connected USB devices. To change source, highlight it and press OK. Back Button Highlight this button and press OK if you would like to return to the previous screen on the remote. Current Folder Start Fullscreen Slideshow Sort by Name View Thumbnails/List View Folder Settings Toggle Music/Photos - Vizio E500i-A0 | E500i-A0 User Manual - Page 45
updates and to access online content. See Setting Up Your Network Connection on page 9 if your TV is not yet connected to your home network. Using the VIA Shortcut Buttons Use the four colored buttons on the remote . • Blue - Change the size of the main display window when an App is open in the sidebar - Vizio E500i-A0 | E500i-A0 User Manual - Page 46
Left/Right Arrow buttons on the remote. (The highlighted App is in the lower left corner of the screen.) 3. Select Connected TV Store by pressing the OK set of Apps and App settings are saved. Creating an Owner PIN Creating an owner PIN allows you to restrict access to the Administrative Controls - Vizio E500i-A0 | E500i-A0 User Manual - Page 47
and press OK. 7. Enter your name using the QWERTY Keyboard on the remote or the on-screen keyboard, then press OK. The Create Profile menu is displayed. 8. Highlight Avatar and press OK. The Avatar menu is displayed. 9. Highlight a picture for your profile and press OK. The Create Profile menu is - Vizio E500i-A0 | E500i-A0 User Manual - Page 48
App is in the lower left corner of the screen.) 3. Select the App by pressing the OK button. The Profile App is displayed. 4. Highlight System Settings and press OK. The System Settings menu is displayed. 5. Highlight Restore Factory Settings and press OK. The TV displays, "Are you sure you want to - Vizio E500i-A0 | E500i-A0 User Manual - Page 49
Troubleshooting & Technical Support A do you have questions? LET US HELP! YOUR PRODUCT INCLUDES FREE LIFETIME TECH SUPPORT The VIZIO support team is highly trained and is based in the United States. We can help with: • New Product Setup • Connecting Your Devices • Technical Problems • And More - Vizio E500i-A0 | E500i-A0 User Manual - Page 50
TV on. The power is on, but there is no image on the screen. • Ensure all cables are securely attached to the TV. • Ensure all devices are connected correctly. Devices differ; see your device's user manual for details. • Adjust Brightness, Contrast, or Backlight. See Resetting the Picture Settings - Vizio E500i-A0 | E500i-A0 User Manual - Page 51
may be low. Ensure your antenna is connected securely to the TV and move the antenna around the room or close to a window for the best signal. The picture is distorted. • Nearby electrical devices may be interfering with the TV. Separate the TV from electrical appliances, cars, or flourescent lights - Vizio E500i-A0 | E500i-A0 User Manual - Page 52
Screen Size: Viewable Area: Dimensions w/ Stand: w/o Stand: Weight w/ Stand: w/o Stand: TV Type: Refresh Rate: Maximum Resolution: Pixel Pitch: Dynamic Contrast 178° (H) / 178° (V) 4 1 1 (Shared with Component) 1 1 1 46 B E500i-A0 50" Class 49.50" 44.47" x 28.09" 9.04" 44.47" x 26.25" x 3.23" 35 - Vizio E500i-A0 | E500i-A0 User Manual - Page 53
Remote Control Model: Certifications: Compliance: Voltage Range: Power Consumption: Standby Power: Zero Bright Pixel Guarantee: E470i-A0 RCA Class B, HDMI 1.4, Dolby digital Plus Energy Star 120V @ 50/60 Hz 62W - Vizio E500i-A0 | E500i-A0 User Manual - Page 54
and shipping material or packaging that affords an equal degree of protection.VIZIO Technical Support will provide instructions for packing and shipping the covered Product to the VIZIO service center. Limitations and Exclusions VIZIO's one-year limited warranty only covers defects in materials and - Vizio E500i-A0 | E500i-A0 User Manual - Page 55
: UL Canada: CSA Germany: VDE UK: BASE/BS Japan: Electric Appliance Control Act Open Source Software Notice Your VIA device may contain GPL executables and LGPL libraries that are subject to the PL2.0/LGPL2.1 License Agreements. VIZIO offers to provide source code to you on CD-ROM for a processing - Vizio E500i-A0 | E500i-A0 User Manual - Page 56
Software or access to the VIA Services. You may, however, make a one-time permanent transfer of all of your license rights to the VIZIO Software to another party, provided that: (a) the transfer must include the VIZIO HD TV, including all its component parts, original media, printed materials and - Vizio E500i-A0 | E500i-A0 User Manual - Page 57
devices that access the Internet and pay any service fees associated with such access. In addition, you must provide all equipment necessary to make such connection to the Internet including a modem or other Internet access device. 8. Upgrades, Support.VIZIO or its third party providers may elect - Vizio E500i-A0 | E500i-A0 User Manual - Page 58
THE LIMITED WARRANTY ON MEDIA SET FORTH ABOVE AND TO THE MAXIMUM EXTENT PERMITTED BY APPLICABLE LAW, THE VIZIO SOFTWARE AND VIA SERVICES ARE PROVIDED "AS IS", of missiles, or nuclear, chemical or biological weapons. 14. Controlling Law and Severability. This License Agreement will be governed by and - Vizio E500i-A0 | E500i-A0 User Manual - Page 59
MODELS // E3D320VX // E3D420VX // E3D470VX © 2012 VIZIO INC. All rights reserved. 121205OC-NC
-
 1
1 -
 2
2 -
 3
3 -
 4
4 -
 5
5 -
 6
6 -
 7
7 -
8
-
9
-
10
-
11
-
12
-
13
-
14
-
15
-
16
-
17
-
18
-
19
-
20
-
21
-
22
-
23
-
24
-
25
-
26
-
27
-
28
-
29
-
30
-
31
-
32
-
33
-
34
-
35
-
36
-
37
-
38
-
39
-
40
-
41
-
42
-
43
-
44
-
45
-
46
-
47
-
48
-
49
-
50
-
51
-
52
-
53
-
54
-
55
-
56
-
57
-
58
-
59
 |
 |
USER
GUIDE
INSTALLING YOUR NEW TV
CONTROLS & CONNECTIONS
CONNECTING YOUR DEVICES
USING THE ON-SCREEN MENU
USING THE USB MEDIA PLAYER
USING VIZIO INTERNET APPS
TROUBLESHOOTING & SUPPORT
HELP, SPECS, WARRANTY & LEGAL
MODELS
//
E3D320VX
//
E3D420VX
//
E3D470VX
MODEL
E470i-A0
E500i-A0