Vizio E500i-B1 Download
Vizio E500i-B1 Manual
 |
View all Vizio E500i-B1 manuals
Add to My Manuals
Save this manual to your list of manuals |
Vizio E500i-B1 manual content summary:
- Vizio E500i-B1 | Download - Page 1
VIZIO USER MANUAL Model: E500i-B1 - Vizio E500i-B1 | Download - Page 2
This product qualifies for ENERGY STAR in the "factory default" setting and this is the setting in which power savings will be achieved. Changing the factory default picture settings or enabling other features will increase power consumption that could exceed the limits necessary to qualify for - Vizio E500i-B1 | Download - Page 3
warranty service plan, visit www.VIZIO.com. WHEN READING THIS MANUAL When you see this symbol, please read the accompanying important warning or notice. It is intended to alert you to the presence of important operating instructions for replacement of the obsolete outlet. • Protect the power cord - Vizio E500i-B1 | Download - Page 4
of power supplied to your home, consult your dealer or local power company. • Do not apply pressure or throw objects at your TV. This may compromise the integrity of the display. The manufacturer's warranty does not cover user abuse or improper installations. • The power cord must be replaced when - Vizio E500i-B1 | Download - Page 5
your TV will not be used for an extended period of time, unplug the power cord. • To reduce risk of electric shock, do not touch the connector with wet hands. • Insert batteries in accordance with instructions. Incorrect polarities may cause the batteries to leak which can damage the remote control - Vizio E500i-B1 | Download - Page 6
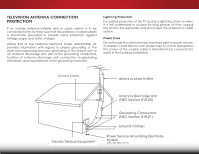
proper grounding of the mast and supporting structure, grounding of the lead- TV from the wall outlet and disconnect the antenna or cable system. Power Lines Do not locate the antenna near overhead light or power circuits, or where it could fall into such power lines or circuits. Remember, the screen - Vizio E500i-B1 | Download - Page 7
Menu 20 Changing the Input Source 21 Changing the Screen Aspect Ratio 21 Viewing Video with the Menu Open 22 Adjusting the Picture Settings 23 Adjusting the Advanced Picture Settings 24 Adjusting the Professional Picture Settings 25 Adjusting the Color Tuner Settings 25 Creating a Custom - Vizio E500i-B1 | Download - Page 8
58 Troubleshooting & Technical Support 59 Specifications 62 Limited Warranty 64 Legal & Compliance 65 Using the USB Media Player 50 Using the USB Media Player 50 Preparing Your USB Drive to Play USB Media 50 Playing USB Media 50 Removing the USB Drive from the TV 50 Using VIZIO Internet - Vizio E500i-B1 | Download - Page 9
THE PACKAGE CONTENTS Before installing your new TV, take a moment to inspect the package contents. Use the images below to ensure nothing is missing or damaged. VIZIO LED HDTV with stand Remote Control with Batteries Quick Start Guide Power Cord 3 6 x M4 14mm Phillips Screws PACKAGE CONTENTS - Vizio E500i-B1 | Download - Page 10
moved • If an earthquake occurs and the TV is not properly secured It is recommended that two people take part in the base installation. Place the TV screen-down on a clean, flat surface. To prevent scratches or damage to the screen, place the TV on a soft surface such as a blanket. TV ON STAND 4 - Vizio E500i-B1 | Download - Page 11
1 To install the stand: 1. Align the neck piece with the bottom of the TV as shown. 2. Using a Phillips screwdriver, tighten three (3) of the included screws into the center of the neck piece to secure it to the TV. 3. Align the base with the neck piece and tighten the remaining three (3) screws - Vizio E500i-B1 | Download - Page 12
Consult the information below to find the appropriate mount for your TV model: Installing a TV on a wall requires lifting. To prevent injury or damage to the TV, ask someone to help you. Screw Size: Hole Pattern: Weight w/o Stand: E500i-B1 M6 200mm (V) x 200mm (H) 31.09 lbs Be sure the mount you - Vizio E500i-B1 | Download - Page 13
or composite device. Coaxial - Connect a coaxial cable from cable, satellite, or antenna. Ethernet - Connect an Ethernet cable from home network. HDMI - Connect an HDMI device. Power - Press and hold to turn TV on or off. Input - Press to change input source. BACK PANEL 7 - Vizio E500i-B1 | Download - Page 14
2 FRONT PANEL REMOTE SENSOR & POWER INDICATOR When using the remote, aim it directly at this sensor. The power indicator flashes on when the TV turns on, then goes out after several seconds. To keep the power indicator on as long as the TV is on, see Turning the Power Indicator On or Off on page 47 - Vizio E500i-B1 | Download - Page 15
audio off or on. NUMBER PAD Manually enter a channel. WIDE Switch the display mode. POWER Turn TV on or off. INFO Display the info window. MENU Display the on-screen menu. ARROW Navigate the on-screen menu. GUIDE Display the info window. V BUTTON Open the VIZIO Internet Apps Plus® dock. CHANNEL UP - Vizio E500i-B1 | Download - Page 16
2 Replacing the Batteries 1. Remove the battery cover. 2. Insert two batteries into the remote control. Make sure that the (+) and (-) symbols on the batteries match the (+) and (-) symbols inside the battery compartment. 3. Replace the battery cover. 10 - Vizio E500i-B1 | Download - Page 17
(not included) to the TV and the device. 4. Turn the TV and your device on. Set the TV's input to match the connection you used (HDMI-1, HDMI-2, etc). BACK OF TV 11 3 Cable/Satellite Box DVD/Blu-ray Player Game Console HDMI CABLE BEST • DIGITAL • HD VIDEO (1080p)* • HD AUDIO COMPONENT CABLE - Vizio E500i-B1 | Download - Page 18
Composite cables) are the traditional way of connecting your devices to your TV.Video signals are sent over the yellow connector while audio is sent over traditional way of connecting antennas and cable television signals to your TV. Coaxial cables carry both audio and video signals through a single - Vizio E500i-B1 | Download - Page 19
ability to automatically adjust themselves for optimal viewing. • HD Video Resolutions up to 1080i • Analog Connection • Audio and Video Signals • HD Video Resolutions up to 1080p • HD Audio • Digital Connection • Audio and Video Signals COMPONENT VIDEO R L Pr/Cr Pb/Cb Y HDMI HDMI BETTER 13 - Vizio E500i-B1 | Download - Page 20
your audio device off. 3. Connect the appropriate cable (not included) to the TV and the device. 4. Turn the TV and your device on. 3 Home Audio Receiver VIZIO Sound Bar HDMI CABLE BEST • ARC 2-WAY COMMUNICATION • 2.0-5.1 DIGITAL AUDIO • PCM, DTS, DOLBY DIGITAL OPTICAL/SPDIF CABLE • PCM STREAM - Vizio E500i-B1 | Download - Page 21
digital multi-channel surround audio through a single HDMI cable. Audio Return Channel-enabled (ARC) TVs allow audio to be sent over an already connected HDMI cable, eliminating the need for a • Audio and Video Signals L R Optical/SPDIF DIGITAL OPTICAL AUDIO HDMI HDMI GOOD BETTER 15 BEST - Vizio E500i-B1 | Download - Page 22
home audio receiver through a separate audio connection. RCA (Audio) Your TV HDMI Your Home Audio Receiver HDMI 3 With HDMI ARC Built-in Tuner Your TV HDMI VIZIO Internet Apps With an HDMI ARC setup, the audio connection between your TV and Home Audio Receiver can be removed. The HDMI cable - Vizio E500i-B1 | Download - Page 23
with a Wired or Wireless connection. Connecting to a Wired Network (Best) 1. Connect an Ethernet cable to your router and to the Ethernet port on the back of the TV. See below. 2. Use the Guided Network Setup to configure the TV. See Using Guided Setup on page 48. Connecting to a Wireless Network - Vizio E500i-B1 | Download - Page 24
complete the first-time setup: 1. Press the Power/Standby button on the remote. The TV powers on and the Setup App starts. 4. Use the Arrow buttons on the remote to highlight your country, and then press the OK button. 5. Use the Arrow buttons on the remote to highlight your wireless network in the - Vizio E500i-B1 | Download - Page 25
4 8. Use the Arrow and OK buttons on the remote to answer the question about your TV signal connection, then perform the channel scan or select the input source for your cable or satellite box. 9. When you are finished, "Your VIZIO TV is set up" will be displayed. The First-Time Setup is complete. - Vizio E500i-B1 | Download - Page 26
• Name Inputs • Adjust TV settings • Access the Guided Setup • Access the User Manual VIZIO TV SETTINGS Picture Audio Timers Network Tuner CC Closed Captions Devices System Guided Setup User Manual NAVIGATING THE ON-SCREEN MENU To open the on-screen menu, press the MENU button on the remote. Use - Vizio E500i-B1 | Download - Page 27
Devices on the Input Menu on page 42 for more information. 21 The TV can display images in five different modes: Normal, Stretch, Panoramic, Wide, and Zoom. Each mode displays the picture differently. To change the screen aspect ratio: 1. Press the WIDE button on the remote. 2. Use the Arrow - Vizio E500i-B1 | Download - Page 28
the best picture, use 3D Calibrated mode.To reduce video delay (lag) when gaming, use Game mode. Sleep Timer Picture Audio Network Settings Help ABC RE-SIZED TO FIT Input Wide VIZIO CC Sleep Timer PICTURE Picture Mode Standard Backlight - + 85 Brightness - + 50 Contrast - + 50 - Vizio E500i-B1 | Download - Page 29
ENERGY STAR® requirements. For the best picture, use Calibrated mode. To reduce video delay (lag) when gaming, use Game mode. • Calibrated Dark mode sets the picture settings to values perfect for watching TV in a dark room. • Vivid mode sets the picture settings to values that produce a brighter - Vizio E500i-B1 | Download - Page 30
the picture for watching film. Select Auto or Off. • Wide - Adjust the wide mode to preserve aspect ratio or NetworktoSfeiltltinthgse scHerelpen. See Changing the Screen Aspect Ratio on page 21. 3. When you have finished adjusting the Advanced Picture Settings, press the EXIT button on the remote - Vizio E500i-B1 | Download - Page 31
allow technicians to manually calibrate the TV. Calibration requires specialized training, an input with precisely set colors, and a specialized light meter. To adjust the professional picture settings: 1. From the PICTURE menu, use the Arrow buttons to highlight Professional Picture, and then - Vizio E500i-B1 | Download - Page 32
on. Only two color channels can be turned off at the same time. 5. When you are finished with the color channels, press the EXIT button. To adjust the 11 Point White Balance settings: 1. From the Color Tuner menu, use the Arrow buttons to highlight Color Tuner, and then press the Left/Right Arrow - Vizio E500i-B1 | Download - Page 33
the Flat Test Pattern: 1. From the Color Tuner menu, use the Arrow buttons to highlight Color Tuner, and then press the Left/Right Arrow buttons until the Flat Test Pattern menu is displayed. Flat Test Pattern Off 2. Use the Arrow buttons on the remote to highlight Off. Use the Left/Right Arrow - Vizio E500i-B1 | Download - Page 34
name for your custom picture mode using the on-screen keyboard. 3. Highlight Done and press OK. VIZIO CREATE PICTURE MODE Custom1_ abc def ghi j k l mn o p q r s t u v wx y z 0 123456789 .@# .com Space Done 4. Make any desired changes to the picture settings. 5. Press the EXIT button to exit the - Vizio E500i-B1 | Download - Page 35
name using the on-screen keyboard. 4. Highlight Done and press OK. 5. Press the EXIT button to exit the menu screens. Locking a Custom Picture Mode Custom picture modes can be locked with a unique PIN to prevent accidental changes to their settings. To lock all custom picture modes: 1. From the - Vizio E500i-B1 | Download - Page 36
that are no longer needed can be deleted. Inputs assigned to a deleted custom picture mode become assigned to the Calibrated picture mode. To delete a custom picture mode: 1. From the PROFESSIONAL PICTURE menu, use the Arrow buttons to highlight Delete Picture Mode, and then press OK. The DELETE - Vizio E500i-B1 | Download - Page 37
buttons on the remote to highlight Audio and press OK. The AUDIO menu is displayed. 3. Use the Arrow buttons to highlight the setting you wish to adjust, then press Left/Right Arrow buttons to change the setting: • TV Speakers - Turns the built-in speakers on or off. VIZIO AUDIO TV and input - Vizio E500i-B1 | Download - Page 38
bars change to reflect the mode. 5. Press the EXIT button on the remote. To create, modify, or replace the single custom equalizer setting: 1. Press the MENU button on the remote. The on-screen menu is displayed. 2. Use the Arrow buttons on the remote to highlight Audio and press OK. The AUDIO menu - Vizio E500i-B1 | Download - Page 39
the TV will turn off. If you don't want the TV to turn off when there is no signal, change the setting to Off. Otherwise, select 10 minutes. Exit 2D 3D 3. When you have finished setting the auto power off time, press the EXIT button on the remote. ABC Input Wide CC Sleep Timer Picture - Vizio E500i-B1 | Download - Page 40
on-screen keyboard, enter your network's password, then highlight Connect and press OK. VIZIO NETWORK Wired Connection Disconnected Wireless Access Points More Access Points WPS Manual Setup Hidden Network Test Connection 6. Press the EXIT button on the remote. Changing the Manual Setup Settings - Vizio E500i-B1 | Download - Page 41
enter your network's name (SSID), then highlight Connect and press OK. 3. Using the on-screen keyboard, enter your network's password, then highlight Connect and press OK. 4. Press the EXIT button on the remote. VIZIO ENTER ACCESS POINT NAME Enter your access point name. This is used to connect to - Vizio E500i-B1 | Download - Page 42
5 SETTING UP THE TUNER You can use the TV's Tuner menu to: • Select a Tuner Input • Perform an Auto Channel Scan • Perform a Partial Channel Scan • Manually Add Channels • Select channels to skip • Select Analog MTS modes • Select Digital Languages VIZIO TUNER Tuner Mode Auto Channel Scan Partial - Vizio E500i-B1 | Download - Page 43
of new channels: 1. From the TUNER menu, highlight Partial Channel Scan, and remote to enter the number of the channel you are adding. 3. Highlight Add Channel and press OK. The TV scans for the channel. 4. When the TV is done scanning for the channel, press the EXIT button on the remote. VIZIO - Vizio E500i-B1 | Download - Page 44
remove these channels from the TV's memory with the Skip Channel button on the remote. VIZIO SKIP CHANNEL 1 Test 0 1 Test 1 P 1-2 Test 2 P 2 Test 3 2-2 Test 4 P 2-3 Test 5 Wide Zoom Normal Panoramic Exit 2D 3D ABC Input Wide CC Sleep Timer Picture Audio Network Settings - Vizio E500i-B1 | Download - Page 45
menu is displayed. 2. Select your preferred language: English, Español, or Français . Press OK. 3.WiPderessZtohome EXNIoTrmbaul ttoPannooranmicthe remote. VIZIO DIGITAL LANGUAGE English Español Français Exit 2D 3D ABC Input Wide CC Sleep Timer Picture Audio Network Settings Help 39 - Vizio E500i-B1 | Download - Page 46
closed captions, the TV will not display them. The Closed Captions menu does not appear when an HDMI input is selected. To activate or deactivate closed captions: 1. Press the MENU button on the remote. The on-screen menu is displayed. 2. Use the Arrow buttons on the remote to highlight Closed - Vizio E500i-B1 | Download - Page 47
are satisfied with the appearance of the closed captions, press the EXIT button on the remote. Text 5 Typical choices include: • Opaque background, transparent window-Only is green, the background is black, and the window is red. Background CLOSED CAPTION TEXT SAMPLE Window 41 CLOSED CAPTIONS - Vizio E500i-B1 | Download - Page 48
Enter your custom label using the on-screen keyboard. b. Highlight OK and press OK. c. The Input Name changes to show the custom name that you created. 5. When you have finished naming your input, press the EXIT button on the remote. 5 Input Port VIZIO NAME INPUT HDMI-1 DVD DVD_ abc def ghi - Vizio E500i-B1 | Download - Page 49
Time & Local Settings Parental Controls CEC Power Indicator Reset & Admin English Off View status information for the TV, remote, current input and your network. Viewing System Information To view a summary of the TV settings: 1. Press the MENU button on the remote. The on-screen menu is - Vizio E500i-B1 | Download - Page 50
MENU button on the remote. The on-screen menu is displayed. 2. Use the Arrow buttons on the remote to highlight System and press OK. The SYSTEM menu is displayed. 3. Use the Arrow buttons on the remote to highlight Parental Controls and press OK. 4. Enter your parental PIN. If you have not set a PIN - Vizio E500i-B1 | Download - Page 51
PIN and save it in a secure location. 5. Press the EXIT button on the remote. Resetting the Content Locks To reset the content locks to the factory-default settings: 1. From the Parental Controls menu, highlight RESET LOCKS and press OK. The TV displays, "Are you sure you want to RESET ALL LOCKS - Vizio E500i-B1 | Download - Page 52
To ensure the correct time is displayed when you press the INFO button, set the TV's time zone: 1. Press the MENU button on the remote. The on-screen menu is displayed. VIZIO TIME ZONE 2.WiUdese thZoeomArroNwormbaul ttPoannosraominc the remote to highlight System and press OK. The SYSTEM menu is - Vizio E500i-B1 | Download - Page 53
on your TV enables you to control HDMI-connected devices with the included remote without any additional programming. Not all HDMI devices support CEC. See your device's user manual for details. To enable, disable, or adjust CEC settings: 1. Press the MENU button on the remote. The on-screen menu is - Vizio E500i-B1 | Download - Page 54
GUIDED SETUP MENU Using Guided Setup The TV's Setup App can be used to easily set up the TV tuner or to connect the TV with your network. To use guided setup: 1. Press the MENU button on the remote. The on-screen menu is displayed. 2. Highlight Guided Setup and press OK. VIZIO GUIDED SETUP Tuner - Vizio E500i-B1 | Download - Page 55
information. • Press the INFO or GUIDE button twice to display the program title, program rating, audio information, and the start and end times of the program. Channel/Input Information Network/Display Information 28-1 KCET-HD 1080p Oliver's Holiday Surprise TV-PG V 6:15pm Dolby Digital - Vizio E500i-B1 | Download - Page 56
supported file extension (.jpg or .jpeg.). • The player is not designed to play media from external hard drives, MP3 players, cameras, or smartphones. Playing USB Media To play your USB media: 1. Connect your USB thumb drive to the USB port on the side of the TV. 2. Press the V button on the remote - Vizio E500i-B1 | Download - Page 57
Button Highlight this button and press OK if you would like to return to the previous screen. Connected Sources Displays connected USB devices. VIZIO Fab Apple Dream On January Mix Comp By Oliver 5:50 MyFlashDrive\Audio\root\My Music # Track 1 Seminal Summer buttons on the remote. MUSIC PLAYER 51 - Vizio E500i-B1 | Download - Page 58
Button Highlight this button and press OK if you would like to return to the previous screen. Connected Sources Displays connected USB devices. VIZIO USB thumb drive has more files than can be displayed on a single screen, the page information is displayed here. 52 Folder Contents/ Playlist This - Vizio E500i-B1 | Download - Page 59
press OK if you would like to return to the previous screen. Connected Sources Displays connected USB devices. VIZIO Photo USB1: Back Button Highlight and press OK to return to left column. Current Folder Displays the folder path. VIZIO_2GB\Photo\root Current Folder Start Fullscreen Slideshow - Vizio E500i-B1 | Download - Page 60
pressing the OK button on the remote. Using the Hot Keys Use the following colored buttons on the remote to perform common V.I.A. tasks: • Yellow - Not used. • Blue - Change the size of the main display window when an App is open in the sidebar. • Red - Not used. • Green - View settings for an - Vizio E500i-B1 | Download - Page 61
exit from an open App or to close the App Dock, press the EXIT button on the remote or the red hot key. My Apps Tab Features the Apps installed on your TV. Installed Apps The Apps displayed here are also available in the V.I.A. Plus App Dock. App Store Tabs Browse through Apps - Vizio E500i-B1 | Download - Page 62
apps that are already installed on your TV. The first four rows of apps on Apps: Displays apps that are installed on your TV. • Featured: Displays apps that are recommended by download. • Categories: Displays apps sorted into categories: Spotlight, Yahoo!, Weather, News and Finance, Movies and TV - Vizio E500i-B1 | Download - Page 63
and feel. Adding an App to the My Apps Tab To add an App to your TV: 1. Use the Arrow buttons on the remote to highlight the App you wish to add. 2. Press and hold the OK button until [App Name] has been added to your My Apps list appears. Once the App has - Vizio E500i-B1 | Download - Page 64
by moving them where you want. To move the Apps on your My Apps tab: 1. Use the Arrow buttons on the remote to highlight the App you wish to move. 2. Press and hold the OK button. The following options appear: Note: App location, appearance, and availability subject to change without notice. 3. Use - Vizio E500i-B1 | Download - Page 65
Troubleshooting & Technical Support A Do You Have Questions? Find Answers At SUPPORT.VIZIO.COM Find help with: • New Product Setup • Connecting Your Devices • Technical Problems • Product Updates • And More Live Chat Support Available Your can also contact our award-winning support team at: Phone - Vizio E500i-B1 | Download - Page 66
the screen. • Ensure all cables are securely attached to the TV. • Ensure all devices are connected correctly. Devices differ; see your device's user manual for details. • Adjust Brightness, Contrast, or Backlight. See Adjusting the Picture Settings on page 23. • Press the INPUT button on the remote - Vizio E500i-B1 | Download - Page 67
for the best signal. The picture is distorted. • Nearby electrical devices may be interfering with the TV. Separate the TV from electrical the entire screen. • If you are using TV, AV, or Component with 480i input, press the WIDE button on the remote to change the screen mode. The TV has pixels - Vizio E500i-B1 | Download - Page 68
Area: Dimensions w/ Stand: w/o Stand: Weight w/ Stand: w/o Stand: TV Type: Refresh Rate: Maximum Resolution: Pixel Pitch: Dynamic Contrast Ratio: Response Time: Brightness: Viewing Angle: HDMI Inputs: Component Video Inputs: Composite Inputs: RF Antenna Input: USB 2.0 Ports: Ethernet: E500i-B1 50 - Vizio E500i-B1 | Download - Page 69
Audio Outputs: OSD Language: Ambient Light Sensor: Remote Control Model: Certifications: Compliance: Voltage Range: Power Consumption: Standby Power: B E500i-B1 RCA Analog Stereo Output, Optical Digital English, Spanish, French Yes XRT112 UL/CUL, FCC Class B, HDMI 1.4, Dolby Digital Plus Energy - Vizio E500i-B1 | Download - Page 70
or packaging that affords an equal degree of protection.VIZIO Technical Support will provide instructions for packing and shipping the covered Product to the VIZIO service center. Limitations and Exclusions VIZIO's one-year limited warranty only covers defects in materials and workmanship. This - Vizio E500i-B1 | Download - Page 71
interface cables and AC power cord, if any, must be used in order to comply with the emission limits. 3. The manufacturer is not responsible for any radio or TV interference caused by unauthorized modification to this equipment. It is the responsibilities of the user to correct such interference - Vizio E500i-B1 | Download - Page 72
made available to you in advance.VIZIO makes no warranties or representations of any kind as to the accuracy, currency, or completeness of any information contained on the data servers of such third party providers of any VIA Services. Furthermore, we do not review, control, or endorse the content - Vizio E500i-B1 | Download - Page 73
gathered periodically to facilitate the provision of software updates, product support and other services to you, including additional or different VIA Services related to the VIZIO Software and to verify compliance with the terms of this License Agreement. VIZIO and its third party providers of VIA - Vizio E500i-B1 | Download - Page 74
FOR THE LIMITED WARRANTY ON MEDIA SET FORTH ABOVE AND TO THE MAXIMUM EXTENT PERMITTED BY APPLICABLE LAW, THE VIZIO SOFTWARE AND VIA SERVICES ARE PROVIDED "AS IS", WITH ALL FAULTS AND WITHOUT WARRANTY OF ANY KIND, AND VIZIO AND VIZIO'S THIRD PARTY PROVIDERS OF VIA SERVICES AND THIRD PARTY LICENSORS - Vizio E500i-B1 | Download - Page 75
© 2014 VIZIO INC. ALL RIGHTS RESERVED. 140207OC-A
-
 1
1 -
 2
2 -
 3
3 -
 4
4 -
 5
5 -
 6
6 -
 7
7 -
8
-
9
-
10
-
11
-
12
-
13
-
14
-
15
-
16
-
17
-
18
-
19
-
20
-
21
-
22
-
23
-
24
-
25
-
26
-
27
-
28
-
29
-
30
-
31
-
32
-
33
-
34
-
35
-
36
-
37
-
38
-
39
-
40
-
41
-
42
-
43
-
44
-
45
-
46
-
47
-
48
-
49
-
50
-
51
-
52
-
53
-
54
-
55
-
56
-
57
-
58
-
59
-
60
-
61
-
62
-
63
-
64
-
65
-
66
-
67
-
68
-
69
-
70
-
71
-
72
-
73
-
74
-
75
 |
 |
USER MANUAL
Model: E500i-B1
VIZIO