Vtech SBS-OB2 IS6200 User Manual - Page 1
Vtech SBS-OB2 Manual
 |
View all Vtech SBS-OB2 manuals
Add to My Manuals
Save this manual to your list of manuals |
Page 1 highlights
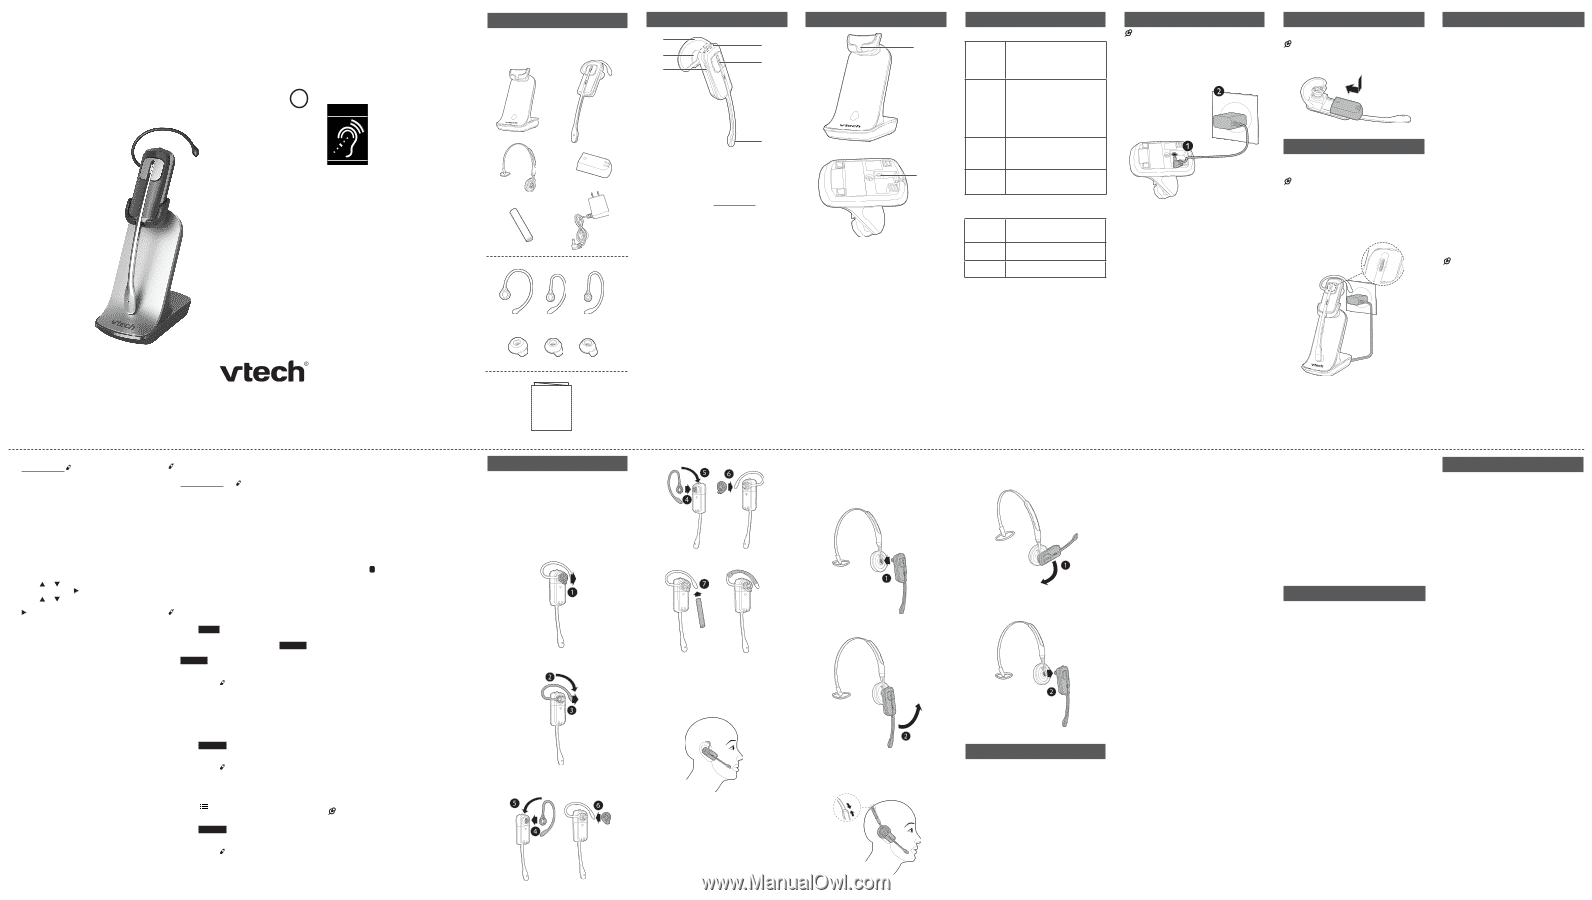
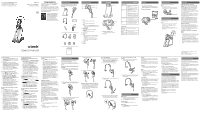
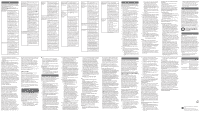
Go to www.vtechphones.com to register your product for enhanced warranty support and the latest VTech product news. IS6200 DECT 6.0 accessory cordless headset BC Congratulations on purchasing your new VTech product. Before using this product, please read Important safety instructions. This abridged user's manual provides you with basic installation and use instructions. A limited set of features are described in abbreviated form. Please refer to the online User's manual for a full set of installation and operation instructions at www.vtechphones.com. Compatible with Hearing Aid T-Coil T TIA-1083 Telephones identified with this logo have reduced noise and interference when used with most T-coil equipped hearing aids and cochlear implants. The TIA-1083 Compliant Logo is a trademark of the Telecommunications Industry Association. Used under license. What's in the box Your product package contains the following items. Save your sales receipt and original packaging in the event warranty service is necessary. Headset overview f e d a Charger �o�v�e�rv�i�e�w� a a b c 1 - VOL+ • Increase the headset volume. VOL• Decrease the headset volume. Flash • While on a call, press and hold to answer an incoming call when you receive a call waiting alert. 2 - ON / OFF light • On when the headset is charging. ON / OFF key • Press to answer or end a call. 3 - Microphone 4 - MUTE • Press to activate the voice-controlled application on your connected cell phone when idle. • Mute the microphone during a call. • When there is an incoming call, press to silence the ringer in the earpiece temporarily. 5 - Earpiece 6 - Earhook b b 1 - Magnetic charging mount • Place the headset for charging. 2 - Power jack Lights and alert tones�o�v�e�r�v�i�e�w� Light status Red • On when the headset battery is� charging�. • Flashes every 10 seconds when the headset battery is low and needs charging. Blue • Flashes twice every three seconds when the headset is in use. • Flashes every four seconds when there is an incoming call. • Flashes every 10 seconds when the headset is out of the headset charger and has enough charge. Red and blue • Flashes slowly when the headset is not registered. • Flashes quickly when the headset is registering to a telephone base. Off • No battery is installed, or the headset has run out of battery. • The headset is powered off. Alert tones One short beep every 30 seconds Two low beeps Three rising beeps • The microphone is muted. • Call waiting alert tone. • A conference call has started. Connect NOTES • Use only the adapters provided. • Charge the battery provided with or identified for use with this product only in accordance with the instructions and limitations specified in this manual. Connect the charger Install the battery Install the battery as shown below. NOTES • Use only supplied battery. • If the headset will not be used for a long time, remove the battery to prevent possible leakage. Charge the battery Place the headset in the charger to charge. The LED light turns on. NOTES • For best performance, keep the headset in the telephone base or charger when not in use. • The battery is fully charged after 3 hours of continuous charging. • When fully charged, the battery provides approximately 4 hours of talk time or 48 hours of standby time. Before use Add and register a headset Before use, each newly purchased headset (IS6200) must be registered to a VTech DS, IS, LS, or SN series home cordless phone, a VTech ErisBusinessSystemTM or CM series business phone, an AT&T CL, CRL, CLP, or TL series home cordless phone, or an AT&T Synapse®, Syn248® or SynJ® business phone. Visit www.vtechphones.com for a list of compatible telephones. The telephone base recognizes and counts a headset the same as a handset. You can place the headset charger anywhere you have an available power outlet. Refer to your telephone user's manual for a maximum number of headsets that you can register to the telephone base. If you already have the maximum number of handsets/ headsets registered, you need to follow the deregistration information in your telephone user's manual before adding a new headset. Before registering: Place the non-registered headset in the headset charger and allow it to charge for at least 15 minutes before registration. Remove the headset from the headset charger. The LED light on the headset flashes slowly and alternately in red and blue. To register a headset to a telephone base: NOTES • You cannot register a headset if any other system handset or headset is in use. You can only register one headset to the telephone base at a time. • The headset must be deregistered before registering it to another telephone system. • If the registration fails, you hear "Not registered" when you press ON/OFF key on the headset. The ON/OFF light on the headset flashes slowly and alternately in red and blue. To reset the headset, remove it from the headset charger and then place it back into its charger. Try the registration process again. User's manual User's manual ErisBusinessSystem™ is a trademark of VTech Communications, Inc. Synapse®, Syn248® and SynJ® are trademarks of Advanced American Telephones. For VTech models: 1. Press and hold /FIND HANDSET on the telephone base for about four seconds until the red IN USE light turns on. Then, release the button. 2. Immediately place the headset in the headset charger. It takes about 60 seconds to complete the registration process. The red IN USE light on the telephone base turns off. The ON/OFFlight on the headset turns red when it is registered and charged. 3. Lift the headset, then press ON/OFF key on the headset. If you hear a dial tone, the registration was successful. For VTech ErisBusinessSystemTM: 1. Press MENU on the console or deskset. 2. Press or to scroll to Registration, and press SELECT or /SKIP. 3. Press or to scroll to select DECT Headset, and then press SELECT or /SKIP. The console or deskset screen displays Registering DECT Headset...(Put DECT Headset in charger). 4. Place the headset in the charger. The registration takes up to 60 seconds to complete. When the registration is complete, the console or deskset screen displays DECT Headset registered. 5. Lift the headset, then press ON/OFF key on the headset. If you hear a dial tone, the registration was successful. For VTech CM series business phone system: 1. Press MENU on the console. 2. Scroll to Registration, then press SELECT. 3. Press SELECT again to select Register Ext. 4. Place the headset in the charger. It may take up to 60 seconds to complete the registration. The console shows HDST/SPK X registered. (X represents the extension number 9 to 1) and beeps when the registration is successful. 5. The console shows Link HDST/SPK X to extension?. If you want to link the headset with an extension, scroll to Yes. Otherwise, choose No and then skip to Step 7. Press SELECT to confirm. 6. Scroll to select a desired extension to be linked with the headset or speakerphone. Press SELECT to confirm. 7. Lift the headset, then press ON/OFF key on the headset. If you hear a dial tone, the registration was successful. If you linked the headset with an extension, the extension screen displays the extension number along with the line number it is using. For AT&T models with /HANDSET LOCATOR button on the telephone base: 1. Press and hold the /HANDSET LOCATOR button on the telephone base for about four seconds until the IN USE light turns on, or the base displays Registering... Please wait. Then, release the button. 2. Immediately place the headset in the headset charger. The ON/OFFlight on the headset flashes quickly and alternately in red and blue to indicate the registration is in progress. This may take up to five minutes to complete. The ON/OFFlight on the headset turns red when it is registered and charged. You hear a confirmation tone. 3. Lift the headset, then press ON/OFFkey on the headset. If you hear a dial tone, the registration was successful. For AT&T models without /HANDSET LOCATOR button on the telephone base: 1. Press MENU on the telephone base when idle. 2. Scroll to Settings, and then press SELECT. 3. Scroll to Registration, and then press SELECT. The base displays Registering... Please wait. 4. Follow Steps 2 and 3 under For AT&T models with /HANDSET LOCATOR button on the telephone base section. For AT&T Synapse® business phone system: 1. Press MENU, 2, and then 6 on the telephone base when idle. Menu Cordless Headset appears. 2. Press Register. The base displays Registering in Progress.... 3. Follow Steps 2 and 3 under For AT&T models with /HANDSET LOCATOR button on the telephone base section. For AT&T Syn248® business phone system: 1. Press MENU, 2, and then 5 on the telephone base when idle. Menu Cordless Headset Registration appears. 2. Press Register. The base displays Registering in Progress.... 3. Follow Steps 2 and 3 under For AT&T models with /HANDSET LOCATOR button on the telephone base section. For AT&T SynJ® business phone system: 1. Press MENU on the telephone base when idle. 2. Scroll to Registration, and then press ENTER twice to select Register HS. The telephone base shows Registering new device.... It takes up to 60 seconds to complete the registration. 3. Place the headset in the headset charger. The telephone base shows Cordless headset registered and beeps when the registration is successful. 4. Lift the headset, then press ON/OFF key on the headset. If you hear a dial tone and the extension 0 icon also appears on the telephone base, the registration was successful. If you have a dial tone but an extension number other than 0 displays on the telephone base, the headset is registered as a handset and will not function properly. If this is the case, you must deregister and start over. See Replace a headset section. Replace a headset If you want to replace a headset or reassign the designated headset number of a registered headset, you must deregister all handsets and headsets that are registered to the same telephone base. Then register each handset and headset individually. To deregister all headsets: To deregister all headsets from the telephone base, follow the instructions in the user's manual of your telephone system, or visit our website at www.vtechphones.com or AT&T's website at www.telephones.att.com. This operation will deregister all the DECT handsets, headsets, and cordless speakerphones, regardless of their battery status and whether they are within range or out-of-range. If the deregistration process is successful, you hear "Not registered" when you press ON/OFF key on the headset. If the deregistration fails, you may need to reset the telephone or headset, and then try again. NOTE • You cannot deregister a headset if any system handset or headset is in use. To reset: • Unplug the power from the telephone base, then plug it back in. Position the headset There are four earbuds and four earhooks provided. One earbud and one earhook have been attached to the headset. You can choose a suitable size of earbud, earhook and an appropriate way to position your headset. Replace the pre-installed earbud and earhook: 1. Hold both sides of the earbud. Twist and pull the earbud until it separates from the earpiece. 2. Rotate the earhook to vertical direction and then pull the earhook until it separates from the headset. 3. Attach a earhook, and then a suitable earbud to the headset until they fit into place. To wear on the right ear: To wear on the left ear: 4. Wrap the earhook with the sponge. Adjust the headset to wear on the ear: • Hook the headset on your ear. Adjust the angle of the headset until the microphone is pointing towards your mouth. Firmly grip the headset with one hand whenever adjusting the headset microphone up or down. Over the head band To attach the head band to the headset: 1. Refer to Steps 1 and 2 in Replace the pre-installed earbud and earhook section to remove the earbud and earhook. 2. Attach the headset to the headband. To remove the head band from the headset: 1. Hold the headset with one hand and the head band with your other hand. 3. Rotate the headset to horizontal direction until it clicks into place. 2. Rotate the headset to vertical direction and the pull the headset until it separates form the head band. 4. Adjust the head band to fit your head. Adjust and rotate the angle of the headset until the microphone is pointing towards your mouth. Using the headset Make a call 1. Follow the instructions in your telephone user's manual for making calls. 2. Press ON/OFF key to join the call. Answer a call • Press ON/OFF key to answer a call. End a call • Press ON/OFF key or place the headset in the headset charger. Ringer The headset does not have an external ringer. When there is an incoming call, the headset earpiece rings. If you have telephones connected to the same telephone line, you can rely on the ringers of those telephones to alert you to incoming calls. Volume • During a call, press VOL+ or VOL- on the headset to adjust the listening volume. Mute The mute function allows you to hear the other party but the other party cannot hear you. 1. During a call, press MUTE. The headset announced "Mute on". 2. Press MUTE again to resume the conversation. The headset announced "Mute off". Call waiting When you subscribe to call waiting service from your telephone service provider, you hear an alert tone if there is an incoming call while you are on another call. • Press FLASH to put the current call on hold and take the new call. • Press FLASH to switch back and forth between calls. Multiple headset/handset use Headset(s) and handset(s) on the same phone line can join an outside call at the same time. The number of headset(s) and handset(s) that can join may be limited by your telephone system. See your telephone user's manual for more information. To share an outside call: • When a headset or handset is already on a call, press ON/OFF key on another headset to join the call. • To exit the call, press ON/OFF key again or place the headset in the headset charger. The call continues until all handsets and/or headsets hang up. Intercom call Follow the instructions in your telephone user's manual for initiating an intercom call. When there is an intercom call request from a cordless telephone to a headset, the headset earpiece rings if it is not in use. To answer an intercom call: • Press ON/OFF key to answer the intercom call. To transfer a call to the headset: • During a call on the cordless handset or telephone base, initiate an intercom call to the headset. Press ON/OFF key on the headset to answer the intercom call, and then hang up the call on the cordless handset or telephone base. Operating range This cordless headset operates with the maximum power allowed by the Federal Communications Commission (FCC). Even so, this headset and telephone base can communicate over only a certain distance - which can vary with the locations of the telephone base and headset, the weather, and the layout of your home or office. If there is a call while the headset is out of range, it may not ring, or if it does ring, the call may not connect well when you press ON/OFF key on the headset. Move closer to the telephone base, then press ON/OFF key on the headset to answer the call. If the headset moves out of range during a telephone conversation, there may be interference. To improve reception, move closer to the telephone base. General product care Taking care of your headset Your cordless headset contains sophisticated electronic parts, so it must be treated with care. Avoid rough treatment Place the headset down gently. Save the original packing materials to protect your headset if you ever need to ship it. Avoid water Your headset can be damaged if it gets wet. Do not use the headset outdoors in the rain, or handle it with wet hands. Do not install the headset charger near a sink, bathtub or shower. Electrical storms Electrical storms can sometimes cause power surges harmful to electronic equipment. For your own safety, take caution when using electrical appliances during storms. Cleaning your headset Your headset has a durable plastic casing that should retain its luster for many years. Clean it only with a dry non-abrasive cloth. Do not use dampened cloth or cleaning solvents of any kind.
-
 1
1 -
 2
2
 |
 |