Weber Ducane SS 5-burner LP Owner Manual
Weber Ducane SS 5-burner LP Manual
 |
View all Weber Ducane SS 5-burner LP manuals
Add to My Manuals
Save this manual to your list of manuals |
Weber Ducane SS 5-burner LP manual content summary:
- Weber Ducane SS 5-burner LP | Owner Manual - Page 1
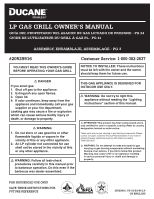
LP GAS GRILL OWNER'S MANUAL GUÍA DEL PROPIETARIO DEL ASADOR DE GAS LICUADO DE PROPANO - PG 24 GUIDE DE L'UTILISATEUR DU GRILL À GAZ PL - PG 41 ASSEMBLY, ENSAMBLAJE, ASSEMBLAGE - PG 3 #20529916 YOU MUST READ THIS OWNER'S GUIDE BEFORE OPERATING YOUR GAS GRILL ƽ DANGER If you smell gas: 1. Shut off - Weber Ducane SS 5-burner LP | Owner Manual - Page 2
burner obstructions before use. See instructions in this manual for correct procedures. ƽ Do not operate the Ducane® gas barbecue if there is a gas leak present. ƽ Do not use a flame to check for gas leaks. ƽ Combustible materials should never be within 24 inches of the top, bottom, back or sides - Weber Ducane SS 5-burner LP | Owner Manual - Page 3
is assembled according to these instructions. Failure to assemble the grill properly could create a fire hazard or cause burns or other bodily harm. ƽ WARNING: Do not lift the barbecue using the control panel as a handle. Lifting by the control panel can damage gas handling and electrical components - Weber Ducane SS 5-burner LP | Owner Manual - Page 4
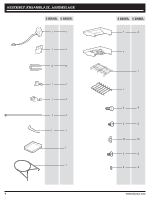
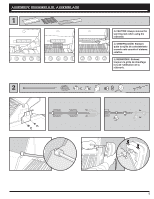
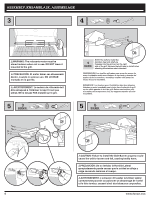
ASSEMBLY, ENSAMBLAJE, ASSEMBLAGE 3 BRNR. 5 BRNR. 1 1 1 1 2 2 1 1 1 1 1 1 1 1 1 1 4 3 BRNR. 5 BRNR. 1 2 1 1 1 8 8 2 2 10 10 2 2 2 2 www.ducane.com - Weber Ducane SS 5-burner LP | Owner Manual - Page 5
remove the warming rack when using the rotisserie. ƽ OBSERVACIÓN: Siempre quite la rejilla de calentamiento cuando esté usando el sistema rotativo. ƽ REMARQUE: Enlevez toujours la grille de chauffage lors de l'utilisation de la rôtisserie. 5 - Weber Ducane SS 5-burner LP | Owner Manual - Page 6
grill, sur les côtés gauche et droit du grill. Retirez ces boulons puis ré-installez-les lorsque vous fixez les étagères latérales en acier inoxydable. 55 BRNR. ƽCAUTION: Failure to install the Side Burner de l'unité et le faire tomber, causant ainsi des blessures corporelles. 6 www.ducane.com - Weber Ducane SS 5-burner LP | Owner Manual - Page 7
ASSEMBLY, ENSAMBLAJE, ASSEMBLAGE 63 BRNR. 65 BRNR. 73 BRNR. 7 5 BRNR. 85 BRNR. 9 7 - Weber Ducane SS 5-burner LP | Owner Manual - Page 8
rotisserie burners Two-Year Limited Warranty • Rotisserie motor • Ignition system • All remaining parts The above warranty period(s) applies only to grills used in a non-commercial setting when assembled and operated in accordance with the printed instructions accompanying the grill. Ducane may - Weber Ducane SS 5-burner LP | Owner Manual - Page 9
trouble-free operation of your new Ducane® Gas Grill. We also advise you to keep this manual for future reference. ƽ WARNING: Your grill has been designed to operate using only the gas beneath the grill burner box or in the vicinity of your grill. ƽ WARNING: Be sure to have your LP (propane) - Weber Ducane SS 5-burner LP | Owner Manual - Page 10
brush a little of the mixture around fittings. If new bubbles form, you have a leak! IMPORTANT See Assembly Guide for LP tank installation. Type 1 Connective Coupling All Ducane liquid propane gas grill regulators are equipped with a UL-listed tank connection as per the latest edition of ANSI Z21.58 - Weber Ducane SS 5-burner LP | Owner Manual - Page 11
in an upright position. Never lie your LP tank down on its side whether it is full or empty. Never store a spare tank near your grill. ƽ CAUTION: Never transport or move your grill or grill tank without first closing the manual valve on your liquid propane gas tank. ƽ CAUTION: Place dust cap on - Weber Ducane SS 5-burner LP | Owner Manual - Page 12
they are not in the OFF position, when you turn on the LP cylinder valve, the "excess gas flow control" feature will activate, limiting the gas flow of gas from the LP cylinder. If this should occur, turn off the LP cylinder valve and burner control knobs. Then start over. ƽ DANGER: When the "excess - Weber Ducane SS 5-burner LP | Owner Manual - Page 13
climate. Your Ducane® gas grill has been designed and burner does not light on first try, push control knob in and turn to OFF. ƽ WARNING: If ignition still does not occur, turn control knob OFF and wait 5 minutes before manually lighting the burner with match. See Match Lighting instructions - Weber Ducane SS 5-burner LP | Owner Manual - Page 14
to ignite the selected Main Burner. ƽ WARNING: If the burner does not light, turn the selected burner control knob to OFF and wait 5 minutes to let the gas clear before trying again to light burner(s). 6. Verify selected Main Burner(s) has ignited by visual inspection of a flame. 14 www.ducane.com - Weber Ducane SS 5-burner LP | Owner Manual - Page 15
OFF and wait 5 minutes before manually lighting the burner with match. See Match Lighting instructions. OFF / ARRÊTÉ / APAGADO 14 3 HI LO SIDE BURNER Match Lighting Your Grill Side Burner Follow the simple steps listed below to match light the Side Burner of grill, in the event snap ignition fails - Weber Ducane SS 5-burner LP | Owner Manual - Page 16
wait 5 minutes before manually lighting the burner with match. See Match Lighting instructions. OFF / ARRÊTÉ / APAGADO 16 4 HI LO 5 ROTISSERIE BURNER Match Lighting Your Rotisserie Burner Follow the simple steps listed below to match light the Rotisserie Burner of grill, in the event electronic - Weber Ducane SS 5-burner LP | Owner Manual - Page 17
rotisserie motor. 7. Line up both the groove on the right side bearing with the right side spit rod mount cut-out, and slide the motor over the to turn freely. • Follow Lighting Instructions for Rotisserie Burner under Lighting Your Grill section. • Set Rotisserie Burner on "med-high" based on - Weber Ducane SS 5-burner LP | Owner Manual - Page 18
the side shelf. ƽ CAUTION: If your grill is portable and you are using a gas tank, make sure you turn the appliance control knobs first, and then the gas supply tank. On permanent installations, it is strongly recommended that the inline field installed cutoff valve also be turned off when the grill - Weber Ducane SS 5-burner LP | Owner Manual - Page 19
TROUBLESHOOTING PROBLEM IGNITION SYSTEM MAIN GRILLING BURNERS CHECK and CURE IMPORTANT Be sure that there is gas flow to the burners by attempting to match light your burners. If match lighting is successful, the problem lies somewhere in the ignition system and will need to be checked. ƽ - Weber Ducane SS 5-burner LP | Owner Manual - Page 20
, etc. can ignite and cause a severe grease fire. If a grease fire were to occur on a Ducane® grill, flames would probably be seen under the burner box. A severe grease fire could lead to a burned hose or regulator which would allow gas to feed the fire and, obviously, make the fire worse. Any type of fire - Weber Ducane SS 5-burner LP | Owner Manual - Page 21
Inspection and Cleaning of the Spider/Insect Screens To inspect the Spider/Insect screens. 1. Turn "OFF" gas at source. 2. Remove the cooking grate and the heat distribution plates, exposing the burner tubes. 3. Remove the two(2) screws and washers holding each valve to the control panel and control - Weber Ducane SS 5-burner LP | Owner Manual - Page 22
Customer Service at 1-800-382-2637 for replacement parts. To reassemble, reverse steps 2 through 5. Cleaning the Spider/Insect Screens Your Ducane® gas barbecue, as well as any outdoor gas appliance, is a target for spiders and other insects. They can nest in the venturi section (1) of the burner - Weber Ducane SS 5-burner LP | Owner Manual - Page 23
brush to clean the outside of the burners. This is to make sure that all burner ports are fully open. ƽ WARNING: Do not enlarge the burner ports when cleaning. Replacing the Main Burners 1. Your Ducane® gas barbecue must be "OFF" and cool. 2. Turn "OFF" gas at source. 3. Remove the cooking grate and - Weber Ducane SS 5-burner LP | Owner Manual - Page 24
sin antes leer la sección "Instrucciones para encender la asador" de este manual. ƽ ATENCIÓN: A este producto se le han realizado pruebas de seguridad de repuesto Ducane genuinas. ƽ ADVERTENCIA: No trate de reparar ningún componente que transporte o queme gas sin antes contactar a Ducane. Si no - Weber Ducane SS 5-burner LP | Owner Manual - Page 25
obstrucciones de hornillas antes de ser usada. Ver instrucciones en este manual para los procedimientos correctos. ƽ No use la parrilla de gas Ducane® si hay una fuga de gas. ƽ No use una llama para revisar si hay una fuga de gas. ƽ El material combustible nunca debe estar a menos de 0.61 metros (24 - Weber Ducane SS 5-burner LP | Owner Manual - Page 26
uso libre de problemas de su nueva Parrilla de Gas Ducane®. Le aconsejamos que usted guarde el manual para referencia futura. ƽ ADVERTENCIA: Su parrilla ha de verano, tanque dejado en el sol) puede causar una descarga de gas LP por la válvula de descarga de presión del tanque, ya que el aumento de - Weber Ducane SS 5-burner LP | Owner Manual - Page 27
requeridos específicamente de la fábrica. • Por razones de seguridad y de diseño, cambiar el sistema operativo de una parrilla Ducane®, de usar gas LP a usar gas natural, requiere un cambio completo del sistema de la parrilla. Si esto es necesario, contacte a su proveedor para información adicional - Weber Ducane SS 5-burner LP | Owner Manual - Page 28
gas gas de gas gas mientras una válvula de hornilla Cierre de Gas gas gas desde el Gas gas de gas propano, gas til de gas propano el gas propano manual de su tanque de propano líquido. ƽ ADVERTENCIA: Recomendamos llenar su cilindro de gas propano licuado con un distribuidor de gas LP LP LP gas LP se - Weber Ducane SS 5-burner LP | Owner Manual - Page 29
orange flame coming from the burner lighting tube at the left side of the burner (D). Continue to hold the burner control knob in for two seconds after the "snap". This will B allow gas to flow completely down the burner tube (E) and insure ignition. Check that the burner is lit by looking through - Weber Ducane SS 5-burner LP | Owner Manual - Page 30
asegure que todas las hornillas estén en su posición de "OFF" (apagada). 2. Abra el flujo principal de gas 3. Presione la perilla de control y gírela hacia "START/HI" (encendido/fuego alto) hasta que oiga el Encender con Fósforo. OFF / ARRÊTÉ / APAGADO 14 3 HI LO MAIN BURNER 30 www.ducane.com - Weber Ducane SS 5-burner LP | Owner Manual - Page 31
se enciende la hornilla principal puede resultar en una explosión que causará serias lesiones al cuerpo o muerte. 2. Abra el flujo principal de gas 3. Poner el fósforo en su estuche y encenderlo. 4. Presione la perilla de control de la Hornilla Principal seleccionada y gire hasta indicar "HIGH" (alto - Weber Ducane SS 5-burner LP | Owner Manual - Page 32
para permitir que el gas se disperse, si 2. Abra el flujo principal de gas 3. Presione la perilla de control y APAGADO 14 3 HI LO SIDE BURNER ƽ ADVERTENCIA: Si la para permitir que el gas se disperse, si flujo principal de ga 3. Poner el fósforo minutos para que el gas se disperse antes de volver - Weber Ducane SS 5-burner LP | Owner Manual - Page 33
.) PUSH TO TURN OFF / ARRÊTÉ / APAGADO 16 4 HI LO 5 ROTISSERIE BURNER ƽ ADVERTENCIA: Si la ignición todavía no ocurre gire la perilla de control a del Sistema Rotativo o de no esperar 5 minutos para permitir que el gas se disperse, si no se enciende la hornilla lateral puede resultar en una - Weber Ducane SS 5-burner LP | Owner Manual - Page 34
regular. OBSERVACIÓN: Cuando esté usando el Sistema Rotativo, el termómetro de la parrilla no reflejará la temperatura dentro de la caja. 34 www.ducane.com - Weber Ducane SS 5-burner LP | Owner Manual - Page 35
parrilla deben ser desconectadas, y el tanque debe sacarse de la parrilla y almacenarlo fuera de la casa en un lugar bien ventilado. Cuando el tanque de gas propano no es sacado de la parrilla, ésta debe ser almacenada fuera de la casa en un lugar bien ventilado. Calculando la Cantidad de Propano - Weber Ducane SS 5-burner LP | Owner Manual - Page 36
cuerpo. Después de haber cerrado la fuente de gas principal, saque las rejillas de cocinar y as tapando el filtro o los orificios. En una parrilla LP, si hay poca llama o es muy difícil de encenderla llame a atención al cliente, al 1-800-DUCANES Si los problemas no logran corregirse usando estos mé - Weber Ducane SS 5-burner LP | Owner Manual - Page 37
funcione bien, por eso esta sección de su manual es tan importante. Esta sección le da la informaci 10 minutos del poscalentamiento, apague el gas. Abra la tapa con su (manguera, regulador, tanque LP, etc.) involucrados sean la propiedad y/o lesiones al cuerpo. Ducane no quiere que esto pase, ni - Weber Ducane SS 5-burner LP | Owner Manual - Page 38
la Malla Contra Arañas/Insectos Para inspeccionar la malla contra Arañas/Insectos. 1. Cierre la fuente de gas. 2. Retire la rejilla de cocción y las placas de distribución de calor, tras lo cual quedan expuestos el cable del encendedor electrónico para el quemador giratorio. 38 www.ducane.com - Weber Ducane SS 5-burner LP | Owner Manual - Page 39
, para un repuesto. Para ensamblar siga los pasos 2 al 4 en orden reverso. Limpiar las Mallas Contra Arañas/Insectos Su parrilla de gas Ducane®, tanto como otros aparatos de gas para el uso al aire libre, atraen mucho a las arañas y a otros insectos. Pueden hacer nidos en las aberturas de los tubos - Weber Ducane SS 5-burner LP | Owner Manual - Page 40
la Hornilla Principal 1. Su parrilla de gas Ducane® debe de estar en "OFF" (apagada) y frío. 2. Cierre la fuente de gas. 3. Retire la rejilla de cocción enfrente. ƽ ADVERTENCIA: Después de volver a instalar la línea de gas, debe revisar las conexiones con agua enjabonada antes de usar la parrilla. - Weber Ducane SS 5-burner LP | Owner Manual - Page 41
GUIDE DE L'UTILISATEUR DU GRILL À GAZ PL ASSEMBLAGE - PG 3 #20529916 Service à la clientèle : 1-800-382-2637 VOUS DEVEZ LIRE CE MODE D'EMPLOI AVANT D'UTILISER VOTRE GRILL DE L'INSTALLATEUR: Les présentes instructions doivent être remises au propriétaire du gaz sans contacter Ducane. Si vous ne - Weber Ducane SS 5-burner LP | Owner Manual - Page 42
, ou tout autre trouble lié à la reproduction. ƽ N'utilisez pas ce barbecue à moins que toutes les pièces soient en place. L'unité doit être correctement assemblée selon les instructions soulignées dans le "Guide d'assemblage". ƽ N'intégrez pas ce modèle de grill à n'importe quelle construction - Weber Ducane SS 5-burner LP | Owner Manual - Page 43
PROPANE Déterminer l'emplacement de votre gril • Votre gril à gaz Ducane® est fabriqué pour utilisation extérieure seulement! Tout gril, au Assemblage Assurez-vous que votre gril est assemblé correctement. Les instructions d'assemblage détaillées sont emballées avec chaque gril et expliquent - Weber Ducane SS 5-burner LP | Owner Manual - Page 44
loin de votre gril au gaz. Instructions de transport La portabilité complète est utilisez aucune autre dimension. Le support de rétention de la bouteille Guide d'assemblage pour l'installation de la bouteille de propane. Accouplement de raccord de type 1 Tous les régulateurs de grils Ducane - Weber Ducane SS 5-burner LP | Owner Manual - Page 45
rallumez le gril, un brûleur à la fois. Pour s'assurer que ceci ne cause pas de difficulté lors de l'allumage du gril, suivez ces instructions: 1. Assurez-vous que toutes les valves du brûleur sont à la position "OFF" (FERMÉE). 2. Ouvrez la valve de bouteille et attendez 5 secondes. 3. Suivez les - Weber Ducane SS 5-burner LP | Owner Manual - Page 46
orange flame coming from the burner lighting tube at the left side of the burner (D). Continue to hold the burner control knob in for two seconds after the "snap". This will B allow gas to flow completely down the burner tube (E) and insure ignition. Check that the burner is lit by looking through - Weber Ducane SS 5-burner LP | Owner Manual - Page 47
échauffage assurera que la grille de cuisson soit assez Votre gril au gaz Ducane® a été con votre grille de ATTENTION: Ne couvrez pas la grille de cuisson durant la période en regardant à travers les grilles de cuisson. Vous devriez instructions d'allumage par allumette. OFF / ARRÊTÉ / APAGADO 14 3 HI - Weber Ducane SS 5-burner LP | Owner Manual - Page 48
tournez-la à "HIGH". 5. Insérez le porte-allumette et allumer l'allumette vers le bas à travers la grille de cuisson pour allumer le brûleur principal sélectionné. ƽ AVERTISSEMENT: Si le brûleur ne s'allume pas sélectionné a été allumé par inspection visuelle d'une flamme. 48 www.ducane.com - Weber Ducane SS 5-burner LP | Owner Manual - Page 49
ral est allumé en regardant à travers les grilles de cuisson. Vous devriez voir une flamme. TURN OFF / ARRÊTÉ / APAGADO 14 3 HI LO SIDE BURNER ƽ AVERTISSEMENT: Si l'allumage ne se produit pas encore, brûleur avec une allumette. Voir les instructions d'allumage par allumette. Allumage par allumette - Weber Ducane SS 5-burner LP | Owner Manual - Page 50
. 3. Retirez la grille de réchauffement. REMARQUE : Enlevez toujours la grille de chauffage lors de / APAGADO 16 4 HI LO 5 ROTISSERIE BURNER ƽ AVERTISSEMENT: Si l'allumage ne se produit pas leur avec une allumette. Voir les instructions d'allumage par allumette. Allumage par allumette ducane.com - Weber Ducane SS 5-burner LP | Owner Manual - Page 51
support d'installation du moteur et poussez vers le bas. REMARQUE : La vis à serrage à main est seulement serrée lorsque la rôtisserie n'est pas en service les grilles de cuisson et la grille de réchauffement pour permettre à la nourriture de tourner librement. • Suivez les instructions d'allumage - Weber Ducane SS 5-burner LP | Owner Manual - Page 52
enlevez la décoloration est de mettre la grille de cuisson dans un four autonettoyant durant ée à l'intérieur lorsqu'il n'est pas en service. Ne le laissez pas installé sur le gril. avec la fente dans la broche du support du moteur. Voir le Guide d'assemblage pour plus d'information. Étagè ducane.com - Weber Ducane SS 5-burner LP | Owner Manual - Page 53
fermeture de l'alimentation principale de gaz, retirez la grille de cuisson et les plaques de distribution de chaleur. Instructions d'allumage. Si vous avez encore une flamme faible, veuillez contacter le détaillant pour assistance supplémentaire ou appelez le service à la clientèle au 1-800-DUCANES - Weber Ducane SS 5-burner LP | Owner Manual - Page 54
et un fonctionnement optimal à votre gril. Lisez et suivez les instructions sur votre gril dans cette section pour faire durer votre investissement utilisant une brosse de laiton, frottez la surface de la grille. La grille de cuisson Ducane® en acier inoxydable a été construite d'un acier inoxydable - Weber Ducane SS 5-burner LP | Owner Manual - Page 55
de l'écran contre les araignée/insectes Pour inspecter l'écran contre les araignée/insectes. 1. Tournez à "OFF" (FERMÉE) le gaz à la source. 2. Retirez la grille de cuisson et les plaques de distribution de chaleur pour révéler les tubes de brûleur. 3. Enlevez les deux (2) vis et rondelles qui - Weber Ducane SS 5-burner LP | Owner Manual - Page 56
ou n'agrandissez pas les ouvertures de l'écran. Si l'écran contre les araignée/insectes s'endommage ou ne peut pas être nettoyé, appelez le service à la clientèle chez Ducane au 1-800-382-2637 pour des pièces de remplacement. Pour assembler de nouveau, inversez les étapes 2 à 4 de la page précédente - Weber Ducane SS 5-burner LP | Owner Manual - Page 57
ports du brûleur lors du nettoyage. Remplacement des brûleurs principaux 1. Votre barbecue à gaz Ducane® doit être à "OFF" (FERMÉE) et refroidi. 2. Tournez à "OFF" (FERMÉE) le gaz à la source. 3. Retirez la grille de cuisson et les plaques de distribution de chaleur pour révéler les tubes de brûleur - Weber Ducane SS 5-burner LP | Owner Manual - Page 58
country. Refer to country designation located on outer carton. These parts may be gas carrying or gas burning components. Please contact a Ducane Customer Service Representative in your area for genuine Ducane replacement part(s) information by calling 1-800-382-2637. ƽ WARNING: Do not attempt to - Weber Ducane SS 5-burner LP | Owner Manual - Page 59
grill I have owned Weber charcoal grill Ducane gas grill Weber gas grill Ducane portable grill Char-Broil gas grill Weber portable grill Sunbeam gas grill Thermos gas grill Fiesta gas grill mail order/catalog Listening to music on my CD player Listening to music on any device Physical - Weber Ducane SS 5-burner LP | Owner Manual - Page 60
Fold Over Here PLEASE SEAL WITH TAPE BEFORE MAILING-NO STAPLES PLEASE Please send products and other correspondence to: 1890 North Roselle Rd. Schaumburg, IL 60195 USA RNS01-01 1890 NORTH ROSELLE RD. SCHAUMBURG, IL 60195 USA First-Class Postage Required Post Office will not deliver without proper
-
 1
1 -
 2
2 -
 3
3 -
 4
4 -
 5
5 -
 6
6 -
 7
7 -
8
-
9
-
10
-
11
-
12
-
13
-
14
-
15
-
16
-
17
-
18
-
19
-
20
-
21
-
22
-
23
-
24
-
25
-
26
-
27
-
28
-
29
-
30
-
31
-
32
-
33
-
34
-
35
-
36
-
37
-
38
-
39
-
40
-
41
-
42
-
43
-
44
-
45
-
46
-
47
-
48
-
49
-
50
-
51
-
52
-
53
-
54
-
55
-
56
-
57
-
58
-
59
-
60
 |
 |
ASSEMBLY, ENSAMBLAJE, ASSEMBLAGE - PG 3
Customer Service: 1-800-382-2637
#20529916
20529916_US 03/03/08 LP
US ENGLISH
FOR HOUSEHOLD USE ONLY
SAVE THESE INSTRUCTIONS FOR
FUTURE REFERENCE
LP GAS GRILL OWNER'S MANUAL
GUÍA DEL PROPIETARIO DEL ASADOR DE GAS LICUADO DE PROPANO - PG 24
GUIDE DE L’UTILISATEUR DU GRILL À GAZ PL - PG 41
±
DANGER
If you smell gas:
1. Shut off gas to the appliance.
2. Extinguish any open flames.
3. Open lid.
4. If odor continues, keep away from the
appliance and immediately call your gas
supplier or your fire department.
Leaking gas may cause a fire or explosion
which can cause serious bodily injury or
death, or damage to property.
±
WARNING:
1. Do not store or use gasoline or other
flammable liquids or vapors in the
vicinity of this or any other appliance.
2. An LP cylinder not connected for use
shall not be stored in the vicinity of this
or any other appliance.
±
WARNING: Follow all leak-check
procedures carefully in this manual prior
to barbecue operation. Do this even if the
barbecue was dealer-assembled.
NOTICE TO INSTALLER: These instructions
must be left with the owner and the owner
should keep them for future use.
THIS GAS APPLIANCE IS DESIGNED FOR
OUTDOOR USE ONLY.
YOU MUST READ THIS OWNER’S GUIDE
BEFORE OPERATING YOUR GAS GRILL
±
ATTENTION: This product has been safety tested and is
only certified for use in a specific country. Refer to country
designation located on outer carton.
These parts may be gas carrying or gas burning components. Please
contact a Ducane Customer Service Representative in your area for
genuine Ducane
replacement part(s) information by calling
1-800-382-2637.
±
WARNING: Do not attempt to make any repair to gas
carrying or gas burning components without contacting
Ducane. Your actions, if you fail to follow this product
Warning, may cause a fire or an explosion resulting
in serious personal injury or death and damage to
property.
±
WARNING: Do not try to light this
appliance without reading the “Lighting
Instructions” section of this manual.