Weber Gas Go-Anywhere Instruction Sheet
Weber Gas Go-Anywhere Manual
 |
View all Weber Gas Go-Anywhere manuals
Add to My Manuals
Save this manual to your list of manuals |
Weber Gas Go-Anywhere manual content summary:
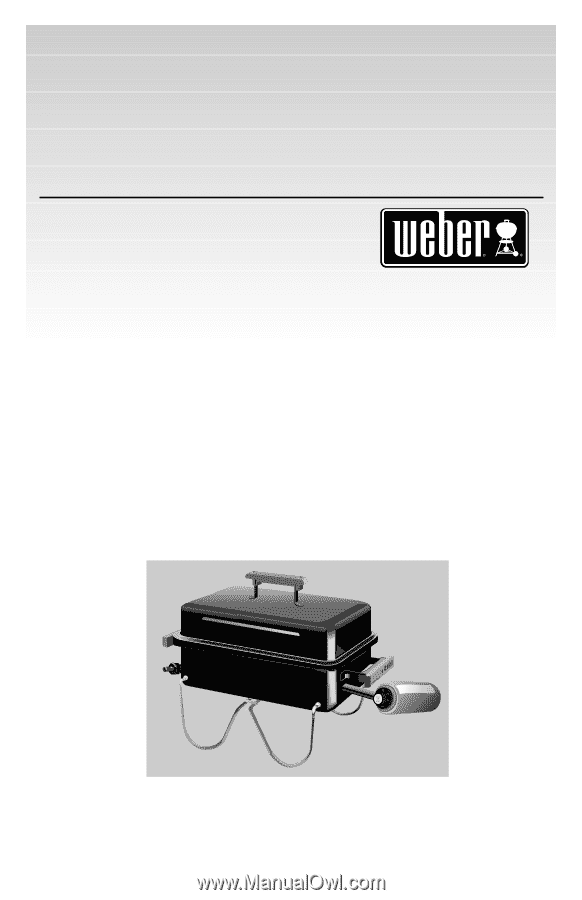
- Weber Gas Go-Anywhere | Instruction Sheet - Page 1
Gas Go Anywhere® 55014 02/23/01 - Weber Gas Go-Anywhere | Instruction Sheet - Page 2
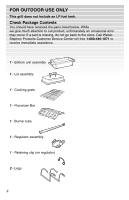
occur. If a part is missing, do not go back to the store. Call WeberStephen Products Customer Service Center toll free 1-800-446-1071 to receive immediate assistance. 1 - Bottom unit assembly 1 - Lid assembly 1 - Cooking grate 1 - Flavorizer Bar 1 - Burner tube 1 - Regulator assembly 1 - Retaining - Weber Gas Go-Anywhere | Instruction Sheet - Page 3
1 - Leg Lock 1 - 1/4-20 wing nut 1 - 5/16" Washer 1 - 1/4-20 x 1/2 bolt 2 - 10-24 screws 2 - 10-24 wing nuts 6 - 1/4" Flat washers 1 - Igniter 3 - Weber Gas Go-Anywhere | Instruction Sheet - Page 4
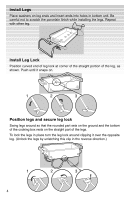
until it snaps on. 1 2 3 Position legs and secure leg lock Swing legs around so that the rounded part sets on the ground and the bottom of the cooking box rests on the straight part of the legs. To lock the legs in place turn the leg lock around clipping it over the - Weber Gas Go-Anywhere | Instruction Sheet - Page 5
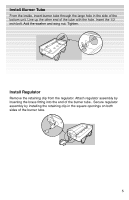
the 1/2 inch bolt. Add the washer and wing nut. Tighten. Install Regulator Remove the retaining clip from the regulator. Attach regulator assembly by inserting the brass fitting into the end of the burner tube.. Secure regulator assembly by installing the retaining clip in the square openings on - Weber Gas Go-Anywhere | Instruction Sheet - Page 6
to be adjusted so the tip is approximately 1/8 inch from the holes in the burner tube. ƽDANGER Make sure the tip of the igniter wire is adjusted to the holes in the burner tube. If it is not adjusted properly, gas can accumulate in the barbecue while igniting the barbecue. Delayed ignition of the - Weber Gas Go-Anywhere | Instruction Sheet - Page 7
Install Flavorizer Bar Place the Flavorizer Bar in bottom unit, covering the burner. Install Cooking Grate Set the cooking grate onto the recessed edge of the bottom unit. To Secure for Transport Put the lid on the bottom - Weber Gas Go-Anywhere | Instruction Sheet - Page 8
, WARNINGS and CAUTIONS in Owner's Guide before operating this barbecue. Connecting the Cylinder 1. Lubricate the threads of the regulator assembly with petroleum jelly. 2. Make sure the burner control valve is in the LOCK/OFF position before attaching the propane cylinder. Valve closes by turning - Weber Gas Go-Anywhere | Instruction Sheet - Page 9
lighting your grill. 1. Push down the burner control valve and turn counter-clockwise to HIGH. 2. Hold the handle of the bottom unit while pushing the igniter button 2 or 3 times. 3. Check to see if the burner is lit by looking through the viewing hole in the Flavorizer Bar. ƽWARNING: If burner does - Weber Gas Go-Anywhere | Instruction Sheet - Page 10
Then wipe with paper towels. Thoroughly clean your gas grill at least once a year. 1. Remove cooking grate and Flavorizer Bar. 2. Remove tubular burner before cleaning (refer to assembly instructions) To remove: Take out retaining clip and remove regulator assembly. Remove wing nut, washer and bolt - Weber Gas Go-Anywhere | Instruction Sheet - Page 11
7 1-3. Handle 4. 10-24 Wing Nuts 5. Retaining Clip 6. Regulator Assembly 7. Leg Lock 8. Lid 9. Cooking Grate 10. Flavorizer Bar 11. Bolt 8 9 10 11 12 13 14 15 16 17 18 19 12. 5/16" Flat Washer 13. 1/4-20 Wing Nut 14. Machine Screw 15. Burner Tube 16. Igniter 17. Legs 18. Flat Washer 19. Bottom unit - Weber Gas Go-Anywhere | Instruction Sheet - Page 12
-Stephen Products Co., Weber, the ® silhouette, and the kettle configuration are registered trademarks of WeberStephen Products Co., 200 East Daniels Road, Palatine, IL, 60067-6266, U.S.A. This product is covered
-
 1
1 -
 2
2 -
 3
3 -
 4
4 -
 5
5 -
 6
6 -
 7
7 -
8
-
9
-
10
-
11
-
12
 |
 |
Gas Go Anywhere
®
55014 02/23/01