Weber Gas Go-Anywhere Instruction Sheet - Page 9
Lighting Your Gas Grill, Check for Gas Leaks - grill with igniter
 |
View all Weber Gas Go-Anywhere manuals
Add to My Manuals
Save this manual to your list of manuals |
Page 9 highlights
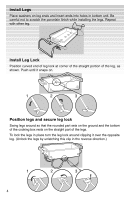
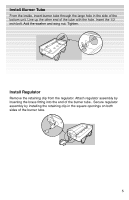
Check for Gas Leaks ƽDANGER Do not use an open flame to check for gas leaks. Be sure there are no sparks or open flames in the area while you check for leaks. This will result in a fire or explosion which can cause serious bodily injury or death, and damage to property. 1. Check the connection between the tank and the regulator for gas leaks. Mix a couple of tablespoons of liquid detergent with an equal amount of water. 2. Be sure to leave the burner control valve in the LOCK/OFF position. Wet the connection with the soap solution and watch for bubbles. If bubbles form or if a bubble grows, there is a leak. 3. If there is a leak, check the fitting, make sure it is tight, recheck the connections. 4. Check for gas leaks each time you disconnect or connect the gas supply. Lighting Your Gas Grill ƽWARNING: Always remove the lid before lighting your grill. 1. Push down the burner control valve and turn counter-clockwise to HIGH. 2. Hold the handle of the bottom unit while pushing the igniter button 2 or 3 times. 3. Check to see if the burner is lit by looking through the viewing hole in the Flavorizer Bar. ƽWARNING: If burner does not light, turn burner control valve OFF, wait 5 minutes for the gas to clear, then try again. 9
-
 1
1 -
2
-
3
-
 4
4 -
 5
5 -
 6
6 -
 7
7 -
 8
8 -
 9
9 -
 10
10 -
 11
11 -
 12
12
 |
 |
