Weber Genesis E-320 LP Owner Manual
Weber Genesis E-320 LP Manual
 |
View all Weber Genesis E-320 LP manuals
Add to My Manuals
Save this manual to your list of manuals |
Weber Genesis E-320 LP manual content summary:
- Weber Genesis E-320 LP | Owner Manual - Page 1
GAS GRILL LP GAS GRILL OWNER'S GUIDE Guía del propietario del asador de gas licuado de propano - Pg 20 Guide de l'utilisateur du grill à gaz PL - Pg 34 E/S -310/320, EP -310/320 #89#50505000 YOU MUST READ THIS OWNER'S GUIDE BEFORE OPERATING YOUR GAS GRILL ƽ DANGER If you smell gas: 1. Shut off gas - Weber Genesis E-320 LP | Owner Manual - Page 2
use. See instructions in this manual for correct procedures. ƽ Do not operate the Weber® gas barbecue if there is a gas leak present. ƽ Do not use a flame to check for gas leaks. ƽ Combustible materials should never be within 24 inches (61 cm) of the back or sides of your Weber® gas barbecue. ƽ Do - Weber Genesis E-320 LP | Owner Manual - Page 3
Weber® gas grill or improper maintenance or service, or failure to perform burner tubes, as set out in this owner's manual. Porcelain-enameled shroud, 25-years Deterioration or é et utilisé conformément aux instructions imprimées qui l'accompagnent. Weber peut exiger une preuve raisonnable de - Weber Genesis E-320 LP | Owner Manual - Page 4
4 1 2 3 4 5 6 7 8 9 10 11 12 13 14 15 16 17 18 19 20 21 22 EXPLODED VIEW E/S/EP 310 VISION ÉCLATÉE, DIAGRAMA DE DESPIECE Genesis_310_LP_US 23 24 25 26 27 28 29 30 31 32 33 34 35 36 37 38 39 40 41 42 43 44 45 46 47 WWW.WEBER.COM® - Weber Genesis E-320 LP | Owner Manual - Page 5
EP Rack Rejilla de calentamiento Grille de réchauffage 23. bouteille 7. Left Side Table Mesa lateral Grates Parrillas de cocción Grilles de cuisson 25. Bezel Support Soporte posterior del bastidor Support arrière du cadre 29. Right Side Soporte del plato recolector Support d'égouttoir 33. Front - Weber Genesis E-320 LP | Owner Manual - Page 6
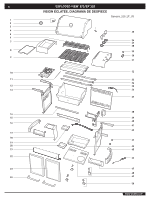
6 EXPLODED VIEW E/S/EP 320 VISION ÉCLATÉE, DIAGRAMA DE DESPIECE Genesis_320_LP_US 1 2 3 4 25 5 6 7 26 27 28 8 29 30 9 31 10 32 11 33 34 12 35 13 36 37 38 14 15 39 40 16 41 42 17 18 43 19 20 44 21 45 22 46 23 47 48 24 49 50 WWW.WEBER.COM® - Weber Genesis E-320 LP | Owner Manual - Page 7
EXPLODED VIEW LIST E/S/EP 320 LISTA DEL DIAGRAMA DE DESPIECE, LISTE DE LA VISION ÉCLATÉE 1. Shroud Hardware Accesorios de la cubierta Structure de protection 18. Catch Pan Holder Soporte del plato recolector Support d'égouttoir 35. Front Burner Tube Tubo quemador frontal Tube du brûleur avant 7 - Weber Genesis E-320 LP | Owner Manual - Page 8
Propane (LP) gas supply is easy to use and gives you more cooking control than charcoal fuel. ƽ WARNING: Do not use the barbecue within 24 inches of combustible materials to the back or sides of the grill. ƽ WARNING: The entire cooking box gets hot when in use. Do • These instructions will give - Weber Genesis E-320 LP | Owner Manual - Page 9
. GAS INSTRUCTIONS IMPORTANT LP CYLINDER INFORMATION Failure to follow these DANGER statements exactly may result in a fire causing death or serious injury. ƽ DANGER ƽ NEVER store a spare LP Cylinder under or near this barbecue. ƽ NEVER fill the tank beyond 80% full. Your Weber® gas grill is - Weber Genesis E-320 LP | Owner Manual - Page 10
side). 3) Open base cabinet doors. 4) Turn the LP cylinder so the opening of the valve is either to the front, side or rear of the Weber® gas the gas and tighten the fitting. Turn the gas back on and recheck with the soap and water solution. If leak does not stop, contact the Customer Service - Weber Genesis E-320 LP | Owner Manual - Page 11
GAS INSTRUCTIONS GAS INSTRUCTIONS after checking for leaks. If your grill has a side burner make sure the side burner is off. To perform leak gas. DO NOT OPERATE THE GRILL. Contact the Customer Service Representative in your area using the contact information on our web site. Log onto www.weber - Weber Genesis E-320 LP | Owner Manual - Page 12
leak persists after re-tightening the fitting, turn OFF the gas. DO NOT OPERATE THE GRILL. Contact the Customer Service Representative in your area using the contact information on our web site. Log onto www.weber.com®. 4) Regulator to cylinder connection. 5) Hose to regulator connection. 6) Valves - Weber Genesis E-320 LP | Owner Manual - Page 13
GAS INSTRUCTIONS 13 SAFE HANDLING TIPS FOR LIQUID PROPANE GAS CYLINDERS 13 ƽ WARNING: Replacement LP tanks must match the regulator connection supplied with this barbecue. • Liquid Propane (LP) gas is a petroleum product as are gasoline and natural gas. LP gas is a gas at regular temperatures - Weber Genesis E-320 LP | Owner Manual - Page 14
of gas from the LP cylinder. If this should occur, turn OFF the LP tank valve and burner control knobs. Start over. MAIN BURNER MANUAL LIGHTING 2 TE /OFF APAGAD ARRE O 1 1 5 46 2 7 5 4 2 7 *The grill illustrated may have slight differences than the model purchased. 3 5 WWW.WEBER.COM - Weber Genesis E-320 LP | Owner Manual - Page 15
WARNING: If the side burner does not light in five (5) seconds: a) Turn off the side burner control valve, main burners and gas supply at source. b) Wait 5 minutes to let the gas clear before you try again, or try lighting with a match (see "Manually Lighting the Side Burner"). 320 WWW.WEBER.COM® - Weber Genesis E-320 LP | Owner Manual - Page 16
16 OPERATING INSTRUCTIONS MANUALLY LIGHTING THE SIDE BURNER ƽ DANGER Failure to open the lid while igniting the side burner, or not waiting 5 minutes to allow the gas to clear if the side burner does not light, may result in an explosive flare-up that can cause serious bodily injury or death. 320 - Weber Genesis E-320 LP | Owner Manual - Page 17
Instructions". Straighten hose. If match lights burner, check igniter (see Sideburner Maintenance). If problems cannot be corrected by using these methods, please contact the Customer Service Representative in your area using the contact information on our web site. Log onto www.weber.com®. SIDE - Weber Genesis E-320 LP | Owner Manual - Page 18
the Spider/Insect screen becomes damaged or cannot be cleaned, please contact the Customer Service Representative in your area using the contact information on our web site. Log onto www.weber.com®. BURNER FLAME PATTERN The Weber® gas barbecue burners have been factory set for the correct air and - Weber Genesis E-320 LP | Owner Manual - Page 19
manifold support bracket the burner assembly out from under the guide screw and washer (a) in the corners of ƽ WARNING: After reinstalling the gas lines, they should be leak the barbecue. (See Step: "Check for gas leaks.") CROSSOVER® IGNITION SYSTEM OPERATIONS If The Service Representative in your area using - Weber Genesis E-320 LP | Owner Manual - Page 20
gas propano licuado E/S-310/320, EP-310/320 ##0809050505 DEBE LEER ESTA GUÍA DEL PROPIETARIO ANTES DE PONER A FUNCIONAR LA BARBACOA DE GAS ƽ PELIGRO Si huele a gas: 1. Cierre el suministro de gas siga cuidadosamente todos los procedimientos en este manual para verificar que no existan fugas. Haga - Weber Genesis E-320 LP | Owner Manual - Page 21
tapa y espere cinco minutos antes de tratar de volver a encender la barbacoa, usando las instrucciones de encendido en este manual. ƽ No use carbón o piedra pómez en su barbacoa de gas Weber®. ƽ No se incline sobre la barbacoa abierta o coloque las manos o dedos en el borde delantero de la caja de - Weber Genesis E-320 LP | Owner Manual - Page 22
de licuado extra (de repuesto) debajo o cerca de la barbacoa de agua. gas Weber®. • Esta barbacoa de gas Weber® está diseñada para ser usada solamente con gas propano licuado (LP). No la use con gas natural (suministrado a través de ƽ ADVERTENCIA: El cilindro de propano licuado usado con - Weber Genesis E-320 LP | Owner Manual - Page 23
de gas portátiles, usted deberá cumplir con la más reciente edición de NOM. INSTRUCCIONES SOBRE EL GAS GENERAL INSTRUCTIONS INFORMACIÓN QUE TODAS LAS VÁLVULAS DE LOS QUEMADORES ESTÉN CERRADAS Su barbacoa de gas Weber® está equipada para usarse con un sistema de suministro desde cilindros dise - Weber Genesis E-320 LP | Owner Manual - Page 24
24 INSTRUCCIONES SOBRE EL GAS GAS INSTRUCTIONS PARA CONECTAR LA MANGUERA AL CILINDRO: 1) Pase la de la válvula esté viendo hacia la parte delantera, lateral o posterior de la barbacoa de gas Weber®. Levante y enganche el cilindro al indicador de combustible. 5) Levante el tanque a su posición - Weber Genesis E-320 LP | Owner Manual - Page 25
INSTRUCCIONES SOBRE EL GAS GAS INSTRUCTIONS PARA LAS PRUEBAS DE FUGAS, RETIRE LAS PERILLAS DE CONTROL Y la ausencia de fugas antes de utilizar la barbacoa de gas Weber® Durante el transporte y manejo alguna conexión de la línea de gas pudiera aflojarse o dañarse. ƽ ADVERTENCIA: Lleve a cabo - Weber Genesis E-320 LP | Owner Manual - Page 26
web. Conéctese a www.weber.com®. Cuando se haya completado la revisión de las fugas de gas, CIERRE el suministro de gas en la fuente y enjuague las Otros tipos de capuchas o tapones pudieran causar fugas de propano. 320 *La barbacoa ilustrada puede tener ligeras diferencias con respecto al modelo - Weber Genesis E-320 LP | Owner Manual - Page 27
SOBRE EL GAS 27 GAS INSTRUCTIONS 27 SUGERENCIAS PARA EL MANEJO SEGURO DE LOS CILINDROS DE GAS PROPANO LICUADO CILINDRO insectos, etc. en gas. • Las conexiones de gas suministradas con la barbacoa de gas Weber® han sido • El gas propano tiene un olor similar al gas natural. Usted deberá - Weber Genesis E-320 LP | Owner Manual - Page 28
limitará el flujo de gas desde el tanque de gas sigue fluyendo a los quemadores. gas de gas del para permitir que el gas se disipe antes de el QUEMADOR 3. ENCENDIDO MANUAL DEL QUEMADOR PRINCIPAL que el gas se disipe limitará el flujo de gas desde el tanque de gas en la fuente del mismo. ENCENDIDO MANUAL - Weber Genesis E-320 LP | Owner Manual - Page 29
una pequeña 29 ENCENDIDO MANUAL DEL QUEMADOR PRINCIPAL cantidad de gas sigue fluyendo a los quemadores causar lesiones corporales serias o la muerte. 320 ƽ ADVERTENCIA: Inspeccione la manguera previo a con una manguera de repuesto autorizada por Weber®. Contacte al Representante de Servicios al - Weber Genesis E-320 LP | Owner Manual - Page 30
MANUAL DEL QUEMADOR LATERAL ƽ PELIGRO El no abrir la tapa mientras se esté encendiendo el quemador lateral, o no esperar 5 minutos para que el gas el suministro de gas en la fuente. 320 b) Antes de probar de nuevo, espere 5 minutos para dejar que el gas se disipe. .weber.com®. WWW.WEBER.COM® - Weber Genesis E-320 LP | Owner Manual - Page 31
lateral Aro y cabezal del quemador lateral Electrodo de encendido Perilla de control Encendedor MANTENIMIENTO MALLAS WEBER® CONTRA ARAÑAS E INSECTOS La barbacoa de gas Weber®, al igual que cualquier otro aparato de gas al aire libre, es un blanco para las arañas y demás insectos. Pueden crear sus - Weber Genesis E-320 LP | Owner Manual - Page 32
. ƽ PRECAUCIÓN: Al limpiar, no agrande las aberturas del quemador. REEMPLAZO DE LOS QUEMADORES PRINCIPALES 1) Su barbacoa de gas Weber® debe estar APAGADA y enfriada. 2) CIERRE el gas en la fuente. 3) Para sacar el panel de control: (a) Saque las perillas de control de los quemadores. (b) Saque - Weber Genesis E-320 LP | Owner Manual - Page 33
una solución de agua y jabón. (Vea el paso: "Verificación de que no existen fugas de gas") OPERACIÓN DEL SISTEMA DE ENCENDIDO CROSSOVER® Si el sistema de encendido Crossover® no logra encender el QUEMADOR contacto en nuestro sitio en la Internet. Conéctese a www.weber.com®. WWW.WEBER.COM® A B - Weber Genesis E-320 LP | Owner Manual - Page 34
Mode d'emploi du grill à gaz PL E/S -310/320, EP -310/320 #89#50505000 VOUS DEVEZ LIRE CE MODE D'EMPLOI AVANT D'UTILISER VOTRE GRILL A GAZ ƽ DANGER S'il le revendeur. NOTE A L'INTENTION DE L'INSTALLATEUR: Les présentes instructions doivent être remises au propriétaire et le propriétaire devrait - Weber Genesis E-320 LP | Owner Manual - Page 35
cinq minutes avant d'essayer de rallumer les brûleurs, en utilisant les instructions pour l'allumage. ƽ N'utilisez pas de charbon de bois ni de pierres de lave dans votre barbecue à gaz Weber®. ƽ Ne vous penchez jamais au-dessus du grill ouvert ou ne placez jamais les mains ou les doigts sur l'extr - Weber Genesis E-320 LP | Owner Manual - Page 36
3 sur M (moyen). Veuillez vous reporter à votre livre de recettes Weber® pour des instructions de cuisson détaillées. Remarque : La température à l'inté disponibilité des grilles de cuisson et des barres Flavorizer® de rechange, veuillez entrer en contact avec le Représentant du Service clientèle de - Weber Genesis E-320 LP | Owner Manual - Page 37
graisse accumulée ressemblent à des éclats de peinture. INSTRUCTIONS RELATIVES AU GAZ INFORMATIONS IMPORTANTES RELATIVES A LA BOUTEILLE DE RACCORDEMENT DE LA BOUTEILLE DE PROPANE LIQUIDE Tous les régulateurs de grills à gaz propane Weber® sont équipés d'un raccord de bouteille de gaz homologué - Weber Genesis E-320 LP | Owner Manual - Page 38
GAS INSTRUCTIONS Pour connecter le tuyau à la bouteille de gaz : 1) Faites passer le tuyau du régulateur à travers l'ouverture du panneau latéral à l'intérieur du placard inférieur. 2) Localisez la pince de retenue (a) sur le tuyau du régulateur. Fixez-la dans la fente (b) au dessous du support - Weber Genesis E-320 LP | Owner Manual - Page 39
AU GAZ GAS INSTRUCTIONS RETIREZ LES afin de détecter toute fuite avant d'utiliser votre Barbecue à gaz Weber®. L'expédition et la manipulation peuvent desserrer ou détériorer un gaz (OFF). N'UTILISEZ PAS LE GRILL. Veuillez entrer en contact avec le Représentant du Service clientèle le plus proche en - Weber Genesis E-320 LP | Owner Manual - Page 40
GAS INSTRUCTIONS PAS LE GRILL. Veuillez entrer en contact avec le Représentant du Service clientèle le plus proche grâce aux coordonnées à votre disposition sur notre site Internet. Connectez-vous sur www.weber de propane. 320 *Il est possible que le grill de l'illustration - Weber Genesis E-320 LP | Owner Manual - Page 41
RELATIVES AU GAZ 41 GAS INSTRUCTIONS 41 ASTUCES POUR UNE MANIPULATION SANS DANGER DES BOUTEILLES DE Ne remplacez le tuyau que par un tuyau de rechange agréé par Weber®. Veuillez entrer en contact avec le Représentant du Service clientèle le plus proche grâce aux coordonnées à votre disposition - Weber Genesis E-320 LP | Owner Manual - Page 42
42 INSTRUCTIONS RELATIVES A L' une allumette. ALLUMAGE DU BRULEUR PRINCIPAL 5 1 2 7 6 *Il est possible que le grill de l'illustration présente de légères différences par rapport au modèle acheté. 5 Il est possible que le grill de l'illustration présente de légères différences par rapport au modèle achet - Weber Genesis E-320 LP | Owner Manual - Page 43
INSTRUCTIONS 2 46 7 *Il est possible que le grill de l'illustration présente de légères différences agréé par Weber®. Veuillez entrer en contact avec le Représentant du Service clientèle ne s'allume pas dans un délai de cinq (5) secondes: 320 a) Fermez la valve de commande du brûleur latéral, - Weber Genesis E-320 LP | Owner Manual - Page 44
INSTRUCTIONS à nouveau. 320 PROBLEME Les brûleurs Grilles anti-araignées/insectes pour détecter les obstacles potentiels. (Blocage des trous.) SOLUTION Nettoyez les Grilles de gaz. Consultez les "Instructions pour l'allumage". Le échauffage. Les grilles de cuisson et Service clientèle le plus - Weber Genesis E-320 LP | Owner Manual - Page 45
PROBLEME bouteille de gaz. Consultez les "Instructions pour l'allumage". Le tuyau d' Service clientèle le plus proche grâce aux coordonnées à votre disposition sur notre site Internet. Connectez-vous sur www.weber MAINTENANCE GRILLES ANTI-ARAIGNEES/INSECTES WEBER® Votre barbecue à gaz Weber®, - Weber Genesis E-320 LP | Owner Manual - Page 46
la Grille anti-araignées/insectes se détériore ou ne peut pas être nettoyée, veuillez entrer en contact avec le Représentant du service clientèle leurs pendant le nettoyage. REMPLACEMENT DES BRULEURS PRINCIPAUX 1) Votre barbecue à gaz Weber® doit être FERME et avoir refroidi. 2) Fermez le gaz (OFF) - Weber Genesis E-320 LP | Owner Manual - Page 47
la soupape vers vous, levez dans le même temps le collecteur pour relâcher les supports du collecteur du cadre. (b). 5) Faites glisser l'ensemble du brûleur hors du dessous veuillez entrer en contact avec le Représentant du Service clientèle de votre région grâce aux coordonnées de notre site - Weber Genesis E-320 LP | Owner Manual - Page 48
48 WWW.WEBER.COM® - Weber Genesis E-320 LP | Owner Manual - Page 49
49 WWW.WEBER.COM® - Weber Genesis E-320 LP | Owner Manual - Page 50
50 WWW.WEBER.COM® - Weber Genesis E-320 LP | Owner Manual - Page 51
51 WWW.WEBER.COM® - Weber Genesis E-320 LP | Owner Manual - Page 52
52 WWW.WEBER.COM® - Weber Genesis E-320 LP | Owner Manual - Page 53
53 WWW.WEBER.COM® - Weber Genesis E-320 LP | Owner Manual - Page 54
country. Refer to country designation located on outer carton. These parts may be gas carrying or gas burning components. Please contact Weber-Stephen Products Co., Customer Service Department for genuine Weber-Stephen Products Co. replacement part(s) information. ƽ WARNING: Do not attempt to make - Weber Genesis E-320 LP | Owner Manual - Page 55
1. Genesis® E-310™ 2. Genesis® S-310™ 3. Genesis® E-320™ 4. Genesis® S-320™ 7. Have you ever owned a Weber® grill before? / ¿Ha tenido alguna vez antes un asador Weber®? / Avez-vous déjà possédé un grill Weber® auparavant ? 1. Yes Number of Weber® gas grills owned: Sí Número de asadores de gas Weber - Weber Genesis E-320 LP | Owner Manual - Page 56
questions about the assembly, use or Pour les achats effectués aux États-Unis: Palatine, IL 60078-1999 maintenance of your grill, please call Weber Customer Service. 1-800-446-1071 Gracias por compartir su información de contacto con nosotros. De nuevo, todo quedará estrictamente entre nosotros
-
 1
1 -
 2
2 -
 3
3 -
 4
4 -
 5
5 -
 6
6 -
 7
7 -
8
-
9
-
10
-
11
-
12
-
13
-
14
-
15
-
16
-
17
-
18
-
19
-
20
-
21
-
22
-
23
-
24
-
25
-
26
-
27
-
28
-
29
-
30
-
31
-
32
-
33
-
34
-
35
-
36
-
37
-
38
-
39
-
40
-
41
-
42
-
43
-
44
-
45
-
46
-
47
-
48
-
49
-
50
-
51
-
52
-
53
-
54
-
55
-
56
 |
 |
YOU MUST READ THIS OWNER’S GUIDE
BEFORE OPERATING YOUR GAS GRILL
±
DANGER
If you smell gas:
1. Shut off gas to the appliance.
2. Extinguish any open flames.
3. Open lid.
4. If odor continues, keep away from the
appliance and immediately call your gas
supplier or your fire department.
Leaking gas may cause a fire or explosion
which can cause serious bodily injury or
death, or damage to property.
±
WARNING:
1. Do not store or use gasoline or other
flammable liquids or vapors in the
vicinity of this or any other appliance.
2. An LP cylinder not connected for use
shall not be stored in the vicinity of this
or any other appliance.
±
WARNING: Follow all leak-check
procedures carefully in this manual prior
to barbecue operation. Do this even if the
barbecue was dealer-assembled.
NOTICE TO INSTALLER: These instructions
must be left with the owner and the owner
should keep them for future use.
THIS GAS APPLIANCE IS DESIGNED FOR
OUTDOOR USE ONLY.
89555 02/20/08 LP
US ENGLISH
GAS GRILL
#00000
#89555
±
WARNING: Do not try to light this
appliance without reading the “Lighting
Instructions” section of this manual.
LP GAS GRILL OWNER’S GUIDE
E/S -310/320, EP -310/320
Guía del propietario del asador de gas licuado de propano - Pg 20
Guide de l’utilisateur du grill à gaz PL - Pg 34