Weber Genesis Silver A NG Owner Manual
Weber Genesis Silver A NG Manual
 |
View all Weber Genesis Silver A NG manuals
Add to My Manuals
Save this manual to your list of manuals |
Weber Genesis Silver A NG manual content summary:
- Weber Genesis Silver A NG | Owner Manual - Page 1
keep them for future use. THIS GAS APPLIANCE IS DESIGNED FOR OUTDOOR USE ONLY. ƽ WARNING: Do not try to light this appliance without reading the "Lighting" Instructions section of this manual YOU MUST READ THIS OWNERS GUIDE BEFORE OPERATING YOUR GAS GRILL A004.c B002.b C001.b D003.b ® 55020 05 - Weber Genesis Silver A NG | Owner Manual - Page 2
. ƽ After a period of storage, and/or nonuse, the Weber Gas Barbecue should be checked for gas leaks and burner obstructions before use. See instructions in this manual for correct procedures. ƽ Do not operate the Weber gas barbecue if there is a gas leak present. ƽ Do not use a flame to check for - Weber Genesis Silver A NG | Owner Manual - Page 3
this Weber Gas Grill that in accordance with the printed instructions accompanying it. Weber may require reasonable proof of service, or failure to perform normal and routine maintenance, including but not limited to damage caused by insects within the burner tubes, as set out in this owner's manual - Weber Genesis Silver A NG | Owner Manual - Page 4
A-9 Assembly Instructions B-1 Installing Features C-1 Operating D-1 Lighting D-1 Manual Lighting D-2 Cooking D-3 Storage and/or Nouse D-3 Cleaning D-3 Annual Maintenance D-4 General Maintenance D-5 Replacing Main Burners D-6 Crossover Ignition System Operations ... D-7 Troubleshooting - Weber Genesis Silver A NG | Owner Manual - Page 5
you the minimum requirements for assembling your Weber Gas Barbecue. Please read the instructions carefully before using your Weber Gas Barbecue. Improper assembly can be dangerous. • Not for use by children. • If there are local codes that apply to portable gas grills, you will have to conform to - Weber Genesis Silver A NG | Owner Manual - Page 6
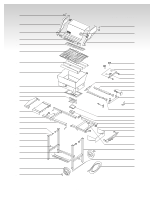
1 Genesis Silver-A NG 2 24 3 25 4 26 5 6 7 27 28 8 29 30 31 9 32 10 33 11 34 12 35 36 13 14 37 38 15 39 16 29 40 17 41 18 19 42 43 20 21 44 45 22 23 A-6 - Weber Genesis Silver A NG | Owner Manual - Page 7
. Right Endcap 27. Burner Control Knobs 28. Control Panel 29. Control Panel Hardware 30. Ignitor Button 31. Crossover Tube 32. Back Burner 33. Manifold Hardware 34. Manifold 35. Manifold Support Bracket 36. Spider Stopper Guards 37. Catch Pan 38. Disposable Drip Pan 39. Right Frame 40. Control Panel - Weber Genesis Silver A NG | Owner Manual - Page 8
-Stephen Products Co., Weber, the silhouette, and the kettle configuration are registered trademarks ® of Weber-Stephen Products Co., 200 East Daniels Road, Palatine, IL, 60067-6266, U.S.A. This product is covered by one or more United States patents and patents in - Weber Genesis Silver A NG | Owner Manual - Page 9
Screwdriver Phillips screwdriver Hammer 7/16 open-end or an adjustable wrench Pliers Block of wood Lid - 1 ® ® Left Frame - 1 Right Frame -1 Wheel Frame - 1 Leg Frame - 1 Frame Connectors - 1 Left Trim Piece - 1 Cooking Box - 1 Right Trim Piece - 1 Work Surface - 1 Cooking grates - 2 Control - Weber Genesis Silver A NG | Owner Manual - Page 10
Pan Holder - 1 Catch-Pan - 1 Disposable Drip Pans - 2 Thermometer - 1 Wheels - 2 Manifold Support Bracket - 1 Burner Control Knobs - 2 Hinge Pins (1/4 x 1 1/2 inch clevis pin) - 2 Washers - 13 Hair Pin Cotter - 2 Hubcaps - 3 Control Panel Hardware (Phillips screws/washers) - 2 Tubing Plugs - 2 A-10 - Weber Genesis Silver A NG | Owner Manual - Page 11
Assembly Instructions Assemble wheel frame You will need: axle rod, two wheel hubcaps, two wheels, wheel frame, one hubcap onto the end of the axle rod. Slide one wheel onto the axle, WEBER name facing out. Next, slide the other end of the axle rod through the wheel frame. Add the other wheel - Weber Genesis Silver A NG | Owner Manual - Page 12
white plugs in the frame as shown Tighten Bolts with wrench. Turn the frame over and continue with assembly. (1) (2) Install tubing plugs You will need: two tubing plugs and a hammer. Insert tubing plugs into the ends of the leg frame. To fully seat the plugs, you may have to tap them lightly with - Weber Genesis Silver A NG | Owner Manual - Page 13
the burner tubes(1) are under the frame brace(2). (1) (2) Your Weber Gas Grill Manifold assembly consisting of gas manifold, valves and gas burners Contact the Customer Service Representative in your region using the contact information sheet provided with your manual. Do not use grill. (2) (1) - Weber Genesis Silver A NG | Owner Manual - Page 14
manual shut-off valve indoors should be installed in the branch fuel line in an accessible location near the supply line s The quick disconnect connects to a 3/8 inch NPT thread from the gas used which is resistant to the action of natural gas when connections are made. s The outdoor connector must - Weber Genesis Silver A NG | Owner Manual - Page 15
s If the length of the line required does not exceed 50 feet, use a 5/8" O.D. tube. One size larger should be used for lengths greater than 50 feet. s Gas piping may be copper tubing, type K or L; polyethylene plastic tube, with a minimum wall thickness of .062 inch; or standard weight (schedule 40 - Weber Genesis Silver A NG | Owner Manual - Page 16
Check that all burner valves are off You will need: burner control knobs. Valves are shipped in the OFF position, but you should check to be sure that they are turned OFF. Put the knob on each valve. Check by pushing down and turning clockwise. If they do not turn, they are off. Proceed to the next - Weber Genesis Silver A NG | Owner Manual - Page 17
before using your Weber Gas Barbecue. Shipping and handling may loosen or damage a gas fitting. ƽ WARNING gas. DO NOT OPERATE THE BARBECUE. Contact the Customer Service Representative in your region using the contact information sheet provided with your manual. When leak checks are complete, turn gas - Weber Genesis Silver A NG | Owner Manual - Page 18
Install the slide out bottom tray You will need: the slide out bottom tray(1), catch pan holder(2), catch pan and one disposable drip pan. Slide the bottom tray onto the mounting rails under the cooking box with finger grip toward you(1). ƽ WARNING: Do not line bottom tray with aluminum foil. It - Weber Genesis Silver A NG | Owner Manual - Page 19
Install Lid You will need: lid, two hair pin cotters(1) and two hinge pins(2). Place lid on top of the cooking box. Align the hinges at the rear of the barbecue. Insert hinge pins through the hinges from the outside. Insert hair pin cotters into the small holes in the hinge pins. (1) (2) Install - Weber Genesis Silver A NG | Owner Manual - Page 20
Installing Features Install the right trim piece with tool holders You will need: Right trim piece with tool holders Push the Right trim piece into the frame as shown(1), making sure that the tabs on the underside of the trim piece are snapped into the slots in the frame.(2) (1) Install the work - Weber Genesis Silver A NG | Owner Manual - Page 21
Install Flavorizer® Bars and Cooking Grates You will need: five Flavorizer Bars and two cooking grates. Place the Flavorizer Bars side by side in the cooking box. Install the thermometer You will need: Thermometer. Insert the thermometer into its holder on the right side of the lid. ® ® Set the - Weber Genesis Silver A NG | Owner Manual - Page 22
to be damaged in any way, do not use the barbecue. Replace using only Weber authorized replacement hose. Contact the Customer Service Representative in your region using the contact information sheet provided with your manual. 1 1) Open the lid. 2) Make sure all burner control knobs are turned OFF - Weber Genesis Silver A NG | Owner Manual - Page 23
Manual Lighting ƽ DANGER Failure to open lid while igniting the barbecue's burners, or not waiting 5 minutes to allow the gas to clear if control knob clockwise to the OFF position. 1 2 7 3 4,6 5 *The grill illustrated may have slight differences than the model purchased. ƽ WARNING: Do not lean - Weber Genesis Silver A NG | Owner Manual - Page 24
secured in the OFF position. When the Weber Gas Barbecue is stored indoors, the gas supply MUST BE DISCONNECTED. s After a period of storage and/or nonuse, the Weber Gas Grill should be checked for gas leaks and any obstructions in the burner tubes before using. (See "Maintenance" Section.) s Check - Weber Genesis Silver A NG | Owner Manual - Page 25
. Contact the Customer Service Representative in your region using the contact information sheet provided with your manual. When leak checks are complete, turn gas supply OFF at the source and rinse connections with water. (1) (2) (3) Inspection and Cleaning of the Weber Spider Stopper™ Guards - Weber Genesis Silver A NG | Owner Manual - Page 26
Barbecue burners have been factory set for the correct air and gas mixture. The correct flame pattern is shown. 1) Burner tube 2) Tips occasionally flicker yellow 3) Light blue 4) Dark blue (1) (2) (3) (4) (2) (3) The Weber Spider Stopper™ Guard(1) is factory installed. It fits tightly around the - Weber Genesis Silver A NG | Owner Manual - Page 27
Replacing Main Burners 1) Your Weber Gas Barbecue must be OFF and cool. 2) Turn gas OFF at source. 3) To remove control panel: take off the burner manifold in place. (2) (1) (1) 6) Slide the burner assembly out from under the guide screw and washer(1) in the corners of the cooking box. (1) D-6 - Weber Genesis Silver A NG | Owner Manual - Page 28
ƽ CAUTION: If the Spider Stopper Guards do not fit tightly, contact the Customer Service Representative in your region using the contact information sheet provided with your manual. ƽ WARNING: After reinstalling the gas lines, they should be leak checked with a soap and water solution before using - Weber Genesis Silver A NG | Owner Manual - Page 29
Troubleshooting Problem Check Burners burn with a yellow or orange flame, in conjunction with the smell of gas. Inspect Weber Spider Stopper Guards for possible instructions of the burner tube. Are burners problems cannot be corrected by using these methods, please contact the Customer Service
-
 1
1 -
 2
2 -
 3
3 -
 4
4 -
 5
5 -
 6
6 -
 7
7 -
8
-
9
-
10
-
11
-
12
-
13
-
14
-
15
-
16
-
17
-
18
-
19
-
20
-
21
-
22
-
23
-
24
-
25
-
26
-
27
-
28
-
29
 |
 |
m
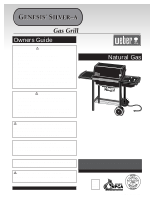
WARNING: Follow all leak-check
procedures carefully in this manual prior
to barbecue operation. Do this even if the
barbecue was dealer-assembled.
NOTICE TO INSTALLER: These
instructions must be left with the owner
and the owner should keep them for future
use.
THIS GAS APPLIANCE IS DESIGNED FOR
OUTDOOR USE ONLY.
m
WARNING: Do not try to light this
appliance without reading the “Lighting”
Instructions section of this manual
m
WARNING
1.
Do not store spare liquid propane
cylinder within 10 feet (3m) of this
appliance.
2.
Do not store or use gasoline or other
flammable liquids or vapors within 25
feet (8m) of this appliance.
®
55020 05/16/00
m
DANGER
If you smell gas:
1.
Shut off gas to the appliance.
2.
Extinguish any open flames.
3.
Open lid
4.
If odor continues, keep away from the
appliance and immediately call your
gas supplier or your fire department.
Leaking gas may cause a fire or explosion
which can cause serious bodily injury or
death, or damage to property.
A004.c
B002.b
C001.b
D003.b
W
E
B
E
R
W
E
B
E
R
Natural Gas
Owners Guide
Y
OU
MUST
READ
THIS
O
WNERS
G
UIDE
BEFORE
OPERATING
YOUR
GAS
GRILL