Weider 130 English Manual
Weider 130 Manual
 |
View all Weider 130 manuals
Add to My Manuals
Save this manual to your list of manuals |
Weider 130 manual content summary:
- Weider 130 | English Manual - Page 1
WEIDER Model No. WEBE13061 Serial No. Write the serial number in the space above for future reference. CUSTOMER HOT LINE: 1-800-999-3756 Mon.-Fri., 6 a.m.-6 p.m. MST ".CAUTION Read alt precautions andinetruc- Alone1n'thie manual using ii:eqqVihenti for future iefeience.' ha. N O 0) O) USER - Weider 130 | English Manual - Page 2
users of the weight bench are adequately informed of all precautions. WARNING: Before beginning this or any'Oxercise program, consult your physician. This is especially important for persons over the age ofw35 or persons withpre-existing health problems. Read all instructions before using. ICON - Weider 130 | English Manual - Page 3
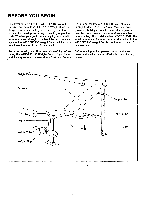
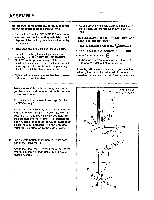
look at the drawing using the WEIDER• 130 Weight Bench. If you have below and familiarize yourself with the parts that are additional questions, please call our Customer Service labeled. Weight Rests Backrest Leg Lever Weight Tube Weight Stop ,(3 (O z / o Support Rod 0 0 "H"-Frame Seat - Weider 130 | English Manual - Page 4
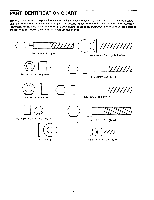
PART IDENTIFICATION CHART This chart is provided to help you identify the small parts used in assembly. The number in parenthesis below each part refers to the key number of the part. The second number refers to the quantity needed for assembly. Important: Some parts may have been pre-assembled for - Weider 130 | English Manual - Page 5
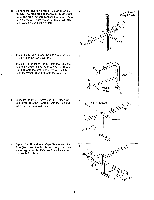
all parts as you assemble them, unless instructed to do otherwise. • As you assemble the WEIDER® 130, make sure that all parts are oriented as that the "H"-Frame (1) is oriented as shown. The high side of the weight rests must be on the side indicated. The "L"-Brackets must also be attached to - Weider 130 | English Manual - Page 6
side indicated. Attach the Frame (2) to the "H"-Frame (1) with two M8 x 56mm Bolts (15) and two M8 Nylon Locknuts (19). i High Side of Weight Rests 19 . .. . 2 • . 15 - 1 • 4. Tap a 38mm Square Inner Cap (22) into the indicated end of the Leg Lever (4). Tap a 1" Round Inner Cap (24 - Weider 130 | English Manual - Page 7
(5) to the Frame (2) with the M8 x 80mm Bolt (17), the two 1/2" x 3/8" Metal Spacers (25), and an M8 Nylon Locknut (19). Rest the Backrest (6) on the Support Rod (7). 9. Attach the Seat (11) to the bracket on the Frame 9 (2) with two M6 x 16mm Screws (13). 7 - Weider 130 | English Manual - Page 8
each time you use the weight bench. Replace any worn parts immediately. The weight bench can be cleaned with a damp Support Rod. 6 7 2 ATTACHING WEIGHTS To use the Leg Lever (4), first slide the Weight Stop (26) onto the weight tube. Next, slide the desired weights (not included) onto the Weight - Weider 130 | English Manual - Page 9
and well-balanced fitness program, many have found that cross training is the answer. We recommend that on Monday, Wednesday and Friday, you plan weight training workouts. On Tuesday and Thursday, plan 20 to 30 minutes of aerobic exercise, such as cycling, running or swimming. Rest from both - Weider 130 | English Manual - Page 10
to maintain proper form. This means End each workout with 5 to 10 minutes of stretching. Include 1 Leg Lever 5 2 Backrest Bracket 6 1 Backrest 7 1 Support Rod 8 2 M8 x 50mm Carriage Bolt 9 4 3/4" Round x 3/8" Metal Spacer Weight Stop M8 Washer User's Manual "#" Indicates a non- - Weider 130 | English Manual - Page 11
EXPLODED DRAWING Model No. WEBE13061 R0996A 6 5 0 13 00 a O 2 19 19 11 25 a 17 15 13 19 22 14 3 4 a.. 23 22 8 18 20 a 26 24 22 10 9 27 16 19 12 21 27 16 7 9 23 0 et 19 12 21 11 - Weider 130 | English Manual - Page 12
2. The NAME of the product (WEIDER® 130 Weight Bench). 3. The SERIAL NUMBER of the product (see the front cover of this manual). 4. The KEY NUMBER and DESCRIPTION abnormal usage or repairs not provided by an ICON authorized service center, products used for commercial or rental purposes, or products
-
 1
1 -
 2
2 -
 3
3 -
 4
4 -
 5
5 -
 6
6 -
 7
7 -
8
-
9
-
10
-
11
-
12
 |
 |

WEIDER
Model
No.
WEBE13061
Serial
No.
Write
the
serial
number
in
the
space
above
for
future
reference.
Serial
Number
Decal
QUESTIONS?
As
a
manufacturer,
we
are
com-
mitted
to
providing
complete
customer
satisfaction.
If
you
have
questions,
or
find
that
there
are
missing
or
damaged
parts,
we
will
guarantee
you
complete
sat-
isfaction
through
direct
assis-
tance
from
our
factory.
TO
AVOID
UNNECESSARY
DELAYS,
PLEASE
CALL
DIRECT
TO
OUR
TOLL
-FREE
CUSTOMER
HOT
LINE.
The
trained
techni-
cians
on
our
customer
hot
line
will
provide
immediate
assis-
tance,
free
of
charge
to
you.
N
CUSTOMER
HOT
LINE:
1-800-999-3756
Mon.
-Fri.,
6
a.m.-6
p.m.
MST
".CAUTION
Read
alt
precautions
andinetruc-
Alone
1n'thie
manual
using
ii:eqqVihenti
for
future
iefeience
.
'
O
ha.
O)
0)
USER'S
MANUAL