Weider 141 Bench User Manual - Page 9
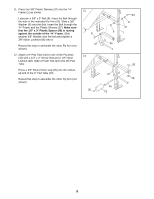
Locknut 28. Slide a Foam Pad 23 onto the Pad
 |
View all Weider 141 Bench manuals
Add to My Manuals
Save this manual to your list of manuals |
Page 9 highlights
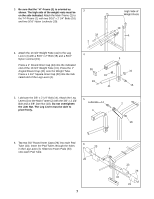
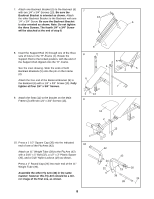
11. Press two 3/8" Plastic Sleeves (37) into the "H"Frame (1) as shown. Lubricate a 3/8" x 5" Bolt (8). Insert the Bolt through the hole in the indicated Fly Arm (42). Slide a 3/8" Washer (9) onto the Bolt. Insert the Bolt through the "H"-Frame and the Plastic Sleeves (37). Make sure that the 1/2" x 3" Plastic Spacer (36) is resting against the outside of the "H"-Frame. Slide another 3/8" Washer onto the Bolt and tighten a 3/8" Nylon Locknut (43) onto it. Repeat this step to assemble the other Fly Arm (not shown). 12. Attach a 9" Pad Tube (40) to one of the Fly Arms (42) with a 1/4" x 2" Screw (33) and a 1/4" Nylon Locknut (28). Slide a Foam Pad (23) onto the Pad Tube. Press a 3/4" Round Inner Cap (26) into the indicated end of the 9" Pad Tube (40). Repeat this step to assemble the other Fly Arm (not shown). 11 8 42 12 26 9 36 42 40 23 43 9 37 1 33 28 9
-
 1
1 -
2
-
3
-
 4
4 -
 5
5 -
 6
6 -
 7
7 -
 8
8 -
 9
9 -
 10
10 -
 11
11 -
 12
12 -
 13
13 -
 14
14 -
15
-
16
 |
 |
