Weider 350 Bench English Manual
Weider 350 Bench Manual
 |
View all Weider 350 Bench manuals
Add to My Manuals
Save this manual to your list of manuals |
Weider 350 Bench manual content summary:
- Weider 350 Bench | English Manual - Page 1
number in the space above for reference. Serial Number Decal (under seat) QUESTIONS? As a manufacturer, we are committed to providing complete Read all precautions and instructions in this manual before using this equipment. Save this manual for future reference. USER'S MANUAL Visit our website at - Weider 350 Bench | English Manual - Page 2
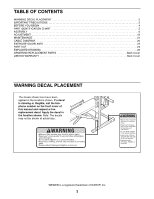
24 EXPLODED DRAWING 25 ORDERING REPLACEMENT PARTS Back Cover LIMITED WARRANTY Back Cover WARNING DECAL PLACEMENT The decals shown here decal is missing or illegible, call the telephone number on the front cover of this manual and request a free replacement decal. Apply the decal in the location - Weider 350 Bench | English Manual - Page 3
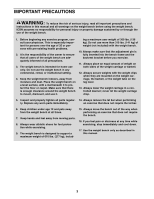
all important precautions and instructions in this manual and all warnings on the weight bench before using the weight bench. ICON assumes no while exercising. 9. The weight bench is designed to support a maximum weight of 610 lbs. (277 kg), includ- 15. Always move the bench out of the way when - Weider 350 Bench | English Manual - Page 4
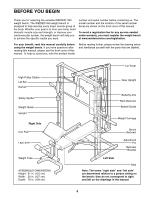
WEIDER® 350 weight bench. The WEIDER 350 weight bench cover of this manual. To avoid a registration fee for any service needed under warranty, you must register the weight bench at www.weiderservice.com/registration. For your benefit, read this manual carefully before using the weight bench - Weider 350 Bench | English Manual - Page 5
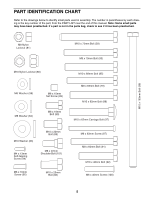
in assembly. The number in parentheses by each drawing is the key number of the part, from the PART LIST near the end of this manual. Note: Some small parts may have been preattached. If a part is not in the parts bag, check to see if it has been preattached. M10 - Weider 350 Bench | English Manual - Page 6
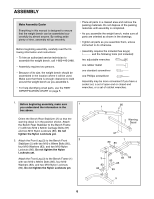
in this manual is designed to ensure that the weight bench can be assembled successfully by almost anyone. By setting aside plenty of time, assembly will go smoothly. Before beginning assembly, carefully read the following information and instructions: • To hire an authorized service technician to - Weider 350 Bench | English Manual - Page 7
(78), and an M8 Nylon Locknut (81). Next, press the 25mm Round Angled Cap (19) onto the Weight Tube; make sure the widest part of the Round Angled Cap Locknuts yet. 92 83 83 Holes 80 7 9 83 92 80 5. Attach the Bench Backrest (11) to the Backrest 5 Frames (9) with four M6 x 40mm Screws ( - Weider 350 Bench | English Manual - Page 8
(1) with an M4 x 13mm Self-tapping Screw (94). Insert the Adjustment Pin into the Bench Frame and the Backrest Bracket (7). Tighten the M6 x 40mm Screws (100) used in step 5. 7. Attach the Seat (12) to the Bench Frame (1) 7 with four M6 x 16mm Screws (95). See steps 1-6. Tighten the M10 Nylon - Weider 350 Bench | English Manual - Page 9
10. Orient the Center Base (24) so that the indented holes are downward. Insert two M10 x 62mm Carriage Bolts (97) up through the Center Base. Locate the Side Base (51) that has a warning decal. Orient the Side Base as shown and attach it to the Center Base (24) with two M10 x 68mm Bolts (85), two - Weider 350 Bench | English Manual - Page 10
Weight 13 Carriage (35). Orient the Weight Carriage and the Rear Upright (27) as shown. Slide the Weight Carriage onto the Upright. Orient the Weight Carriage Stop (48) so the 60mm Bushing (54) is at the top. Slide the Weight Nylon Locknuts yet. 15. Attach a Guide Rod (28) to the right Side - Weider 350 Bench | English Manual - Page 11
83 85 83 51 17. Slide one of the Safety Spotters (38) onto the 17 right Guide Rod (28). Engage the Spotter Hook (40) into one of the holes near the lower end Front Top Frame (30). Attach the Front Top Frame (30) to the right Guide Rod (28) with an M10 x 25mm Bolt (86). Do not tighten the Bolt. 86 - Weider 350 Bench | English Manual - Page 12
the Front Uprights (29). 43 Hand tighten an M8 x 18mm Bolt (90) into the Left Barbell Guide (37). Next, slide a Weight Stop (64) onto the Barbell (42). Hand tighten an M6 x 16mm Screw (95) into the Weight Stop. Make sure that the Screw engages the hole in the Barbell. Repeat this step on - Weider 350 Bench | English Manual - Page 13
22. Slide an Olympic Adapter (22) onto the Barbell (42) and secure it with an M8 x 10mm Set 22 Screw (99). Repeat this step for the other end of the Barbell (42). 42 22 99 23. See the CABLE DIAGRAM on page 20 to 23 identify the cables as you assemble them. Identify the Lat Cable (74). - Weider 350 Bench | English Manual - Page 14
61 58 59 74 55 58 92 59 55 80 83 77 74 31 77 83 85 27. Attach the Lat Cable (74) to the Weight 27 Carriage (35) with the M10 x 20mm Bolt (89) and an M10 Nylon Locknut (80). 74 80 89 35 28. Identify the Butterfly Cable (76 - Weider 350 Bench | English Manual - Page 15
29. Wrap the Butterfly Cable (76) around a "V"-pul- 29 ley (56). Attach the "V"-pulley and a Large Cable Trap (63) to the Center Upright (26) with an M10 x 62mm Bolt (88), two Guards (62), an M10 Washer (83), and an M10 Nylon Locknut (80). Make sure the Cable Trap is oriented to hold the - Weider 350 Bench | English Manual - Page 16
33. Identify the Low Cable (75). Route the Cable through the Center Upright (26) and under a 115mm Pulley (57). Attach the Pulley inside the Upright with an M10 x 68mm Bolt (85), two M10 Washers (83), two 16mm x 13mm Bushings (77), and an M10 Nylon Locknut (80). 33 83 80 77 26 75 57 77 83 85 34. - Weider 350 Bench | English Manual - Page 17
be explained in ADJUSTMENT, beginning on the next page. Before using the weight rack, pull each cable a few times to make sure that the cables smoothly, find and correct the problem. IMPORTANT: If the cables are not properly installed, they may be damaged when heavy weight is used. See the CABLE - Weider 350 Bench | English Manual - Page 18
from your exercise program. Also, refer to the accompanying exercise guide to see the correct form for each exercise. Make sure all parts are properly tightened each time you use the weight bench. Replace any worn parts immediately. The weight bench can be cleaned with a damp cloth and a mild, non - Weider 350 Bench | English Manual - Page 19
38, 39) in the correct position for the exercise. To do this, stand in front of the weight rack and grip the Locking Bar (43) with both hands. Turn the Locking Bar until the two hooks (38) directly under the Right and Left Barbell Guides (36, 37). (See ADJUSTING THE SAFETY SPOTTERS above.) 19 - Weider 350 Bench | English Manual - Page 20
to make sure that the cables, the cable traps, and the guards have been assembled correctly. If the cables have not been correctly routed, the weight system will not function properly and damage may occur. The numbers show the correct route for each cable. Make sure that the cable traps do - Weider 350 Bench | English Manual - Page 21
resistance is felt, the cables should be tightened. See ATTACHING WEIGHTS in the ADJUSTMENT section of this manual. Attach some weights to the the weight carriage. To tighten the cables, remove the M10 Nylon Locknut replaced, see ORDERING REPLACEMENT PARTS on the back cover of this manual. 21 - Weider 350 Bench | English Manual - Page 22
to your workouts, vary the exercises from session to session. Weight Loss To lose weight, use a low amount of resistance and increase the number of manner will leave you feeling exhausted. On the exercise guide accompanying this manual you will find photographs showing the correct form for several - Weider 350 Bench | English Manual - Page 23
keep a record of each workout. List the date, the exercises performed, the resistance used, and the numbers of sets and repetitions completed. Record your weight and key body measurements at the end of every month. The key to achieving the greatest results is to make exercise a regular and enjoyable - Weider 350 Bench | English Manual - Page 24
Pad Tube Bench Backrest Seat Curl Pad 50mm Square Inner Cap 45mm Square Inner Cap 50mm Round Inner Cap 25mm Square Inner Cap 19mm Round Inner Cap 25mm Round Angled Cap Adjustment Pin Curl Knob Olympic Weight Adapter Short Foam Pad Center Base Rear Base Center Upright Rear Upright Guide Rod Front - Weider 350 Bench | English Manual - Page 25
EXPLODED DRAWING A-Model No. WEBE1915.0 R0907A 11 17 13 92 9 8 95 12 80 83 83 17 96 96 83 92 100 96 98 100 80 14 80 15 81 15 84 43 19 83 80 6 49 22 16 99 78 84 91 15 14 14 80 80 21 83 83 83 80 7 1 94 20 14 83 85 85 2 85 83 95 97 14 18 23 5 23 10 10 - Weider 350 Bench | English Manual - Page 26
EXPLODED DRAWING B-Model No. WEBE1915.0 R0907A 72 69 70 68 101 66 76 34 15 44 67 81 44 67 47 80 85 55 88 71 62 63 55 85 83 77 80 31 83 69 101 66 56 73 83 62 83 77 14 80 49 49 14 80 80 77 80 83 85 85 77 83 80 74 83 41 56 63 62 76 32 81 33 62 83 80 80 14 87 96 - Weider 350 Bench | English Manual - Page 27
EXPLODED DRAWING C-Model No. WEBE1915.0 R0907A 86 53 36 65 90 65 14 83 83 85 83 83 85 30 80 83 80 53 53 40 80 38 53 86 16 22 64 99 95 53 29 65 37 90 28 83 85 83 85 53 53 83 80 83 86 38 53 65 40 80 58 55 92 92 60 58 58 80 80 55 86 14 83 80 83 85 83 83 85 80 58 61 - Weider 350 Bench | English Manual - Page 28
cover of this manual) • the key number and description of the part(s) (see the PART LIST and the EXPLODED DRAWING near the end of this manual) LIMITED WARRANTY ICON Health & Fitness, Inc. (ICON) warrants this product to be free from defects in workmanship and material, under normal use and service
-
 1
1 -
 2
2 -
 3
3 -
 4
4 -
 5
5 -
 6
6 -
 7
7 -
8
-
9
-
10
-
11
-
12
-
13
-
14
-
15
-
16
-
17
-
18
-
19
-
20
-
21
-
22
-
23
-
24
-
25
-
26
-
27
-
28
 |
 |

CAUTION
Read all precautions and instruc-
tions in this manual before using
this equipment. Save this manual
for future reference.
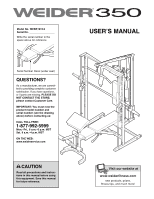
Model No. WEBE1915.0
Serial No.
Write the serial number in the
space above for reference.
Serial Number Decal (under seat)
Visit our website at
www.weiderfitness.com
new products, prizes,
fitness tips, and much more!
USER’S MANUAL
QUESTIONS?
As a manufacturer, we are commit-
ted to providing complete customer
satisfaction. If you have questions,
or if parts are missing,
PLEASE DO
NOT CONTACT THE STORE;
please contact Customer Care.
IMPORTANT: You must note the
product model number and
serial number (see the drawing
above) before contacting us:
CALL TOLL-FREE:
1-877-992-5999
Mon.–Fri., 6 a.m.–6 p.m. MST
Sat. 8 a.m.–4 p.m. MST
ON THE WEB:
www.weiderservice.com